It seriously doesn’t get any better than a crispy fried chicken recipe you can turn to again and again. This classic Southern version is brined in buttermilk for tender, juicy meat and coated in well-seasoned flour for a golden, crunchy crust. It’s finger-lickin’ good comfort food that’s worth every bite.
If you love fried chicken, you’ll also want to try these fried chicken tenders and this oven-fried chicken breast. Find more family favorites in my chicken dinner recipes.

Table of Contents
Before You Get Started
These three tips will help you get the crispiest, juiciest fried chicken every time:
- Brine the chicken in buttermilk for at least 8 hours. This step is essential for tender, flavorful meat. Don’t skip it or cut it too short.
- Let the breaded chicken rest before frying. After coating the chicken in seasoned flour, let it sit on a wire rack for at least 30 minutes (up to 1 hour). This helps the coating adhere and creates a crispier crust.
- Never cover warm fried chicken with foil. Foil traps steam and makes your crispy coating soggy. If you need to keep pieces warm while frying in batches, place them on a wire rack set over a sheet pan in a 250°F oven.
What makes this fried chicken so crispy? A few key steps make all the difference. The buttermilk brine tenderizes the meat and helps the flour stick. Letting the coated chicken rest for 30 minutes to an hour before frying allows the coating to set, so it won’t fall off in the oil. And frying in a mix of oil and butter at the right temperature gives you that golden, shatteringly crisp crust without burning.
How to Make Crispy Fried Chicken
This down-home skillet fried chicken is easier than you might think. Here’s how to get perfect results:
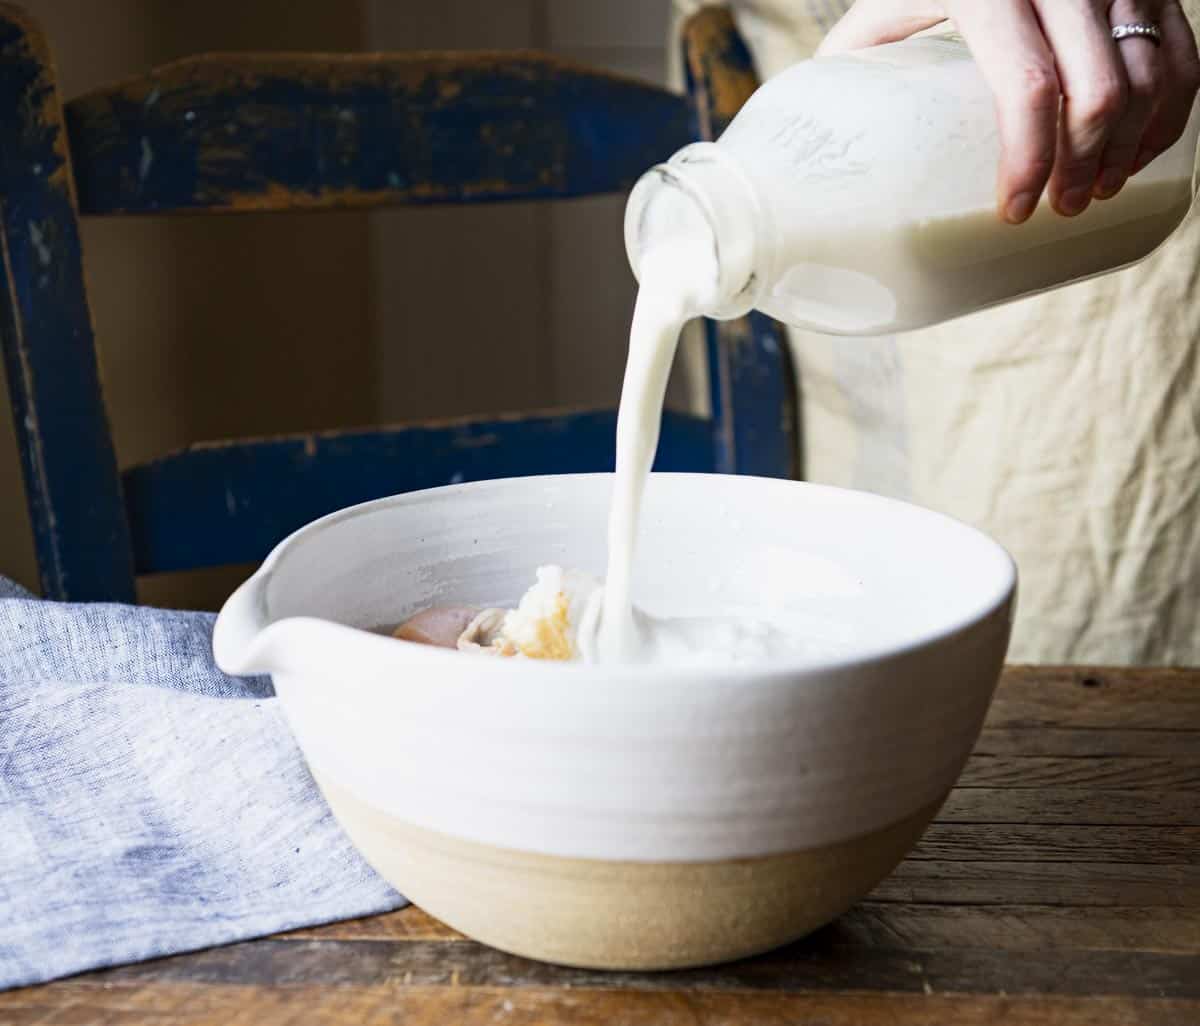
Step 1: Brine the Chicken
Place chicken pieces in a large bowl and cover with buttermilk. Refrigerate for at least 8 hours or overnight.
Why buttermilk? The buttermilk keeps the chicken tender and juicy while adding subtle flavor. Because it’s only slightly acidic, it tenderizes without toughening the meat the way lemon juice or vinegar might. The enzymes also help break down protein, resulting in more flavorful chicken.
You can use a whole fryer chicken cut into pieces, or about 4 lbs. of bone-in, skin-on pieces. Prefer just thighs, drumsticks, or breasts? Use your favorites.
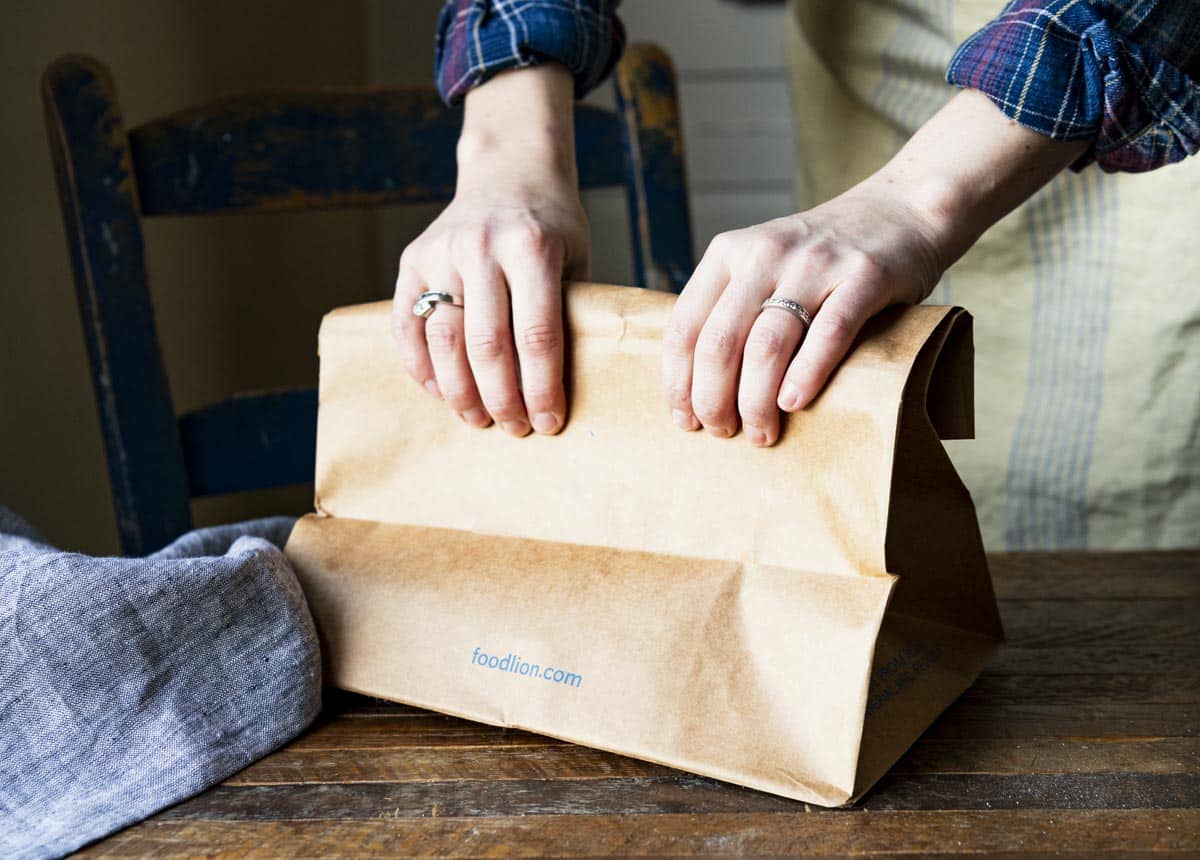
Step 2: Make the Seasoned Flour
Combine the flour, salt, and cayenne pepper (if using) in a large brown paper bag. Shake gently to mix.
If you don’t have a paper bag, a large sturdy plastic bag or shallow bowl works, too.
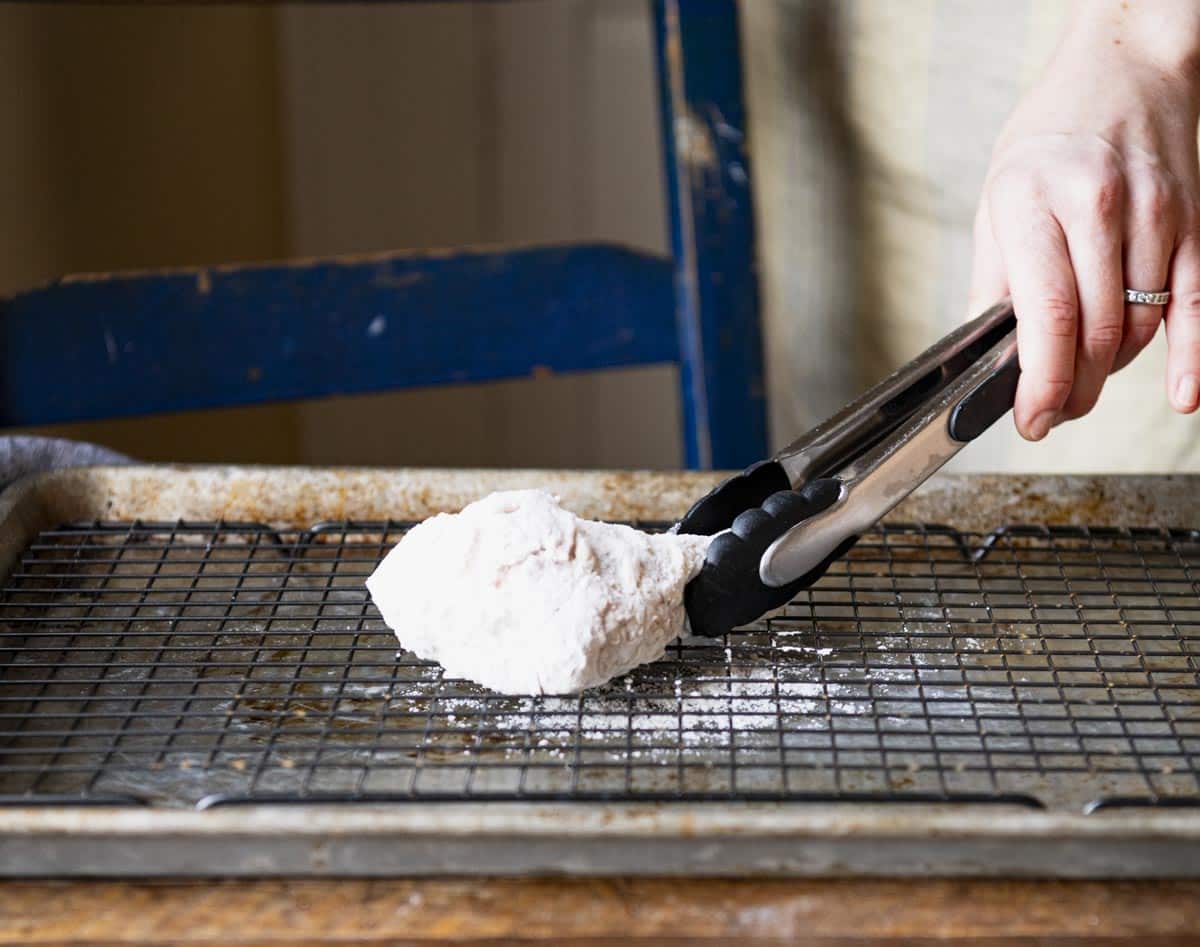
Step 3: Dredge and Rest
Remove one piece of chicken from the buttermilk (let excess drip off) and place it in the bag. Hold the bag closed and shake until the chicken is thoroughly coated. Transfer to a wire rack and repeat with the remaining pieces.
Let the coated chicken rest on the rack for at least 30 minutes, or up to 1 hour. This is the secret to a coating that stays put and fries up extra crispy.
Step 4: Fry the Chicken
Heat the oil and butter together in a large cast iron skillet or Dutch oven over medium-high heat.
Oil Temp Check: You don’t need a thermometer to know when the oil is ready. When the oil is hot (but not smoking), add a drop of water to the pan. If it sizzles, you’re good to go. If using a thermometer, aim for about 350°F.
Best oils for frying: Peanut oil, vegetable oil, or vegetable shortening all work well. Peanut oil is a great choice because it has a high smoke point and won’t flavor the meat. As long as you don’t smoke the oil or use it to fry fish, you can strain it, refrigerate it, and reuse it up to 3 times.
Add chicken pieces to the hot oil without overcrowding the pan. Cover and cook until the chicken begins to turn golden brown, about 8-10 minutes.
Reduce heat slightly if needed to prevent burning. Turn the pieces over, cover again, and cook for about 10 more minutes.
Add Flavor: Adding a stick of butter to the frying oil adds rich flavor to the chicken. Salted or unsalted both work.
Internal temperature check: White meat is done at 165°F. Dark meat can be cooked to 170-175°F for the best texture.
Step 5: Drain and Season
Transfer the fried chicken to a wire rack or paper towels to drain. Season immediately with salt and pepper while the chicken is still warm. The seasoning will stick better this way.
Repeat the frying process with remaining chicken, working in batches. Serve warm, at room temperature, or even cold.

A simple recipe with delicious results! The part that did make the difference to me was letting the breaded chicken rest on a wire rack before frying. I have not done that in the past, and the breading came out too soggy. Thanks for the tip!
– Marina
Southern Fried Chicken Variations
Once you’ve mastered the basic recipe, try these simple twists:
- Add more flavor to the buttermilk: Stir in minced garlic, fresh herbs, shallots, or onion before brining. The flavors will infuse the meat for a unique taste.
- Season the flour mixture: Try adding 1 teaspoon paprika, 1-2 teaspoons garlic powder, onion powder, black pepper, oregano, or thyme for extra layers of flavor.
- Make it spicy: Add hot sauce to the buttermilk, or increase the cayenne pepper in the flour dredge. For a milder version, skip the cayenne and just use black pepper to taste.

What to Serve with Fried Chicken
This crispy fried chicken makes a great dinner, but we often serve it for lunch or picnics with cold sweet tea and vanilla pound cake or pistachio pudding cake for dessert.
Classic Southern Sides:
- Traditional Coleslaw
- Easy Potato Salad
- Collard Greens with Bacon
- Southern-Style Green Beans
- Okra and Tomatoes or Fried Okra
- Southern Deviled Eggs
- Creamy Cucumber Salad
Breads & Biscuits:
Creamy Baked Mac and Cheese is another classic side to pair with your fried chicken.

Preparation and Storage Tips
- Allow plenty of time to brine. At least 8 hours (or overnight) is ideal. In a pinch, a few hours will still help, but longer is better.
- Fried chicken is best fresh when the skin is still crispy. Leftovers will keep in the fridge for 2-3 days, but the coating won’t be quite as crisp.
- To reheat: Preheat oven to 400°F. Place chicken on a wire rack over a baking sheet and let it come to room temperature for about 30 minutes (this helps it reheat evenly). Bake uncovered until the skin is hot and crispy again, about 15 minutes.
Frequently Asked Questions
What is the trick to getting crispy fried chicken?
Three things make the biggest difference: brining in buttermilk, letting the coated chicken rest before frying, and maintaining the right oil temperature (around 350°F). Don’t skip the resting step after dredging. It helps the coating set so it stays put and crisps up beautifully.
Do you do egg or flour first for fried chicken?
This recipe uses buttermilk instead of egg. The chicken soaks in buttermilk overnight, then gets dredged directly in seasoned flour. The buttermilk helps the flour stick and creates a tender, flavorful crust.
How do you keep fried chicken crispy after cooking?
Place fried chicken on a wire rack (not a plate or paper towels) so air can circulate underneath. Never cover it with foil, which traps steam and makes the coating soggy. If keeping it warm while frying batches, put the rack on a sheet pan in a 250°F oven.
Can I make fried chicken without buttermilk?
Buttermilk really does make a difference in tenderness and flavor, so it’s worth using if you can. In a pinch, you can make a buttermilk substitute by adding 1 tablespoon of white vinegar or lemon juice to 1 cup of regular milk. Let it sit for 5 minutes before using.
Can I use boneless chicken for this recipe?
This recipe is designed for bone-in, skin-on pieces, which stay juicier and have better texture. If you want to use boneless chicken, try my fried chicken tenders recipe instead, which is made specifically for boneless cuts.
More Crispy/Fried Recipes to Try

Did you make this recipe?
If you enjoyed this recipe, please leave a comment with a 5-star review at the bottom of the post. Thank you!
Watch How to Make It

Crispy Fried Chicken
Ingredients
- 1 large chicken (4 pounds), cut into pieces (or 3-4 lbs. of your favorite bone-in, skin-on chicken pieces)
- 3 cups buttermilk
- 1 ½ cups all-purpose flour
- 1 tablespoon kosher salt
- ½ teaspoon cayenne pepper, optional
- 2 cups peanut oil, vegetable oil, or vegetable shortening
- 8 tablespoons (1 stick) butter
Instructions
- Place chicken in a bowl with the buttermilk. Let sit in the refrigerator for at least 8 hours, or overnight.

- Place the flour, salt, and cayenne in a large brown paper bag and gently shake to combine (a large plastic bag or bowl works, too).
- Remove chicken from the buttermilk. Add one piece at a time to the bag, hold closed, and shake until thoroughly coated.
- Transfer coated chicken to a wire rack. Repeat with remaining pieces. Let the chicken rest for at least 30 minutes (up to 1 hour) before frying.
- Heat the oil and butter together in a large cast iron skillet or Dutch oven over medium-high heat. When the oil is hot (a drop of water sizzles), add chicken without crowding the pan.
- Cover and cook until golden brown, about 8-10 minutes. Turn pieces over, cover again, and cook about 10 more minutes (white meat to 165°F, dark meat to 170-175°F).
- Drain on a wire rack. Season with salt and pepper while still warm. Repeat with remaining chicken in batches. Serve warm, at room temperature, or cold.


Notes
- Brine time matters. At least 8 hours in buttermilk gives you the most tender, flavorful chicken. Don’t skip this step.
- Rest the breaded chicken. Letting it sit 30-60 minutes after coating helps the flour adhere and creates a crispier crust.
- Oil temperature. Aim for about 350°F. If you don’t have a thermometer, the oil is ready when a drop of water sizzles.
- Don’t crowd the pan. Fry in batches to maintain oil temperature and ensure even browning.
- Keep it crispy. Place fried chicken on a wire rack, not paper towels. Never cover with foil.
- To keep warm: Place fried pieces on a rack over a sheet pan in a 250°F oven while frying remaining batches.
- Reheating: Let chicken come to room temperature, then bake uncovered at 400°F for about 15 minutes until hot and crispy.
- Leftover buttermilk? Use it in recipes with buttermilk like chocolate cake, pancakes, or mashed potatoes.
Nutrition
Originally published in July, 2020, this post was updated in January, 2026.


I have tried to fry chicken a few times over the years but my results have not been that great. But your tutorial has inspired me to give it another try. My only question is the stick of butter. It is listed in the ingredients and instructions at the end of the post, but not mentioned anywhere in the tutorial portion. Do I add it to the oil or not?
Hi, Barbara! Yes, in Step 4 of the recipe it says to heat the butter with the oil in the skillet. I’ll add that note to the step-by-step photos so that there’s no confusion. Hope you love it!
yummy and perfect I love your recipes, thanks for sharing <3
Thank you, Sara!❤️
Wonderful flavor. My husband and I both loved it.
Thank you, Tricia! I’m so glad that it worked well for you!
Blair- I just found your site and can tell by reading your recipes can tell that they are delicious and easy to prepare. When I find recipes online I like to save them to Pinterest, so I don’t have to hand copy them, but I didn’t see a link on your site- any ideas?
Thanks, Trudy Glover
Hi, Trudy! I’m so glad that you found my site and I hope that you enjoy some of the recipes! On each recipe post, there are a couple of different ways to pin images. You will see three different yellow buttons at the top (just below the title of the post). The third button says “Pin,” and when you click on that it will pull up a pinnable image. As you scroll down, small yellow square buttons will appear in the left sidebar of the post. Click on the “P” button to pin an image from that post. Finally, in the recipe box at the bottom of each post, you will see a “Pin” button just below the small thumbnail image of the food. Click on that to pin an image on Pinterest. Hope that helps!
Hi
Looks so good. Will try it out tomorrow.
May I know for 1 stick of butter, is the butter salted or unsalted?
How many gram is 1 stick of butter? Thank you for sharing.
Hi, Elise! I always use salted butter. One stick of butter is equal to ½ cup = 4 ounces = 113 grams. Hope you enjoy!
Hi
I didn’t monitor the temp of my oil. Would overheated oil cause overly crispy crust? My crust was like a hard cracker. I’d like to make the proper adjustments and try again. What do you suggest?
Anita
Hi, Anita! It might. I usually find that if the oil is too hot, the crust burns before the meat is cooked through. I haven’t had an issue with it being too crispy, since that’s usually the goal — crispy not soggy. I’m sorry that I can’t think of another thing to tweak in order to adjust for the next time. Lowering the oil temp might help, though!
Too salty…is the Tablespoon correct?
Hi, Leslie! Yes, that’s correct; however, you can absolutely adjust the quantity to suit your preferences.
I love buttermilk, both to drink and to use as an ingredient. This chicken looks absolutely luscious but unfortunately I’m not skillful with a frying pan and I don’t have any experience with deep fat frying and I don;t want to get over my head in the middle of a cooking session since I’m alone and disabled. Don’t really want to turn the oven on much this time of year so I’m thinking more and more of getting an air fryer. I know you said that you don’t use your s much but I was wondering if you could recommend a really reliable author or blogger who focuses on the air fryer. I love the way you explain everything as you go so that’s what I would be looking for. Thanks.
Hi, Marion! I’m not too familiar with many other bloggers that focus on air fryer recipes, but I do know that my friend Kristine has many air fryer options on her site here: https://kristineskitchenblog.com/category/air-fryer/
I hope that helps!
Thanks for the link, Blair. I’m going to look at it, and several additional ones, very carefully and I think I had better go to several local stores and actually look at some air fryers. My kitchen is bizarre in that it has plenty of floor space for me to walk around in but really little cupboard and counter space. Looking at the blogs, it seems that it’s not just a matter of the size of the unit to deal with but the weight of it, how much room I need to clean it, how much room the vented air is going to need, how far away from the wall it needs to be, ect. ect. I wish I knew someone who owns one so I could see how it works. Definitely not as straight forward as a crock pot. If I go ahead, I may just have to get a small one for heating frozen items for one, at least for starters. But thanks very much for all your help!
A simple recipe with delicious results!
The part that did make the difference to me was letting the breaded chicken rest on a wire rack before frying.
I have not done that in the past, and the breading came out too soggy. Thanks for the tip!
We’re so glad this recipe turned out well for you, Marina! Letting the chicken rest is a complete game changer.
What’s is the stick of butter for? I might be overlooking it in the recipe but I didn’t see what to do with it.
Hi, Emily! You’ll use the butter along with the oil for frying the chicken. In Step 4 of the recipe it says, “Heat the oil in a large cast iron skillet or Dutch oven with the butter over medium-high heat…”
Hope you enjoy the chicken!
Do you have a cooking method with the above recipe using an air fryer instead? Thank you!
Hi! Unfortunately, we haven’t tested this recipe in the air fryer and can’t say for sure.