You don’t even need to boil the pasta for this 5-ingredient, dump-and-bake, easy mac and cheese! Serve the comfort food classic as a side dish for holidays and potlucks, or as an entrée on a busy weeknight. It’s delicious alongside fried chicken, pot roast, roast chicken, and meatloaf!
Easy Baked Mac and Cheese
Yep, you read that right — this is an easy mac and cheese recipe that doesn’t even require you to boil the noodles before it goes into the oven! Now, this is not a creamy baked mac and cheese that starts with a béchamel cheese sauce made from a flour and butter roux. If that’s what you’re looking for, you need to try this popular recipe.
Instead, this is a more traditional Southern baked macaroni and cheese recipe, with a firm texture that’s made from a simple combination of noodles, butter, cheese, and milk. These types of mac and cheese don’t use creamy sauces, but instead often contain eggs to help the dish “set up.” The eggs aren’t necessary here, though. Everything cooks together in one dish, so the macaroni absorbs the milk, and you’re left with an incredibly cheesy, indulgent, flavorful mac and cheese bake — with very little effort!
The Origin of this Overnight Mac and Cheese Recipe
I can’t take credit for this cheesy perfection, since my hairdresser gave me the recipe almost 15 years ago! She has three boys of her own, and she was so excited to tell me about this “method” for preparing mac and cheese because her family has always loved it. She shares the recipe with customers and friends regularly, and often hears stories about folks making it again, and again, and again.
Since originally posting this recipe on my site back in 2016, I’ve heard from a number of you who have made it a staple in your home as well. In fact, blog readers have served the dish at weddings, funerals, and Thanksgiving feasts. What an honor!
Ingredients
This is just a quick overview of the simple ingredients that you’ll need to make a pan of easy mac and cheese. As always, specific measurements and complete cooking instructions are included in the printable recipe box at the bottom of the post.
- Uncooked elbow macaroni: do not cook the pasta before adding it to the pan. I have not tested this recipe with other noodle shapes, which might change the cooking time. Stick with elbows for a classic mac and cheese!
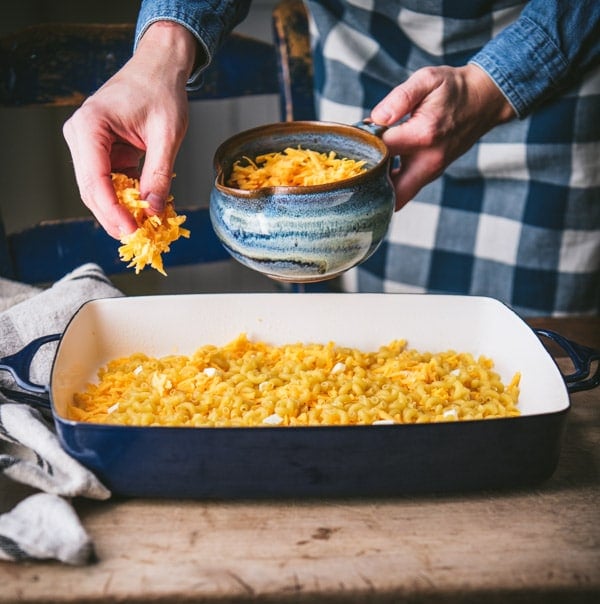
- Sharp cheddar cheese: grate the cheese by hand, rather than using a package of pre-shredded cheese. The packaged shredded cheese includes stabilizers and anti-caking agents that prevent it from melting as smoothly as a hand-grated block of cheddar. Feel free to experiment with combinations of other good melting cheeses, such as Velveeta, mozzarella, Pepper Jack, Gouda, Colby, Gruyere, and Colby-Jack.
- Butter: just enough to add some richness to the dish.
- Kosher salt: to flavor the pasta as it cooks.
- Milk: I prefer whole milk, but you can use low-fat milk as well.
The Best Cheese to Use
The cheese that you use for mac and cheese is really a matter of personal preference. I love classic sharp cheddar here, which is a flavorful cheese that also melts nicely. You can mix it up and use a combination of any good melting cheeses, such as Velveeta (American), Colby or Colby-Jack, Gruyere, Pepper Jack or Monterey Jack, gouda, smoked gouda, Swiss, or mozzarella. A sprinkling of Parmesan cheese on top is also a nice addition. The options are endless, so pick your favorites!
How to Make Easy Mac and Cheese
The only hard part about this recipe is remembering to prep it ahead so that the noodles have time to soak in the milk overnight (or for at least 8-12 hours)!
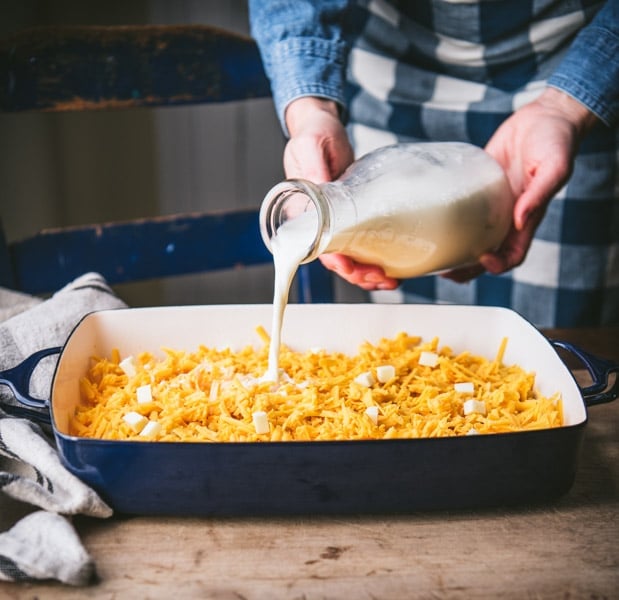
- Spread half of the uncooked macaroni in the bottom of a greased 13 x 9-inch baking dish.
- Sprinkle with half of the cheese, dot with half of the butter, and sprinkle with half of the salt.
- Repeat the layers using the remaining noodles, cheese, butter, and salt.
- Pour milk evenly over the top.
- Cover with aluminum foil and refrigerate for about 24 hours.
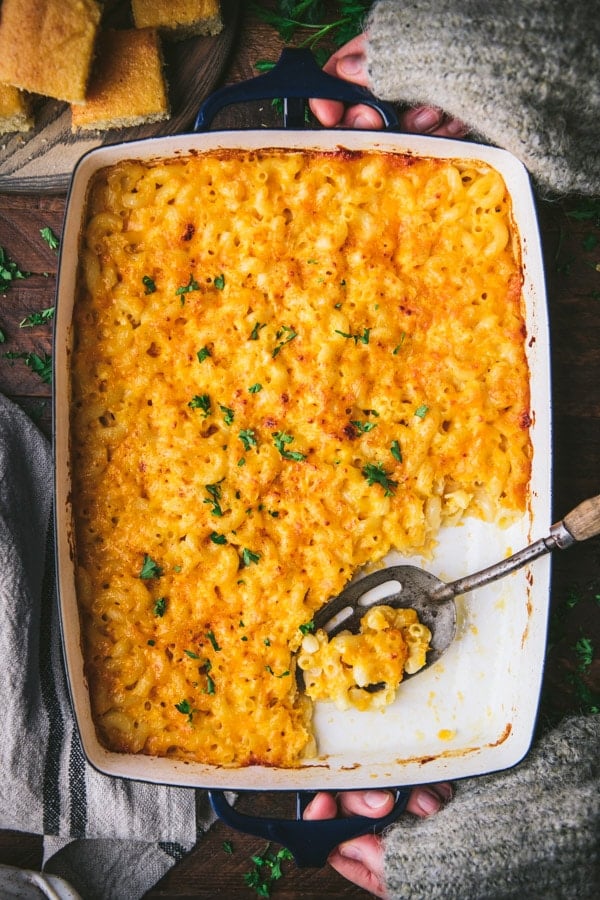
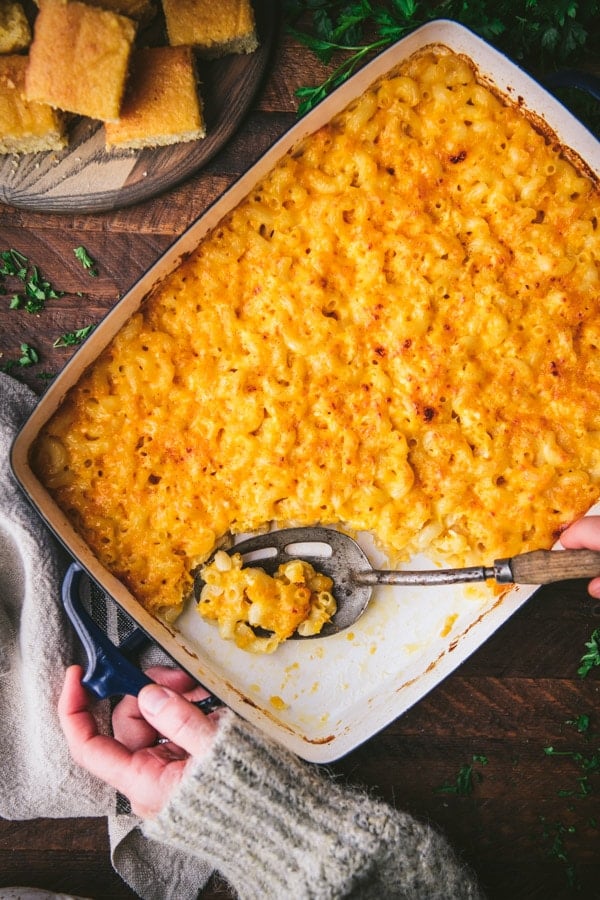
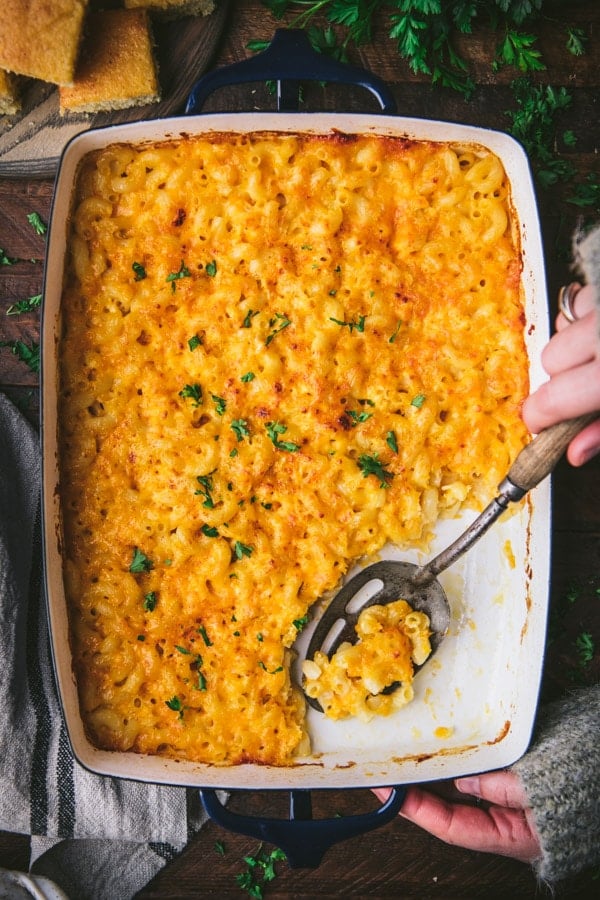
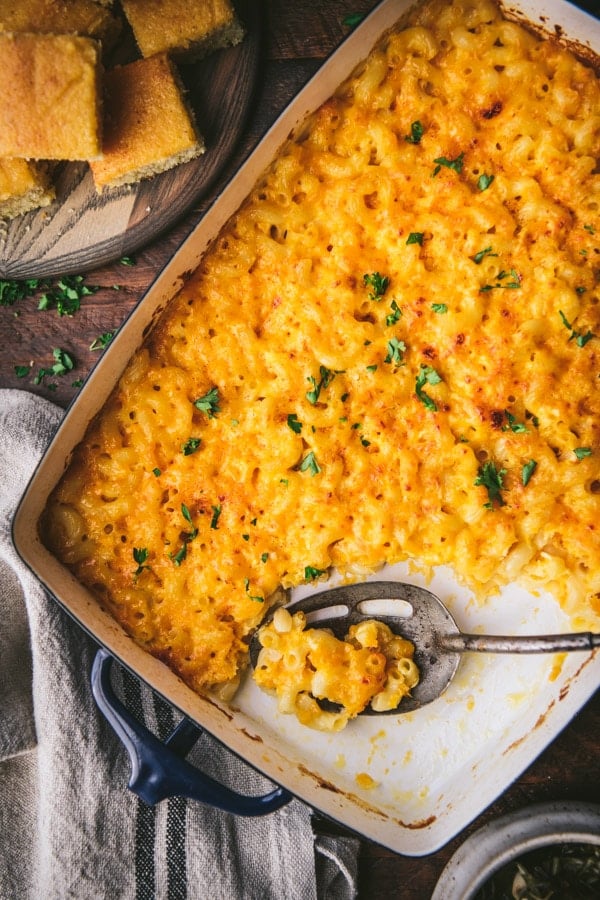
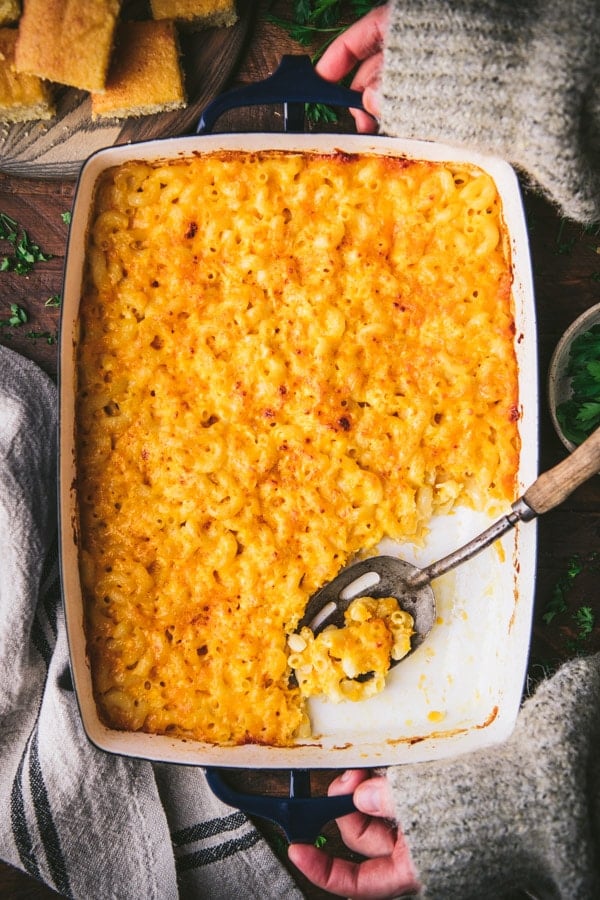
- Bake, covered, in a 350°F oven for a total of about 45 minutes, removing the foil during the final 10 minutes to allow the top to brown.
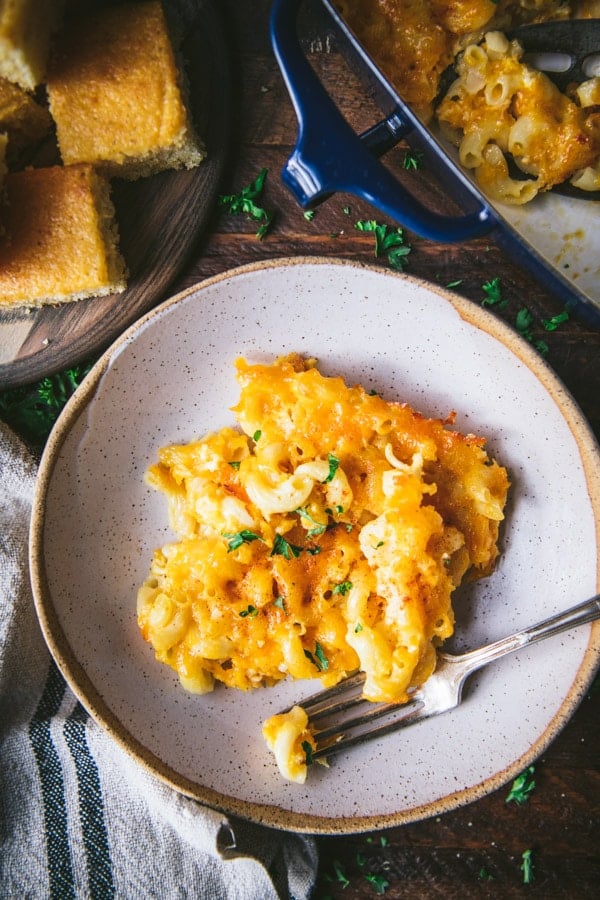
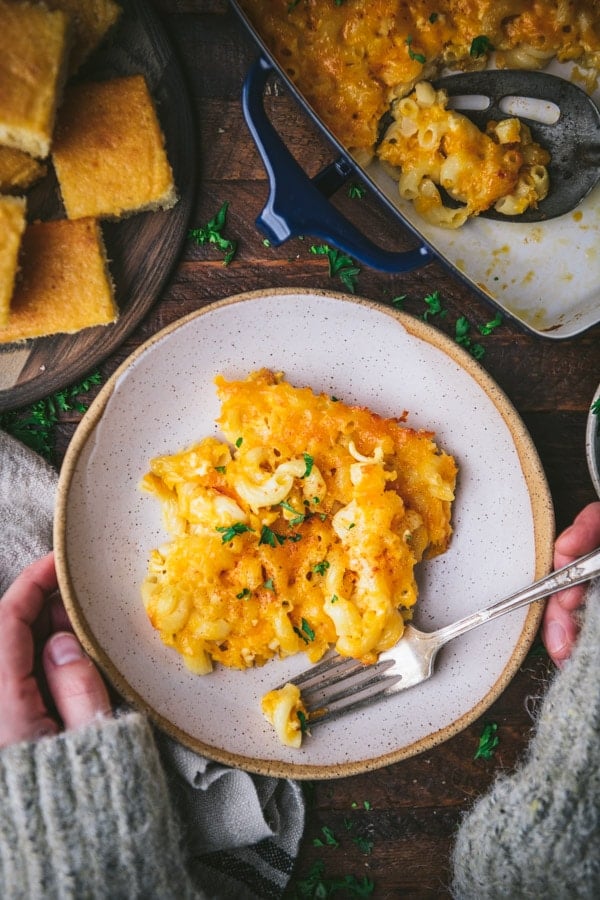
What to Serve with Easy Homemade Mac and Cheese
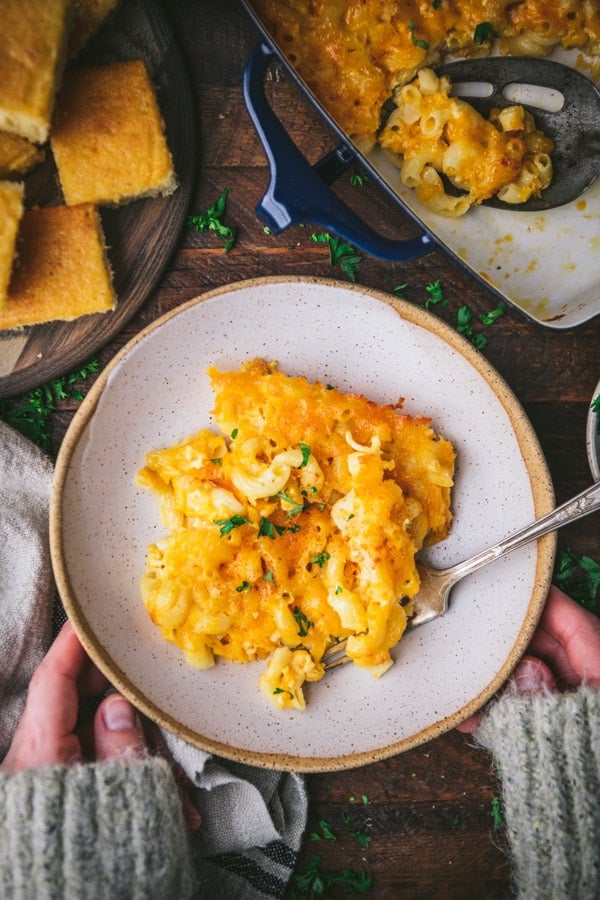
Serve this mac and cheese as a lunch or dinner entrée and your family will be thrilled! Just add a house salad, tomato salad, or Caesar salad, roasted broccoli, Southern-style green beans, or collard greens on the side. We also love a basket of flaky biscuits, blueberry muffins, apple bread, cornbread, or corn sticks on the table to round out the meal.
If you’re serving the mac and cheese as a side dish, here are some entrées that go well with the casserole:
- Meatloaf
- Fried Chicken Cutlets and Country Gravy
- Dutch Oven Pork Roast or 5-Ingredient Pork Sirloin Roast
- Baked Baby Back Ribs
- Ham Steak with Brown Sugar Glaze
- Grilled New York Strip Steak
- Chicken Fried Steak with Gravy or Homemade Salisbury Steak
- Fried Pork Chops or Pork Chop Brine
- Crispy Fried Chicken, Crispy Oven Baked Chicken Tenders, or Homemade Chicken Nuggets
- Roast Chicken or Baked Chicken Thighs
- Dutch Oven Pot Roast or Mississippi Pot Roast
- Slow Cooker Turkey Breast or Oven Roasted Turkey
- Pineapple Glazed Ham or Crock Pot Ham with Cola Glaze
- Glazed Ham Steaks
- Crock Pot Pulled Pork, Dr. Pepper Pulled Pork, or Cider-Braised Pulled Pork
- Mississippi Roasted Pork Shoulder
- Grilled BBQ Pork Chops
- Grilled BBQ Chicken or Oven Baked BBQ Chicken Thighs
- Dutch Oven BBQ Beef
- Oven Baked Pork Tenderloin or Mustard and Brown Sugar Baked Pork Tenderloin
- Crispy Southern Fried Catfish
- Old Fashioned Sloppy Joes
Storage
Store leftover baked macaroni and cheese in an airtight container in the refrigerator for 3-4 days. I do not recommend freezing the leftover mac and cheese. The texture of the pasta will be mushy when thawed.
How to Reheat
Cover the dish loosely with foil and reheat in a 350°F oven just until warmed through. You can remove the foil cover during the final few minutes to allow the top to get nice and crispy again. To reheat individual servings, just cover loosely and microwave for 30 seconds – 1 minute (or until warm).
Recipe Variations
- Use a combination of just about any flavorful melting cheeses that you prefer. For instance, try Velveeta (American), Colby or Colby-Jack, Gruyere, Pepper Jack or Monterey Jack, gouda, smoked gouda, Swiss, or mozzarella. The options are endless, so pick your favorites!
- Add toasted breadcrumbs (like these) to the top of the dish after you remove the cover during the final 10 minutes.
- Whisk a little bit of garlic powder or hot sauce into the milk mixture for even more flavor.
- Bulk up the meal with vegetables like frozen peas or broccoli. If using a firm vegetable like broccoli, it’s best to parboil or steam the broccoli before adding it to the dish.
- Add meat such as crispy bacon, leftover ham, or shredded, cooked chicken.
- Cooking for a smaller family? Cut all of the ingredients in half and bake the casserole in an 8-inch square dish.
Tips for the Best Easy Mac and Cheese Recipe
- This is a firm-style mac and cheese, with a drier texture since the cooked pasta soaks up the milk as it bakes. If you prefer a creamy mac and cheese that starts with a roux and cheese sauce, try this creamy baked mac and cheese recipe or these creamy stovetop shells and cheese.
- Refrigerate the casserole for about 24 hours before baking, allowing the noodles to soften as they soak in the milk. At a minimum, let the noodles soak for at least 8-12 hours.
- Start with blocks of cheese that you grate yourself at home, rather than using bags of pre-shredded cheese from the store. The pre-shredded cheese includes stabilizers and other ingredients to prevent the cheese from clumping, which inhibits its ability to melt smoothly in the dish.
- If you prefer a crispier, darker brown top on your mac and cheese, place the dish under the broiler during the final minute or two of baking. Just keep a close eye on it so that the cheese (or bread crumbs) on top don’t burn.
- Garnish the dish with chives, parsley, green onions, or a dash of paprika just before serving.
More Mac and Cheese Recipes to Try
- Creamy Baked Mac and Cheese
- Stovetop Mac and Cheese
- Crock Pot Mac and Cheese
- Shells and Cheese
- Southern Baked Macaroni and Cheese Recipe

Did you make this recipe?
If you enjoyed this recipe, please leave a comment with a 5-star review at the bottom of the post. Thank you!

No-Boil Easy Mac and Cheese
Equipment
Ingredients
- 2 cups uncooked elbow macaroni, divided
- 16 ounces grated sharp cheddar cheese, divided
- 2 tablespoons salted butter, diced into very small cubes, divided
- ½ teaspoon kosher salt, divided
- 4 cups whole milk
- Optional garnish: chopped fresh parsley or chives; sprinkling of paprika
Instructions
- Grease a 13 x 9-inch baking dish. Spread half of the pasta in the bottom of the dish.
- Sprinkle with half of the cheese, dot with half of the butter, and sprinkle with half of the salt.
- Repeat the layers using the remaining macaroni, remaining cheese, remaining butter, and remaining salt.
- Pour milk evenly over top.
- Cover with aluminum foil, and refrigerate overnight (about 12 hours, or up to 24 hours).
- Bake, covered with foil, at 350°F (180°C) for approximately 45 minutes. Remove the foil during the final 10 minutes to allow top to brown. For a really crispy top, place the dish under the broiler for a couple of minutes at the end.
Notes
- This is a firm-style mac and cheese, with a drier texture since the noodles soak up the milk as they bake. If you prefer a creamy mac and cheese that starts with a roux and cheese sauce, try this creamy baked mac and cheese recipe or these creamy stovetop shells and cheese.
- Refrigerate the casserole for about 24 hours before baking, allowing the noodles to soften as they soak in the milk. At a minimum, let the noodles soak for at least 8-12 hours.
- Start with blocks of cheese that you grate yourself at home, rather than using bags of pre-shredded cheese from the store. The pre-shredded cheese includes stabilizers and other ingredients to prevent the cheese from clumping, which inhibits its ability to melt smoothly in the dish.
- If you prefer a crispier, darker brown top on your mac and cheese, place the dish under the broiler during the final minute or two of baking.
- Use a combination of just about any flavorful melting cheeses that you prefer. For instance, try Velveeta (American), Colby or Colby-Jack, Gruyere, Pepper Jack or Monterey Jack, gouda, smoked gouda, Swiss or mozzarella. The options are endless, so pick your favorites!
- Add toasted breadcrumbs (like these) to the top of the dish after you remove the cover during the final 10 minutes.
- Bulk up the meal with vegetables like frozen peas or broccoli. If using a firm vegetable like broccoli, it’s best to parboil or steam the broccoli before adding it to the dish.
- Add meat such as crispy bacon, leftover ham, or shredded, cooked chicken.
- Cooking for a smaller family? Cut all of the ingredients in half and bake the casserole in an 8-inch square dish.
Nutrition
This recipe was originally published in February, 2016. The photos were updated in January, 2022.


Hi Blair,
I love this! I used freshly made pasta and it was heavenly.
Yum! I bet the freshly made pasta was such a treat! 🙂
This has become my go-to dish for any potluck that kids will be attending. I always come home with an empty dish!
That’s awesome, Glenda! Thank you!!!
Ok to make more than 24 hours in advance? Closer to 32 hours? Thanks
Hey, Jill! Yes — I think that should be fine! 🙂
Hi! Is this 8 or 16 ounces of pasta? I don’t have macaroni so the measurement in cups would be different. Thanks!
Hi, Jessica! This should be roughly 8 ounces. Hope you enjoy the dish!
Has anyone tried doubling the recipe but still putting it in a 9×13. I’ve made a similar recipe and it cooks down quite a bit. I’m looking to make a large amount for a large group of people.
Hi, Holly! I haven’t tried that, but I bet it would work really well! You may need to add about 5-10 minutes to the baking time, but otherwise the process should be the same.
any suggestions to make more creamy? possibly using part velvetta cheese or adding some cream cheese, or making with half & half rather than milk?
I used two 8oz blocks of cheddar.
Hi, Jean! Yes — the Velveeta will melt to a creamier texture, and the half-and-half will give it a more rich taste. Those are both perfectly fine substitutions.
For this type of mac and cheese, though, we’re not making a roux and a creamy cheese sauce, so it’s not going to have the same texture as something like the Kraft Deluxe mac and cheese. Hope that helps! 🙂
Could this be made with lactose free cheese
Hi, Kristie! I honestly don’t know, since I’ve never cooked with lactose free cheese. I imagine it would work fine, so long as the cheese melts like regular cheese (and tastes good)! 🙂
Just wondering if this has to go into the fridge for 24 hours? I am going to try this for a potluck but I won’t be able to put it into the refrigerators for 24 hours. Will only be able to do about 12 hours.
Could I par boil the pasta? Would It still absorb the milk? Would I use less milk?
The 12 hours of refrigeration should be fine, Darlene. No worries! I wouldn’t parboil the pasta because it won’t absorb as much milk and you’d be left with too much liquid in the dish. 🙂
Will reduced fat milk be alright to use with this recipe?
Yes! That will work fine. The creamier and richer the better, but the recipe will still work with reduced fat milk. 🙂
Doctored this up a bit to make it a indulgent main with a salad. Added cooked diced chicken and about a head of riced cauliflower. With the moisture of the cauliflower had to cook longer in the oven and added some breadcrumbs to absorb. Will try again because it was SO easy!
Love that idea, Liz! Thank you! You can’t go wrong with mac and cheese as the main dish. 🙂
This was the easiest and tastiest Mac and Cheese I have made! I am so glad I found this recipe because I am always messing up my Mac. I made this for Thanksgiving and everyone asked me to make it every year! I love that I did not have to boil the noodles because I somehow always mess that up lol. Also in typical fashion I did not read about the shredded cheese that should not be the store shredded so of course that is the one I bought but I just mixed it and it was good!
That’s amazing, Monica! Thanks so much for your kind note. It makes me so happy to hear that your family enjoyed this dish!
Can this be mixed up night before and baked in morning for lunch?
Hi, Lori! Yes, that should work well!
Hi! This recipes sounds amazing! Could this be made in an electric roaster oven?
Hi, Stacie! I’ve never used an electric roaster oven, so I’m not familiar with how it works. If you can use the roaster oven for casseroles and other oven-baked dishes, then it should work well for this recipe, too. Enjoy!
First time ever making mac and cheese and this was easy. Thought it was going to be loose when I took it out of the oven, but it firmed up nicely and was delicious!
Excellent! Thank you! 🙂
Do you think using heavy cream instead of milk would make it creamier?
Hi, Barbara! Yes, it probably would. This isn’t a very creamy mac and cheese, though, because you’re not making a creamy roux-based sauce. So just remember that the pasta absorbs most of the liquid as it sits and then as it bakes. If you’re looking for a creamier mac and cheese, this is my favorite: https://www.theseasonedmom.com/creamy-baked-mac-and-cheese/
Hi, Blair! Now that it’s FINALLY cool enough to turn on the oven, I want to try this out. When I take the casserole from the refrigerator, I’m afraid to put it straight into the oven for fear the pyrex dish will break. Is there any harm in letting it sit on the counter until the glass feels just cool? Also, if I wanted to add some vegetables or meat, about how much do you think? A cupful?
Hi, Marion! Yes, you can definitely let the dish sit on the counter and come to room temperature before baking. If you’d like to add extras, a cup or two of your choice should be fine.
Thank you! It is so nice to finally be able to dare turn on the oven and stove!
Hi Blair, have you ever tried freezing this recipe before baking it? I would like to prep it ahead and freeze it to cook at a later date. It seems like it should work fine but just wondering if you have tried it by chance?
Hi Blair, have you ever tried freezing this recipe before baking it? I would like to prep it ahead and freeze it to cook at a later date. It seems like it should work fine but just wondering if you have tried it by chance?
Hi Madison,
We haven’t tried freezing this dish ahead of time but wouldn’t recommend it. The dairy isn’t likely to thaw the well, and the noodles are likely to become mushy.
WOW! What a hit! We just had an event and while I unfortunately could not eat it (I am GF and made it regular), people were coming up to me raving about the mac and cheese! The last few years I was using another recipe where I had to boil it first and it always came out soupy, this year I had no strength for boiling 2 lbs of macaroni and I loved the overall recipe you have here. I just soaked it overnight instead of 24 hours. I also sprinkled lightly on both layers garlic powder, paprika, pepper and mustard flour. The consistency was PERFECT, it slices and holds like you would expect a baked mac n cheese dish should! I am definitely making it next year! Thank you!
Thank you so much for such a kind review! We’re so glad the recipe was such a big hit.