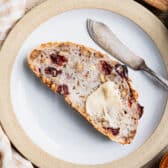
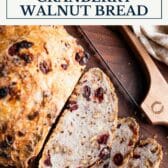
This cranberry walnut no-knead bread bakes into a crusty, golden loaf with a chewy interior and sweet-tart pops of dried cranberries throughout. The dough takes just a few minutes to stir together, then rests overnight before baking in a hot Dutch oven for that classic artisan-style crust. It is a simple, cozy loaf to enjoy warm with butter, serve with winter meals, or toast for breakfast.
If you enjoy seasonal breads, try my cranberry bread, glazed eggnog bread, or chocolate chip banana bread next. They’re simple, festive options for holiday breakfasts and gifting.

Table of Contents
Before You Get Started
A few helpful reminders will set you up for success:
- Use warm water. Water that’s too hot can kill the yeast, while water that’s too cool won’t activate it well. Aim for warm bath temperature.
- Plan for the long rise. No-knead dough needs plenty of resting time to develop flavor and structure. An overnight rise gives you the best results.
- Shape gently. The dough will be wet and sticky. Lightly flour your hands and parchment, then fold the dough under itself to form a loose ball without handling it too much.
** Quick Note: No-knead bread is perfect for anyone intimidated by homemade dough. There’s no sourdough starter, no kneading, and very little hands-on work. The Dutch oven and long resting time do the heavy lifting, giving you a flavorful, crusty loaf without extra effort.
A Festive Version of No-Knead Bread

I’ve slightly adapted the no-knead bread recipe that I originally found in Ruth Reichl’s book, My Kitchen Year, and also added cranberries and walnuts for a delicious twist.
Ruth adapted her recipe from Jim Lahey’s popular no knead bread recipe that was published in the New York Times many years ago. You can find countless variations on the internet, but this is the no-fail method that I have landed on for a perfect loaf every time!
How to Make Cranberry Walnut No Knead Bread
Unlike a more challenging sourdough loaf, there’s nothing difficult about this recipe. The hardest part is simply giving the dough time to rise. You only need about 5 minutes of hands-on prep, and the rest happens while the dough rests, bakes, and cools.
Don’t be intimidated, this loaf is very forgiving and almost impossible to mess up.
Step 1: Mix the Dry Ingredients
In a large mixing bowl, whisk together the flour, salt, and instant yeast. This ensures everything is evenly distributed before you add the water.
** Flour Note: Bread flour yields the best texture; however, you can substitute with all-purpose flour in a pinch.
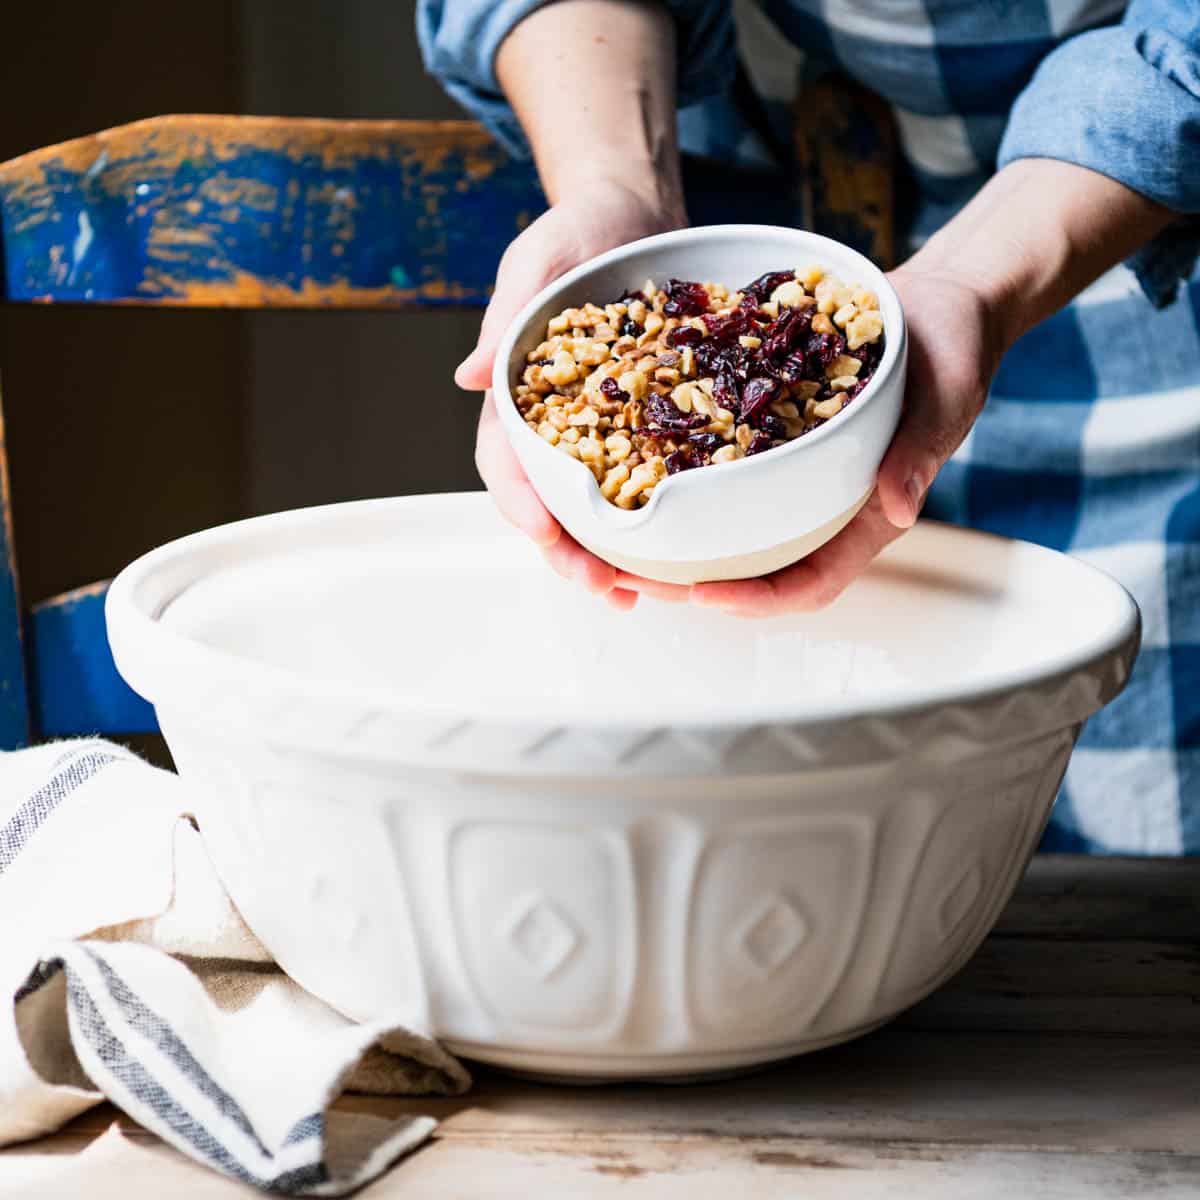
Step 2: Add Cranberries and Walnuts
Stir in the dried cranberries and chopped walnuts. They should be well coated in the flour mixture so they stay evenly suspended in the dough.
** Variations: Swap dried cranberries with raisins or dried currants. Use pecans, almonds, or hazelnuts instead of walnuts.
Step 3: Add Warm Water and Bring the Dough Together
Pour in the warm water and stir until the dough comes together and no dry pockets of flour remain.
** Quick Note: The dough will be very wet and shaggy. That’s exactly what you want for a no-knead loaf.
Step 4: Let the Dough Rise Overnight
Cover the bowl with plastic wrap or a clean kitchen towel. Let it rise at room temperature for about 18 hours, or until doubled in size. The surface should look airy and bubbly.
Don’t have time to let the dough rest for a full 18 hours? The bread will still be delicious if you only let it rest for up to 10-12 hours. Just remember that more flavor develops the longer it sits.
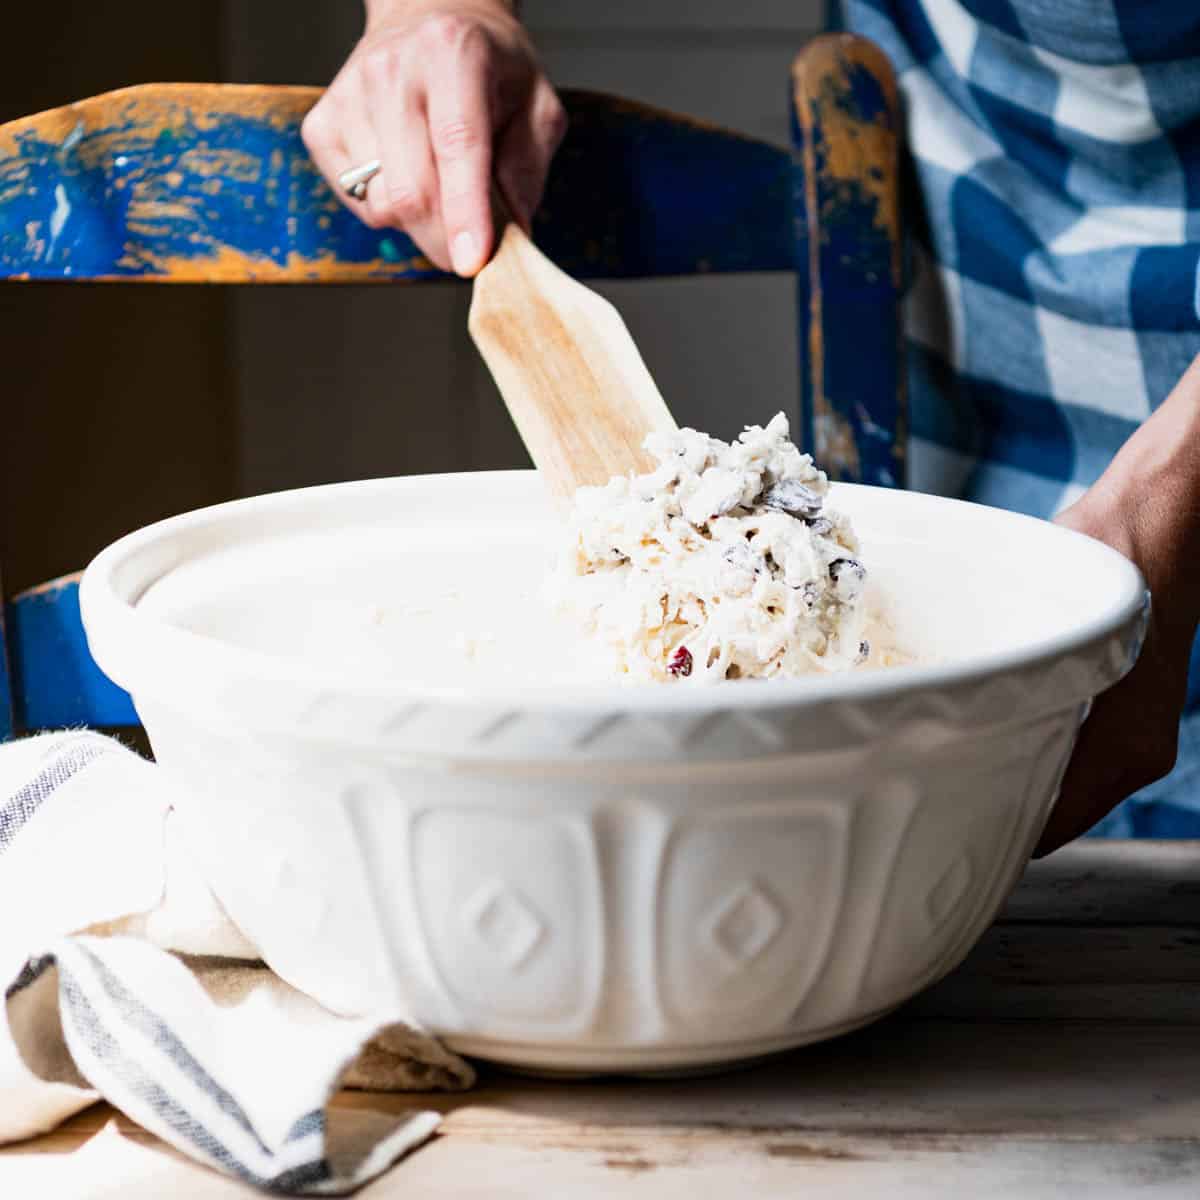
Step 5: Shape the Dough
Dust a piece of parchment with flour. Gently nudge the dough onto the parchment and fold the edges under to form a loose ball.
Cover and let rest for 30-60 minutes.
Step 6: Preheat the Dutch Oven
Place your Dutch oven (with the lid on) into a cold oven and preheat to 475°F.
Heating the pot with the oven helps create the steam that develops a crisp, glossy crust.
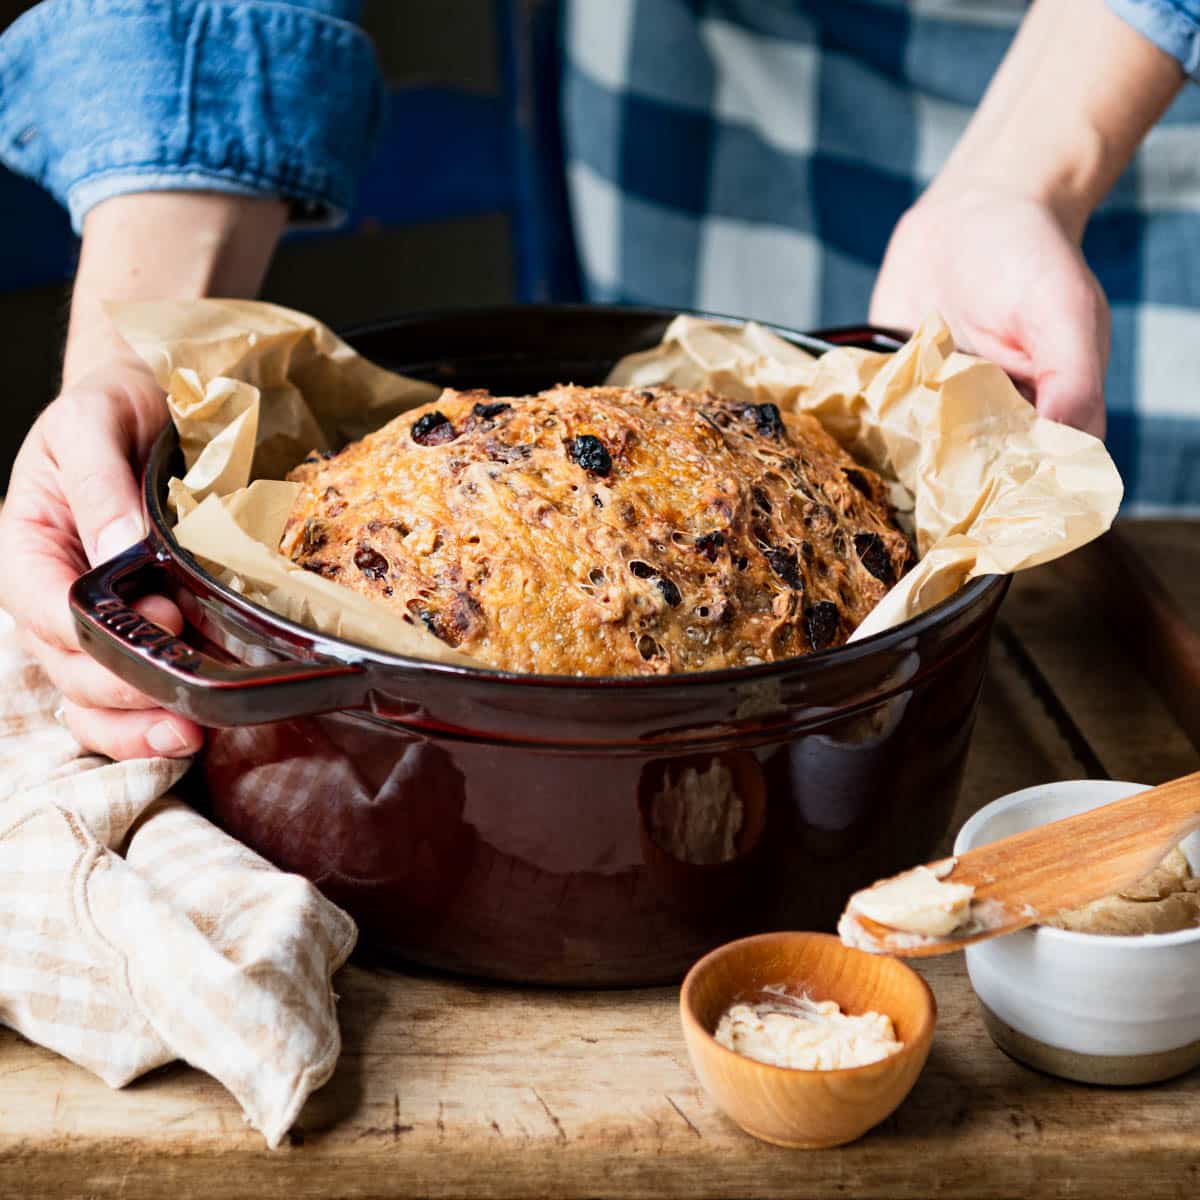
Step 7: Transfer to the Hot Pot
Carefully remove the preheated Dutch oven. Lift the parchment with the dough and place the whole thing into the pot.
Step 8: Bake Covered
Cover and bake for 30 minutes. This traps steam and helps the loaf expand fully before the crust sets.
Step 9: Finish Uncovered
Remove the lid and bake for 10-15 more minutes, or until the crust is deep golden brown.
Step 10: Cool Completely
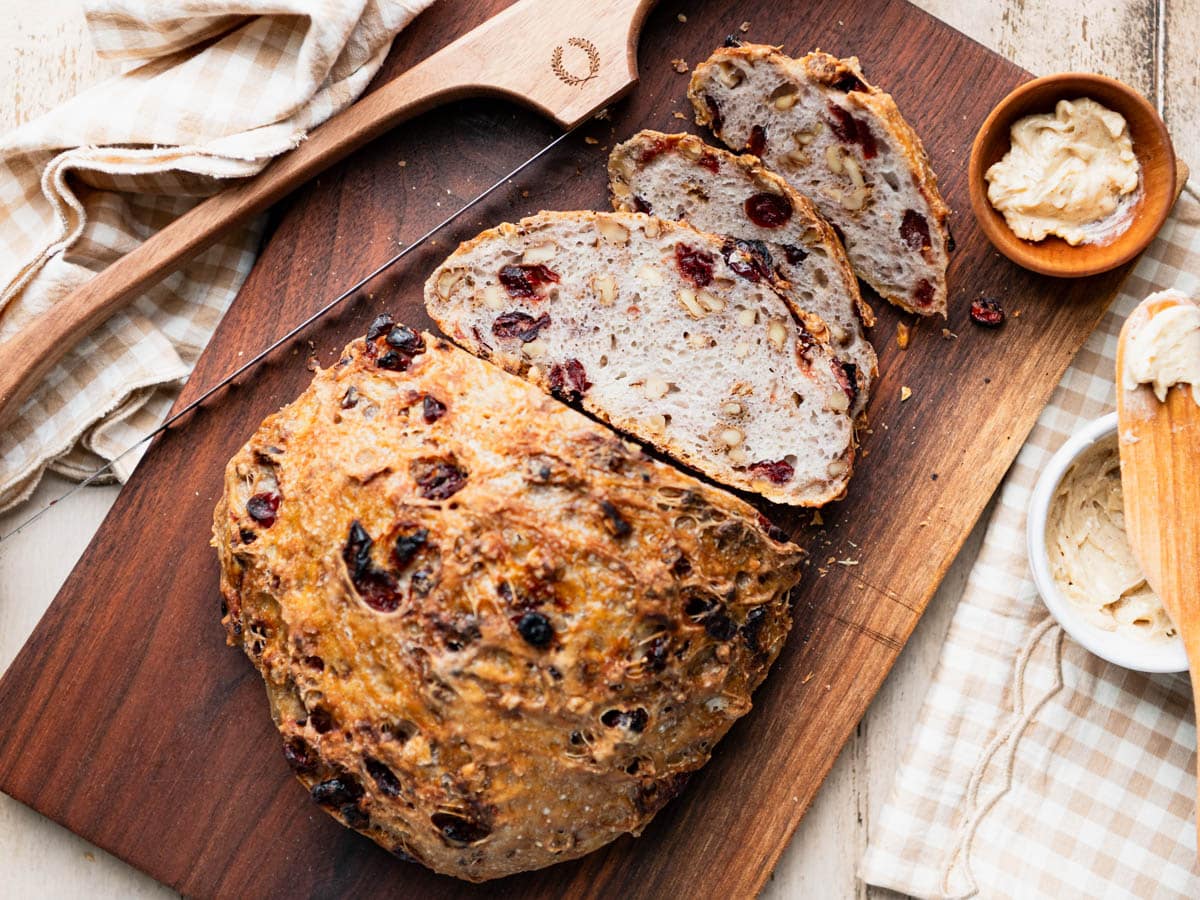
Transfer to a wire rack and let the loaf rest for at least 1 hour before slicing.
** Tip: Cutting too soon can create a gummy texture because the loaf continues to steam as it cools.
Why a Dutch Oven Works So Well
A Dutch oven traps the dough’s natural moisture as steam, helping the loaf rise high before the crust sets. The steam also gelatinizes the surface starches, creating a shiny, crisp crust with beautiful blistering. Cast iron distributes heat evenly, so the bread bakes through without burning on the bottom.
Serving Ideas
This crusty, rustic bread is delicious warm from the oven, toasted for breakfast, or paired with your favorite seasonal dishes.
Great for Breakfast or Lunch
- With butter, honey butter, or jam
- Toasted with cream cheese
- Turkey and cranberry sandwiches
- Ham or chicken salad sandwiches
Dinner Pairings
Complete novice bread maker. Followed the directions exactly except I split the dough and froze half for later as it is only my husband and me. I baked it in my 2.75 quart Staub. It is the best walnut and cranberry bread I have ever eaten! Thank you for making the directions so clear and easy to follow.
– Tish
Storage
No-knead bread is considered a “lean bread,” so it’s best enjoyed the day it’s baked. Store at room temperature in a paper bag for a crisp crust, or wrap tightly in plastic for 1–2 days (the crust will soften). Toasting day-old slices brings the texture right back.
Freezing the Bread: Wrap the cooled loaf tightly and freeze for up to 2 months. Thaw at room temperature, then warm in a low oven if you prefer.
Freezing the Dough: After its long rise, shape the dough into a loose ball, wrap well, and freeze up to 2 months. Let thaw and come to room temperature for 2–3 hours before baking as directed.
Frequently Asked Questions
Can I use all-purpose flour?
Yes. Bread flour gives the best structure and rise, but all-purpose flour works in a pinch.
How do I know when the bread is done?
Look for a deep golden crust. If unsure, an instant-read thermometer inserted into the center should register around 200-205°F.
What is the point of no-knead bread?
A no-knead recipe creates a very wet dough. The higher hydration allows the wheat proteins to move around freely and develop gluten on their own, without kneading. Time replaces effort, giving you a flavorful loaf with almost no work.
Is no-knead bread better than traditional kneaded bread?
Many bakers find that soaking the flour in a wet dough overnight adds extra flavor. No-knead bread has a chewy, soft interior and a crisp crust similar to a French baguette. Both styles are good; no-knead is simply easier and more hands-off.
What happens if you knead no-knead dough?
There’s no harm in kneading it. The long rise already develops gluten and flavor, but kneading can help the dough come together more quickly or shorten the resting time.
How long can you let no-knead dough rise?
The standard 18-hour rise is flexible. You can shorten it to 12 hours, or let it go up to a couple of days. The dough may deflate slightly and rise again, but it will still bake into a flavorful loaf.
What type of Dutch oven is best?
An enameled cast iron Dutch oven (4-6 quarts) works best. A smaller pot gives you a taller, rounder loaf, while a larger one yields a wider, flatter shape. Brands like Staub, Le Creuset, or the budget-friendly Lodge all work well.
Why is my loaf dense or gummy?
It may not have risen long enough, or it was sliced before cooling fully. The long rise helps gluten develop, and the cooling period allows the interior to finish “steaming” so the crumb sets properly.
Do I need to preheat the Dutch oven for bread?
Yes! While your dough is rising for the second time, you’ll need to place the Dutch oven (with the lid on) in a cold oven. Preheat the oven to 475°F while the pot is inside. You want the Dutch oven incredibly hot when you add the dough, since the heat of the cast-iron pot reacts with the wet dough to create the steam that’s essential for a good loaf of no-knead bread.
Why is the bottom of my bread too dark or tough?
Your Dutch oven may be too close to the heating element. Move the rack higher and check your oven temperature with a thermometer. You can also preheat to 475°F and reduce the temperature slightly after adding the Dutch oven.
Do I need to soak the cranberries before adding them to the dough?
No. The dried cranberries will hydrate and soften as they sit in the wet dough over the long rise.

More Homemade Bread Recipes to Try

Did you make this recipe?
If you enjoyed this recipe, please leave a comment with a 5-star review at the bottom of the post. Thank you!
Cranberry Walnut No-Knead Bread
Ingredients
- 3 cups bread flour
- 1 ½ teaspoons salt
- ½ teaspoon instant yeast
- 1 cup sweetened dried cranberries
- 1 cup chopped walnuts
- 1 ⅓ cups warm water (or more as needed)
Instructions
- In a large bowl, whisk together the flour, salt, and yeast.
- Add the cranberries and walnuts; toss to combine.
- Stir in the warm water, adding a little bit more (if necessary) to bring the dough together just until you can’t see any dry pockets of flour.
- Cover the bowl and leave to rise at room temperature for about 18 hours, until the dough has doubled in size. It will spread out in the bowl and look bubbly.
- Place a piece of parchment paper on the counter and dust with flour. Gently nudge the dough from the bowl onto the parchment. Shape the dough into a loose ball by gently folding under the edges.
- Cover the dough with plastic wrap or a towel. Let the dough rest and continue rising for about 30-60 more minutes.
- While the dough rests, place a 4-6-quart cast iron Dutch oven (with the lid on) in the cold oven. Preheat the oven to 475°F.
- Once the dough has rested for 30-60 minutes, carefully remove the hot pot from the oven. Take off the lid. Pick up the parchment paper and gently place the parchment paper (with the dough on it) into the pot.
- Cover the pot and put it back in the oven to bake for 30 minutes.
- After 30 minutes, remove the lid and continue baking for an additional 10-15 minutes (or until the loaf has turned a deep brown color).
- Allow the bread to cool on a rack for at least 1 hour before slicing and serving.
Notes
- Use warm water; not too hot and not too cold. The water should feel like warm bath water (about 110-115°F). If it’s too hot you will kill the yeast; too cool and the yeast will not activate.
- If your no-knead bread does not rise, it could be due to any number of reasons. For instance, your yeast may not be fresh. Even with a good expiration date, yeast has a short shelf life once a package is opened (I recommend keeping it in the freezer). It’s also possible that your water was the wrong temperature (see my note above regarding water temp).
- If the inside of your bread is dense and gummy, this is likely the result of two main culprits. First, the dough may not have rested long enough to give the gluten a chance to fully develop. Alternatively, the bread may not be cooked through all of the way. When the bread comes out of the oven, it’s still “cooking” and steaming. That’s why it’s important to wait and let the bread sit for at least an hour before slicing into it.
- What happens if you knead no knead bread? There’s no harm in doing so. The long rising time helps to develop the gluten in the dough and gives the bread more flavor, but kneading the dough by hand may develop the gluten quicker so that you can bake it sooner.
- Why is my no-knead bread tough? If the bottom of the bread is too dark or too tough to slice, it may be because the Dutch oven is too close to the heating element. Set the rack at the highest possible position that still allows the Dutch oven to fit. Also, use an oven thermometer to make sure that your oven temperature is properly calibrated. Finally, you might need to preheat the oven to 475°F, but then reduce the oven temperature slightly (to 450°F, for example) when you add the Dutch oven.
- Slice only after the loaf has cooled completely.
- Store in a paper bag at room temperature for the best crust.
Nutrition
Originally published in September, 2022, this post was updated in December, 2025.


I make no knead bread all the time and it always comes out perfect! Never with cranberries and walnuts.
Guess I know what we’re having with some homemade chicken soup full of vegetables from the garden!
You can’t leave out the honey butter…..
Thank you!!
One more thing….what’s the bread “knife” you’re using?
Hi, Carrie Anne! That bread bow is from Farmhouse Pottery. Love it! Here’s the link: https://www.farmhousepottery.com/products/pantry-bread-bows?variant=9970774442020
Thank you!!
Hi Blair, I really want to make this, I’m a new bread baker. I need two loaves though. Is it best to make the dough twice or double the recipe and split it in half before rising?
Thanks! Looking forward to this…
Hi, Lisa! I think it would be easiest to prepare two separate batches of the dough in two separate bowls.
Hope you enjoy!
Sounds like the perfect meal! Glad you’ll give this version a try.
Hi Blair,
I want to make a couple of loaves of this bread, but I have only one Dutch oven. Do you think I would need to let the Dutch oven completely cool after baking one loaf before baking another one? Any suggestions you have are most welcome!
Deb
Hi, Deb! No, you definitely don’t need to let the Dutch oven cool in between loaves. In fact, you’ll want to give it plenty of time to heat up in the oven before adding each loaf of bread. You want the Dutch oven incredibly hot when you add the dough, since the heat of the cast-iron pot reacts with the wet dough to create the steam that’s essential for a good loaf of no-knead bread. Hope that helps, and enjoy!
Something is not working for me. Second try and very little rise in the bread. Yeast 1/2 of tablespoons (instant) made sure temperature of water was 104. Hope for some suggestions.
Hi, Juana! It’s tough to know for sure without being in your kitchen with you. If your no-knead bread does not rise, it could be due to any number of reasons. For instance, your yeast may not be fresh. Even with a good expiration date, yeast has a short shelf life once a package is opened (I recommend keeping it in the freezer). Also, maybe the water should be a bit warmer? I recommend 110-115°F to activate the yeast. Those are just the first couple of suggestions that come to mind.
Should add more yeast, but flavor was great! Just what I expected and wanted, not too sweet and crunchy crust.
Thanks, Jackie! You can definitely add more yeast. I’ve tested it with additional yeast and didn’t notice a difference in the size of the loaf, but feel free to experiment on your own. 🙂
Complete novice bread maker. Followed the directions exactly except I split the dough and froze half for later as it is only my husband and me. I baked it in my 2.75 quart Staub. It is the best walnut and cranberry bread I have ever eaten! Thank you for making the directions so clear and easy to follow.
Thank you so much, Tish! We’re so happy to hear it turned out well.
Will this bread rise faster if I use more yeast? I have only made no knead bread with one other recipe that uses the whole envelope, and it had a 2 – 3 hour rise time. Just curious? Thanks.
Hi, Doris! I don’t think so. This type of bread develops its flavor and texture over the long rise time, so I wouldn’t try to shorten that step with more yeast. 🙂
Hallo,
ich besitze keinen Dutch Ofen. Kann ich das Brot auch in einem normalen Ofen und Backform backen?
Es würde mich reizen, es auszuprobieren.
Danke schon einmal für eine Antwort.
LG. Elli
Hallo! Ein Schmortopf in der Größe eines Schmortopfs mit schwerem Boden und dicht schließendem Deckel könnte hierfür geeignet sein, aber ich habe ihn nicht getestet und kann Ihre Ergebnisse nicht garantieren. Ein holländischer Ofen ist wirklich das beste Gerät, um sicherzustellen, dass Ihr Brot gut gelingt, und meiner Meinung nach ist die Investition absolut wert! Günstigere Exemplare finden Sie bei Amazon. Hoffentlich hilft das!
Danke für die Antwort. Ich werde das testen.
LG. Elli
Hi Blair,
I love the recipes on your blog all of them turn out perfectly.
I was never able to make yeast breads until I saw your recipes.
Even making your bread recipes the first time my results were perfect because the directions of
your recipes set me up for success.
Thank you so much for your blog.
Do you have all of these recipes in your blog in a cookbook?
Do you have a recipe for brioche bread?
Thank you again for your wonderful blog. Sincerely Mary
Hi Mary,
Thank you for such a kind message! We’re so glad you enjoy the recipes and that your bread was a success. We don’t currently have a cookbook or a recipe for Brioche bread.
We do hope you continue to enjoy the site!
This bread looks amazing! It seems so simple and easy to make as well. One question, could you substitute the bread flour for all purpose flour instead? Thank you!
~Ilana
Hi Ilana! We highly recommend using bread flour in this recipe; however, if you’re in a pinch and you only have all-purpose flour, the recipe will work with the all-purpose flour, too. We hope you enjoy!
Have made this 3 times recently. I much more frequently also make the plain version… but this is so so good, it’s a big hit here. Have shared it with the daughter’s family and also a hit there. It is really good with some cream cheese. This bread is now on frequent rotation! And the aroma from it baking/cooling! Thanks!
Thank you, Scott! We’re so happy to hear this and appreciate you taking the time to leave a review.
Loved the bread but cranberries seemed to pull A lot of water from the bread, should you soak soak soak them before, adding to the bread, of course taking some of the moisture out of the cranberries
Hi, Elizabeth! I’ve never tried that, since I haven’t found it necessary…but I bet it would work well! Feel free to give them a soak, drain them, and then add them to the dough. Let me know if you give it a shot!
I saw where you use a Dutch oven,but mine is only a 3.5 qt. I have been looking at the bread ovens,do you know if your friend that makes the sourdough bread all the time uses a bread oven and if so what kind? Most recipes I find alls for a Dutch oven larger than mine.
Hi, Marcie! I asked Ashley, and she always uses a Dutch oven. Here’s her response: “My Lodge brand is 5.5 quart. I also have two from Krustic one is an oval shape and it’s 5.5 quart the other is 6 quart. I believe most people use the 5.5 quart or 6 quart. Hope that helps!”
Thanks for checking with her,this helps. I thought my Dutch oven was to small.So I may need to check on a larger one also.
I have a bread recipe that calls for a 450 oven temp,my parchment paper says only safe to 425,I noticed this recipe calls for a 475 temp,and you used parchment paper.My question is where do I find high temp paper ? I looked for it at my local grocery store with no luck.
Hi Marcie,
We use standard parchment paper. It will likely brown or scorch a bit, but it has never caught fire. Hope this helps!
Ok,thanks I will just use what I have.