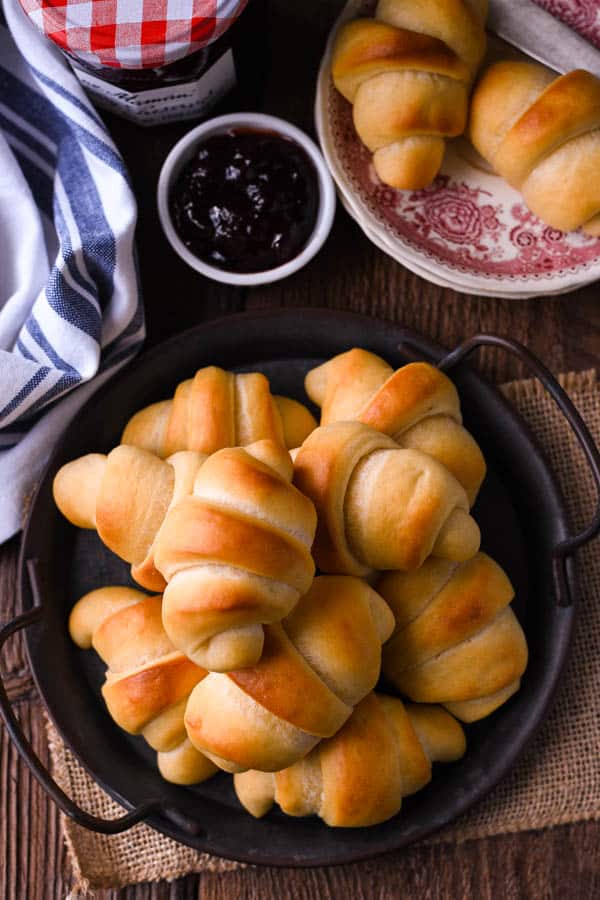
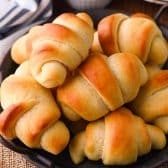
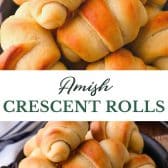
Light and flaky homemade crescent rolls (also called butterhorn rolls) are the perfect addition to your next meal! From a holiday spread on Thanksgiving, Christmas, or Easter, to a simple Sunday supper at Grandma’s, the warm, buttery yeast rolls always disappear fast. You will soon see why these Amish butterhorns are a family favorite!
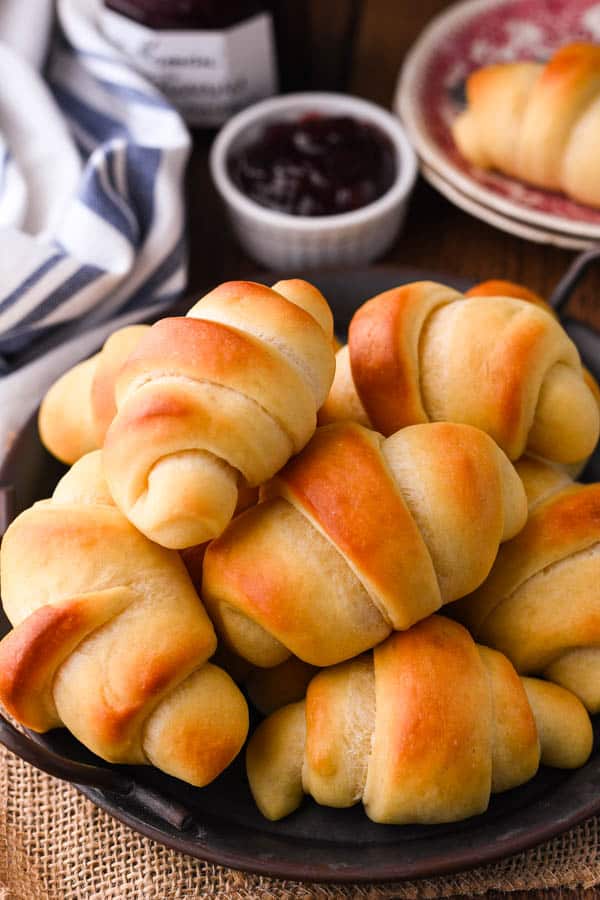
Table of Contents
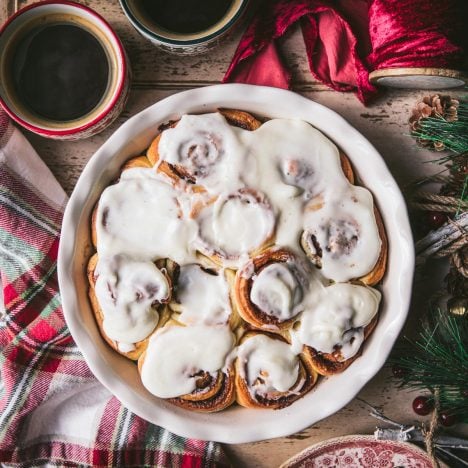
If you’re looking for even more holiday-worthy homemade bread recipes, be sure to try this cranberry bread, a loaf of no-knead Dutch oven bread, a Christmas stollen, and this cranberry walnut no-knead bread!
Why You’ll Love these Homemade Butterhorn Rolls
Don’t be intimidated by the thought of baking your own soft, golden brown crescent rolls at home! I promise, with these step-by-step instructions and a few important tips, the easy recipe will yield a perfect batch of fluffy, flaky butterhorn rolls every single time. They are truly the world’s best dinner rolls, perfect for Christmas or Thanksgiving dinner, and here’s why you’ll love them:
- Make-Ahead. Convenient for holidays and big family gatherings, the rolls can be baked in advance and frozen, or you can prepare the dough ahead of time and then just bake them off.
- Crowd-Pleasing. Regardless of what else is served on the dinner table, one thing is certain: the kids (and the adults) will love these rolls. They never disappoint!
- Versatile. They’re simple enough to bake on a casual Sunday afternoon to pair with a roast chicken, a warm bowl of chicken noodle soup, chicken vegetable soup, chicken gnocchi soup, crock pot potato soup, chicken and noodles, chicken noodle casserole, Bisquick chicken pot pie, chicken broccoli pasta casserole, dump-and-bake chicken marsala, easy baked spaghetti, bean casserole, hamburger casserole, or even slow cooker cabbage soup, or even as sandwiches with easy chicken salad, but they’re also delicious enough to add to the bread basket on a more formal holiday table. Ham, turkey, or beef tenderloin — these homemade butterhorn rolls go well with just about any entree!
Crescent Rolls and Croissants are Not the Same Thing
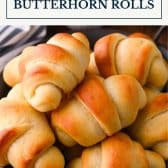
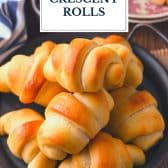
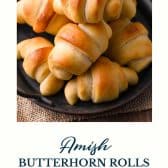
Crescent rolls, also called Amish Butterhorn Rolls, are essentially yeast dinner rolls that are rolled into crescent shapes. It’s a rich, slightly-sweet dough, thanks to plenty of shortening, milk, eggs, and sugar. The rolls are brushed with melted butter twice — when they’re rolled flat and when they’re hot from the oven — giving them a decadent flavor.
Crescent rolls and butterhorns are not the same as croissants. Unlike crescent rolls, croissants are not a yeast-based dough. Instead, croissants are made by layering butter and dough to produce a light, flaky pastry. While crescent rolls and croissants are both shaped like crescents, the croissants have an airy, flaky puff pastry texture. Crescent rolls have a soft bread-like texture. Both are delicious in their own right, but they’re not the same thing.
Ingredients for Butterhorn Dinner Rolls
This is just a quick overview of the ingredients that you’ll need for a batch of our favorite butterhorn rolls. As always, specific measurements and step-by-step baking instructions are included in the printable recipe box at the bottom of the post.
- Active dry yeast: helps the dough rise.
- Lukewarm water: softens and activates the yeast.
- Scalded whole milk: gives the dough a richer, more velvety texture and helps it brown. Low-fat milk will also work, but the whole milk yields the best flavor and texture.
- Shortening: creates super soft rolls with a light, fluffy texture.
- Sugar: feeds the yeast, tenderizes the dough, and gives the rolls a slightly sweet flavor.
- Salt: adds flavor.
- Eggs: give the dough structure and flavor.
- All-purpose flour or bread flour: I like bread flour, which has a bit more protein and yields a slightly higher rise. All-purpose flour works fine, too!
- Melted butter: for extra flavor and shine on the inside and tops of the rolls.

How to Scald Milk
The extra step of scalding milk only takes a few minutes, and is well worth the effort. Scalding milk is simply the process of heating milk to 180°F. Bread recipes often call for scalded milk because the scalding process deactivates the proteins in milk whey that can keep gluten from forming properly. The warm milk can also help activate yeast. In short, scalded milk helps yeast breads rise!
To scald the milk for this recipe, place the milk in a saucepan over low heat. Warm the milk until a skin forms on the top. As soon as the skin forms on top of the milk, remove the pan from the heat — be careful not to let the milk boil.
How to Make Crescent Rolls
This old-fashioned butterhorn recipe yields slightly sweet, very soft, fluffy and puffy rolls. Of all of the different breads, muffins and scones that I bake in our little farmhouse kitchen, these homemade crescent rolls are one of the kids’ favorites. When the aroma of warm, sweet, yeasty rolls wafts through the house, the boys come running! One tray doesn’t last long around here, so it’s a good thing the recipe yields plenty of extras for the freezer.
There’s nothing difficult about this process. Just gather your ingredients and follow the recipe directions carefully. Baking is an exact science, so I do not recommend tweaking the measurements or substituting with different ingredients until you’ve tried it at least once.
You’ll find detailed directions in the recipe card below, but here’s the quick version:
- Soften the yeast in lukewarm water.
- Use a stand mixer (or your hands) to mix and knead the dough.
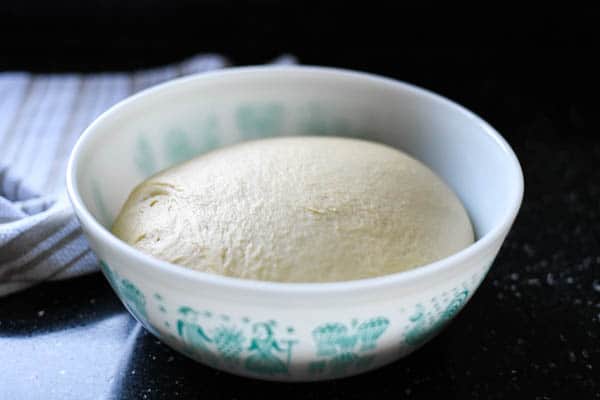
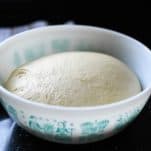
- Transfer the dough to a greased bowl, cover, and let rise.
- Punch down the soft dough, and then divide it into three equal portions.
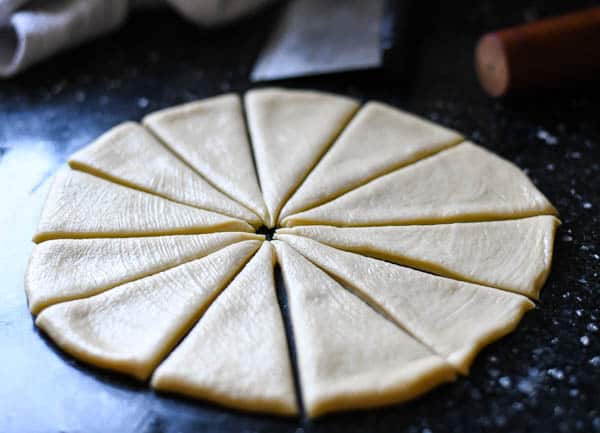
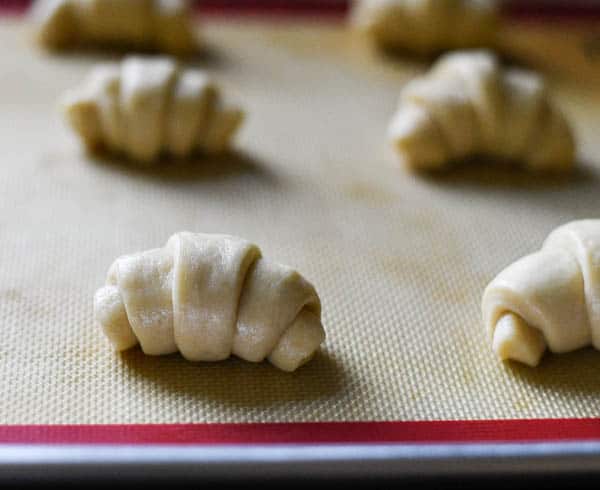
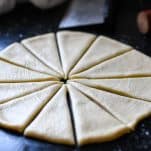
- Roll each piece of dough into a circle with a rolling pin on a lightly floured surface. Brush with melted butter.
- Cut each circle into 12 wedges (you can use a pizza cutter for this step).
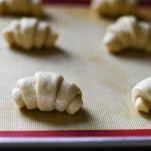
- Roll up each wedge, starting from the wide end.
- Place on lined baking sheets with the tip (seam-side) on the bottom. Bend in the ends to form crescent shapes.
- Cover the dough and let the rolls rise until puffy.
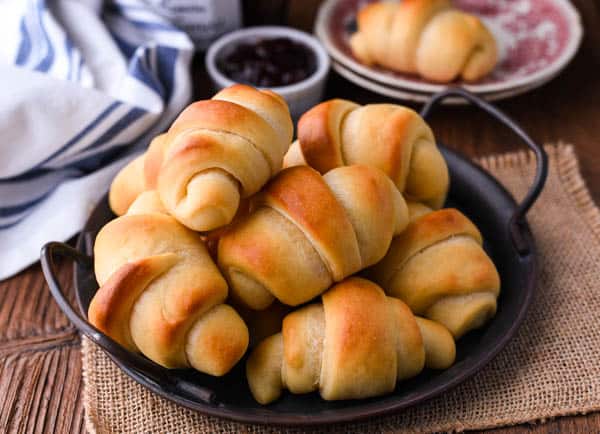
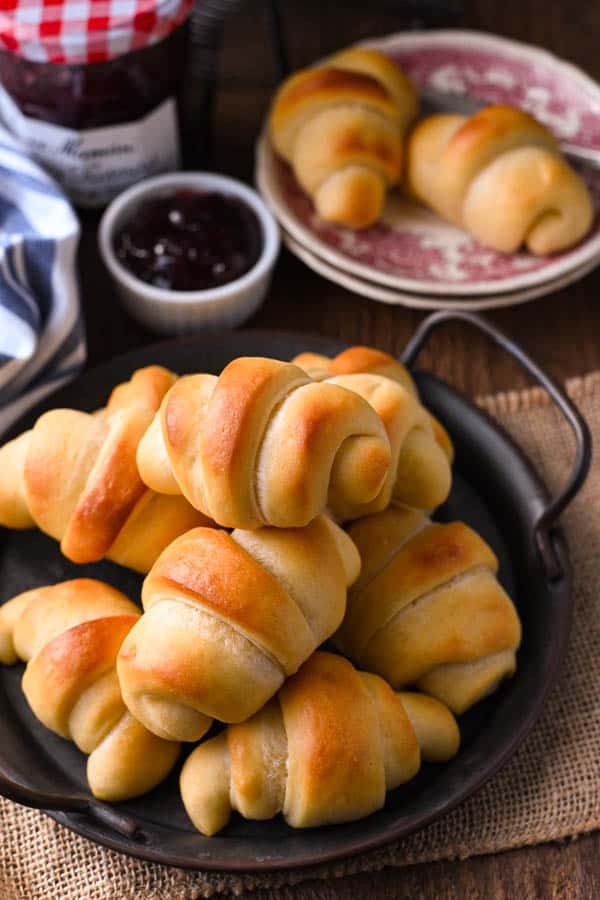
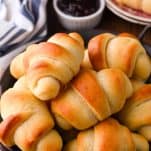
- Bake until golden brown and cooked through, about 10-12 minutes. Brush with melted butter and serve warm!
Preparation and Storage Tips
- How to Store: The homemade rolls are best served warm, straight from the oven. Leftover rolls will keep at room temperature in an airtight container or freezer bag for about 1 day, or wrapped tightly in the freezer for up to 3 months.
- Make Ahead Butterhorn Rolls: To prepare the dough ahead of time, shape the rolls as instructed in the recipe and arrange them on the lined baking sheets. Cover tightly and refrigerate for up to 1 day. About 2-3 hours before you plan to bake the rolls, pull them out of the refrigerator and let them rise on the counter before baking.
- How to Freeze Crescent Roll Dough: If you plan to make the dough more than 1 day ahead, it’s best to freeze the dough. To freeze crescent roll dough, shape the rolls as instructed in the recipe and arrange them on the baking sheets. Cover tightly and freeze until firm. Transfer to airtight freezer containers; freeze up to 4 weeks. When ready to bake, remove the rolls from the freezer, arrange on baking sheets, and re-cover the rolls with a clean cloth or towel. Place them in a warm spot and let them thaw and rise for 3-4 hours (or until they look puffy). Bake according to the recipe instructions.
- How to Reheat Crescent Rolls: If you have leftover crescent rolls that you’d like to reheat, place the rolls in a 350°F oven just until warmed through (about 5 minutes). Don’t leave them in for too long or they’ll become dry and toasted. You can also microwave individual rolls for about 15 seconds, or until warm.
Tips for the Best Butterhorn Rolls Recipe
- Store yeast in the freezer. Even unopened packets of yeast with a good expiration date can go bad at room temperature, so I always keep the yeast in the freezer. Old yeast will impact the dough’s ability to rise.
- Properly measure the flour. Always spoon and level the flour — do not scoop it out of the package. Incorrectly measuring the flour will result in dense, hard dinner rolls.
- Rise in a warm spot. If your dough isn’t rising, check the temperature of your kitchen. Ideally, you want to find a spot that’s about 75-78°F, but this doesn’t have to be exact.
- The crescent rolls will look very small when you first cut them and roll them, but don’t worry — they will puff up really nicely and become much bigger as they rise and bake! You can cut larger crescent rolls by dividing each circle of dough into 8 wedges (instead of 12), but we much prefer the smaller rolls, which are easier to shape and an easier size to eat.
- Make sure that the tips are tucked under the rolls when you place them on the baking sheets. This will help hold the rolls together as they puff up in the oven.
- Bake in the center of the oven to prevent excessive browning on the top or bottom of your rolls. You likely will not need to do so, but you can cover the rolls loosely with foil if they start to get too dark on top before they’re done baking.
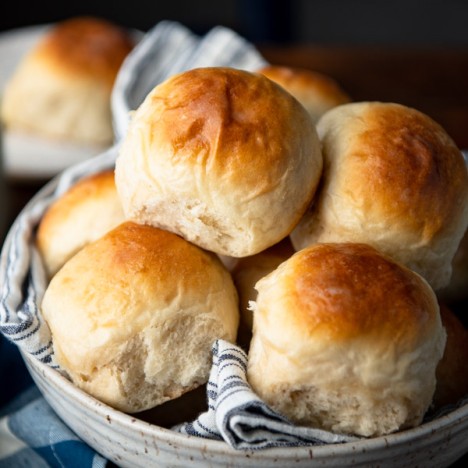
More Homemade Rolls to Try
Easy Homemade Dinner Rolls
3 hours hrs 45 minutes mins
Farmhouse Cinnamon Rolls
3 hours hrs 50 minutes mins
One Hour, No Knead, Easy Dinner Rolls!
1 hour hr 21 minutes mins

Did you make this recipe?
If you enjoyed this recipe, please leave a comment with a 5-star review at the bottom of the post. Thank you!
Crescent Rolls (Amish Butterhorn Rolls)
Ingredients
- 1 (0.25 oz) packet dry active yeast
- ¼ cup lukewarm water
- ¾ cup whole milk, scalded (see note below on how to scald milk)
- ½ cup shortening
- ½ cup sugar
- 1 teaspoon salt
- 3 large eggs, beaten
- 4 ½ cups bread flour (or sub with all-purpose flour), plus more as needed
- 3-4 tablespoons melted butter, divided
Instructions
- In a small bowl, stir together yeast and warm water. Allow to rest for 5-10 minutes, until foamy.
- In a large mixing bowl fitted with a dough hook or paddle attachment, combine scalded milk, shortening, sugar and salt. Stir to dissolve the ingredients in the hot milk. Cool the mixture to a lukewarm temperature (it should feel like warm bath water).
- Add the softened yeast mixture to the milk mixture. Add the eggs and 1 cup of flour. Beat on low speed for 30 seconds, then scrape down the sides of the bowl with a spatula. Add remaining flour; beat on medium speed until the dough comes together (about 1-2 minutes). Add more flour (one tablespoon at a time), if necessary, until the dough pulls away from the sides of the bowl. Continue mixing and kneading the dough for 2 more minutes (or knead by hand on the counter for 2 minutes).
- Lightly grease a bowl with oil. Transfer the dough to the bowl and turn to coat. Cover tightly with plastic wrap and let the dough rise in a warm place until doubled in size (about 1-2 hours).

- Line three baking sheets with parchment or silicone mats. Set aside.
- Punch down the dough. Divide the dough into three equal portions. Roll each piece of dough into a 9-inch circle; brush with melted butter. Cut each circle into 12 wedges.
- Tightly roll up each wedge, starting from the wide end. Place on baking sheets, with the tip (seam-side) on the bottom. Bend in the ends to form crescent shapes. Cover and let rise in a warm spot until puffy, about 45 minutes – 1 hour.
- Bake in a 350 degree F oven for 10-12 minutes, or until lightly browned. Remove from oven and brush with melted butter.

So my Grandma has made butterhorns every Thanksgiving since I was a little girl…well, since my mom was a little girl. Mom is 74 now. Anyway, for years they have complained that they’re not big enough (or as big as they used to be). Mom has talked about how delicate these things are, don’t knead them, takes 2 days to make. This year, I offered to make them and I was doubted. They think I can’t make them. So I made a test-batch according to her instructions (which were vague), and they were awful. Flat, lacked flavor. I knew when I was making them that the process was wrong. So I found your recipe and I’m getting ready to go in there now and re-do them. Fingers Crossed!
Hi, Shannon! I hope that you love this version. Let me know how they turn out. Happy Thanksgiving! 🙂
How did they turn out? Did you stick to the recipe or did you make changes….if you did what did you do?? They look absolutely divine and I want to try them.
Do you use salted or unsalted butter? Do you use regular salt, sea Salt, kosher? Not sure if it makes a difference. When oiling the bowl can you use olive oil. Thank you for your help
Hi, Ria! I use salted butter, and regular table salt in this recipe. Yes, you can use olive oil when oiling the bowl here. It might add a touch of flavor to the dough, but that’s not necessarily bad. You can also just grease the bowl with nonstick cooking spray if that’s easier. Hope you enjoy the rolls!
Do you think these would work using non dairy substitutes? Like oat milk?
Hi, Jay! I honestly don’t know — I’ve never baked with or used oat milk. I would think it would work okay, so long as there’s a decent amount of fat in the non-dairy milk.
What kind of shortening do you use?
Hi, Deb! I use the sticks of Crisco brand shortening.
Instead of shortening, could I use butter??
Hi Stephanie,
We haven’t tested it, but it should work! The taste and texture might change slightly, because shortening is 100% fat while butter is 80% fat and 20% water.
These are great cresents. I have been making them for Thanksgiving and Christmas for the last 2 years and my whole family loves them and asks me to make them every year.
Wonderful! Thank you for letting me know, Sharon. Merry Christmas!
These Amish Cresent Rolls are the same recipe my ex-mother-in-law used to make. They have been a fan favorite for years. I really love making these. The flavor is slightly sweet and buttery. Many of us eat these plain the rest add butter. Best when made fresh that day and these taste great up to the 3rd day if freshened in microwave. I recommend a small bowl of boiling water along side rolls to help add to fresher taste.
Thank you for the recommendation, Julie! We’re so glad you enjoy the recipe.
Love these. Turn out better than the can version. I let them raise, divide the dough into 3 parts. Bake one part as directed. Put the other two 1/3s each in a quart size lightly greased freezer bag. Press the dough in to a flat rectangle filling the bag. Seal and freeze. Thaws very fast ~ 30-45 minutes, roll out and bake as directed.
Thank you for the feedback, Monica! We’re so glad you enjoy the recipe.
Just like my Mom baked! Best recipe!
Thank you, Tammy! Happy holidays!
I’m 82 years old and I learned to make these from my grandmother when I was10. I make them every major holiday. The difference in your recipe is the water and letting the yeast bloom. My recipe calls for 1 cup hot milk and adding the yeast when it cools. Otherwise our recipes are the same. This Thanksgiving I used your recipe and let the dough slow rise overnight. They turned out better than ever. I have made the change on my recipe.
I’m so glad that they worked well for you, Marie. Thank you for letting me know!
How would you convert this to instant yeast? Do you need to increase milk by 1/4 cup to replace water yeast was bloomed in? Can I use bread flour?
Hi Sharon,
We haven’t tested this recipe with instant yeast and can’t guarantee your results. However, a general rule of thumb is to multiply the amount of active dry yeast by 0.75. We would probably add the extra 1/4 cup milk.
We love to use bread flour with this recipe.
We’d love to know how it turns out if you try it out!