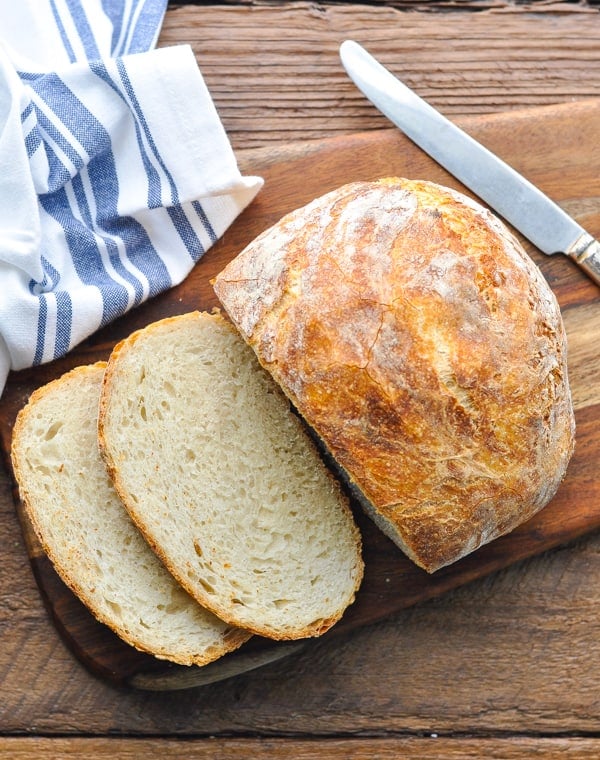
This is the easy No Knead Bread recipe for non-bakers! With just 4 ingredients — flour, yeast, salt and water — and about 5 minutes of prep, you can whip up a loaf of bakery-style homemade bread. Thanks to the magic of a Dutch oven, the crust gets perfectly browned and chewy, while the crumb stays light and fluffy. No baking experience necessary!
Have you jumped on the recent bread-baking trend yet? If homemade sourdough sounds intimidating or time consuming, then you have come to the right place! You don’t need to nurture a starter for this perfect, crusty loaf. While my no knead bread recipe might be incredibly simple, the end result is better than most artisan breads that I’ve bought at the farmer’s market or bakery. You’re not sacrificing taste or texture with this particular method. Prepare for your mind to be blown!
I’ve slightly adapted the No-Knead Bread recipe that I originally found in Ruth Reichl’s book, My Kitchen Year. Ruth adapted her recipe from Jim Lahey’s popular No Knead Bread recipe that was published in the New York Times many years ago. You can find countless variations on the internet, but this is the no-fail method that I have landed on for a perfect loaf every time!
The difference between Knead and No-Knead Bread Recipes:
Traditionally, we knead bread dough in order to form gluten. Gluten is a combination of water with two proteins found in wheat flour (glutenin and gliadin). Folding, stretching and kneading the dough develops various connections between the proteins. The more you knead the flour, the more gluten develops. Well-developed gluten allows the yeasted dough to stretch and expand as it rises. Proper kneading also produces a finer grain or texture in breads.
With that said, you’re probably wondering how it’s possible to bake a loaf of bread without kneading! The difference is that a no knead bread recipe creates a very wet dough. This wet dough allows the glutenin and gliadin proteins to float around on their own, therefore forming gluten on their own, and thus eliminating “the need for kneading!” This saves you a lot of effort by substituting time in place of effort. A no-knead bread recipe is much less effort than a traditional loaf of bread, but you have to allow plenty of time for the dough to develop.
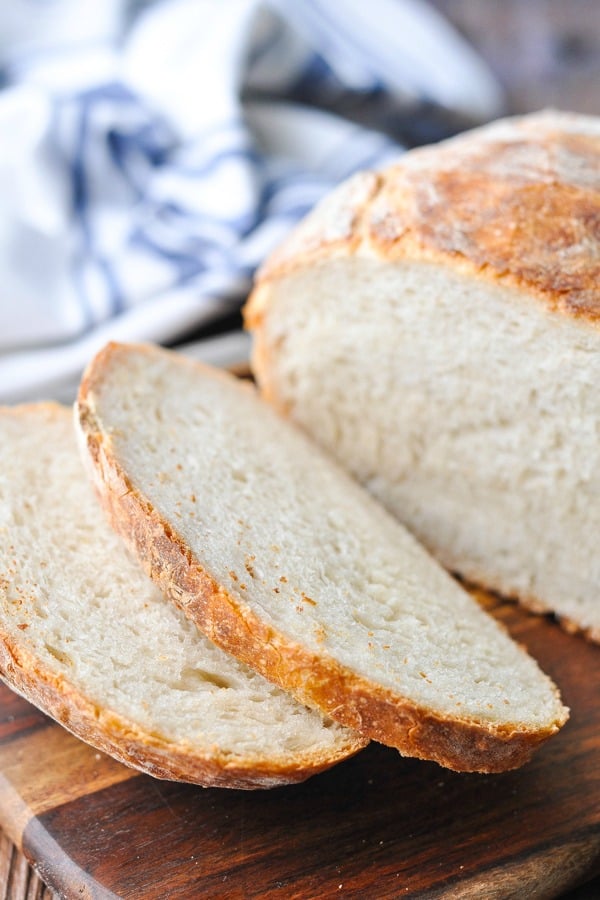
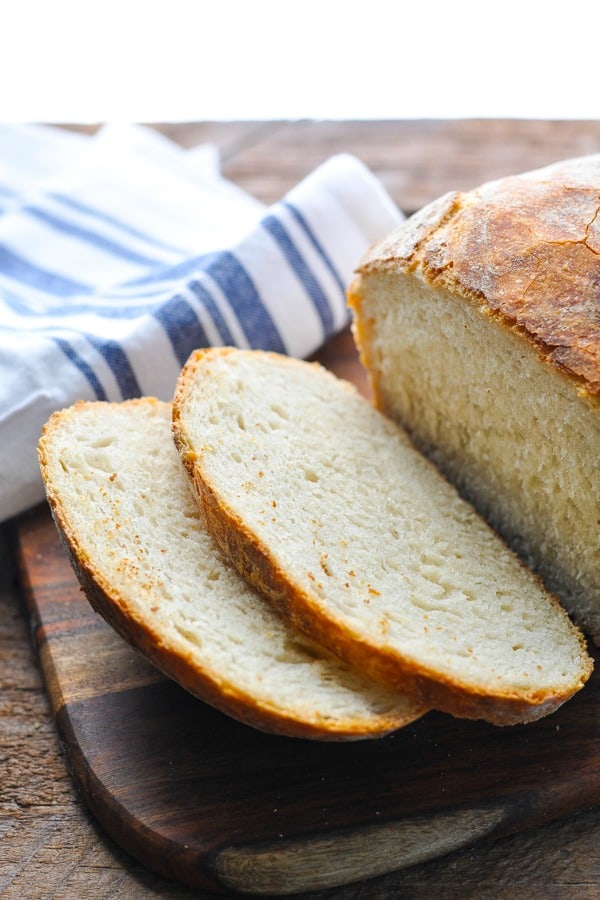
Most folks even agree soaking the wheat in the wet dough overnight results in extra flavor. Not only is no knead bread good, but you might just find that it’s the best bread you’ve ever tasted! It reminds me of a classic French baguette with that super crispy crust and a chewy soft inside. It’s perfect for ripping off a hunk and dunking in soup, toasting, or slathering with butter and jam. Have I convinced you yet?!
How to make a No Knead Bread Recipe at Home:
As I mentioned above, there’s nothing difficult about this recipe. The hardest part is just being patient and giving it time to rise! There’s only about 5 minutes of actual hands-on time necessary, and the rest of your bread baking experience will be spent waiting for the dough to develop, bake and cool. Don’t be intimidated, because this loaf is practically impossible to mess up!
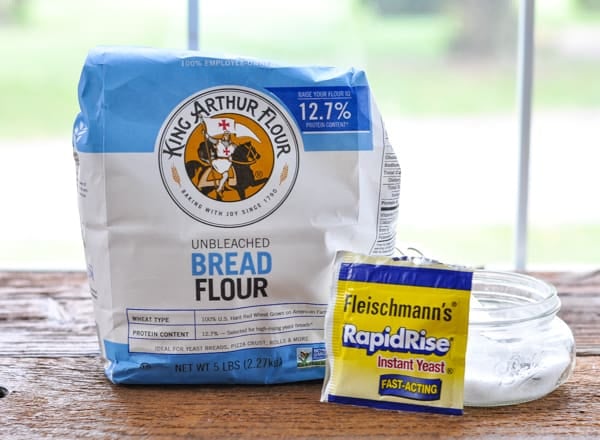
Ingredients for No Knead Bread Recipe:
- Bread flour (see my note below about all-purpose flour)
- Salt
- Instant yeast (also called “Rapid Rise”)
- Warm water
Equipment Needed for No-Knead Bread:
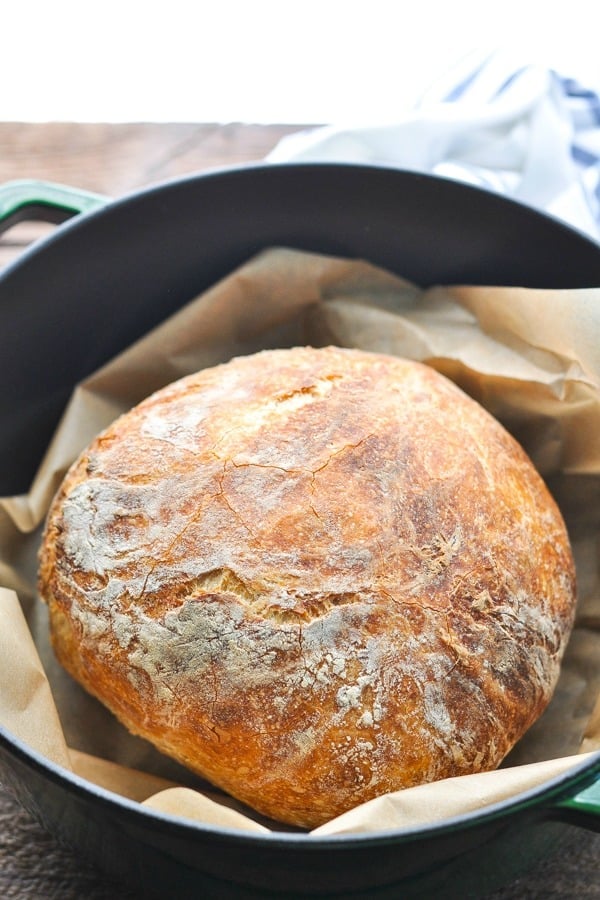
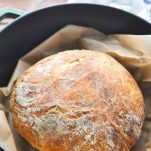
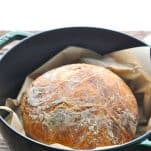
There is one very important piece of equipment that you will need to be able to successfully make this recipe: a heavy enamel-coated Dutch oven with a tight-fitting lid. If you don’t have one yet, trust me: this is a great investment! I use mine almost daily for everything from soup to chili, pot roast to beans…and now overnight bread!
If you don’t want to spend hundreds of dollars on a LeCreuset or Staub Dutch oven, you can find a great, inexpensive model on Amazon Prime for less than $70. Again, this is one kitchen purchase that you will use forever.
You will also need parchment paper — a much less pricey investment! The parchment is the easiest way to lift the dough in and out of the very hot pot. If you don’t have parchment, however, you can place the dough directly into the (ungreased) hot pot — just be very careful!
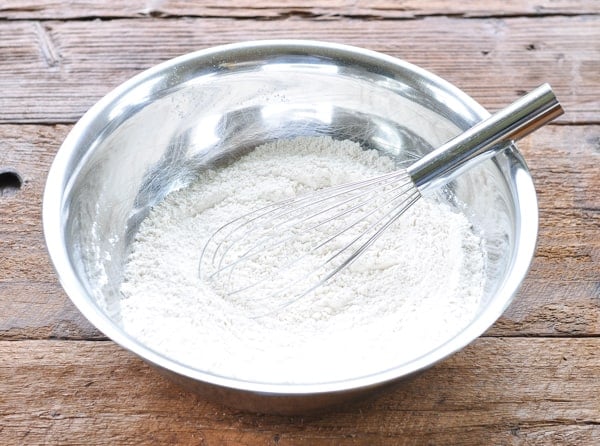
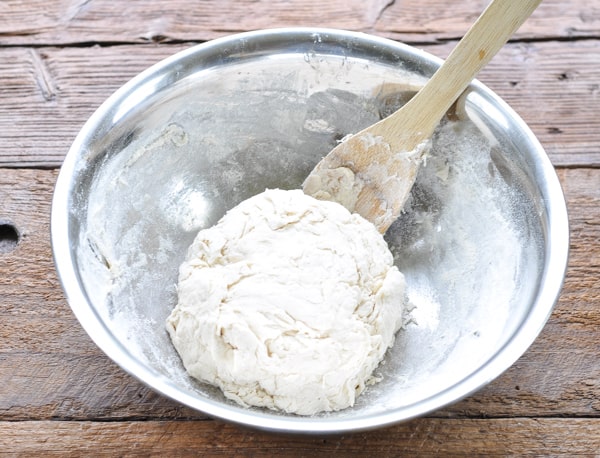
Step 1: Stir together the Ingredients
First, place the flour, salt and yeast in a large bowl.
Add the warm water and stir just until a wet, sticky dough forms. You may need to add slightly more water to get the dry ingredients to come together into a shaggy dough.
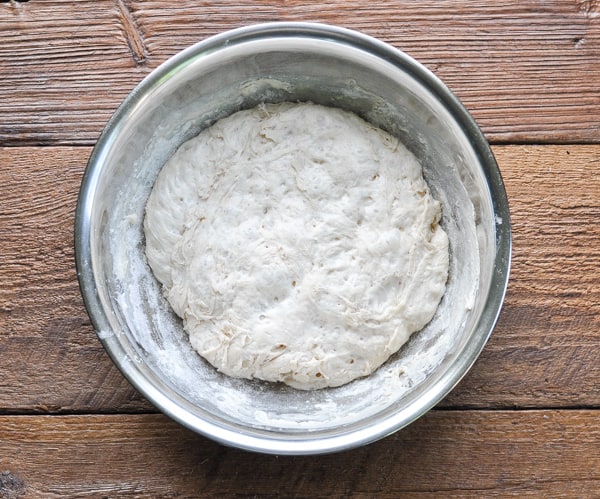
Step 2: Cover and Let Rise
Cover the bowl (I use plastic wrap) and leave it to rest at room temperature for about 18 hours.
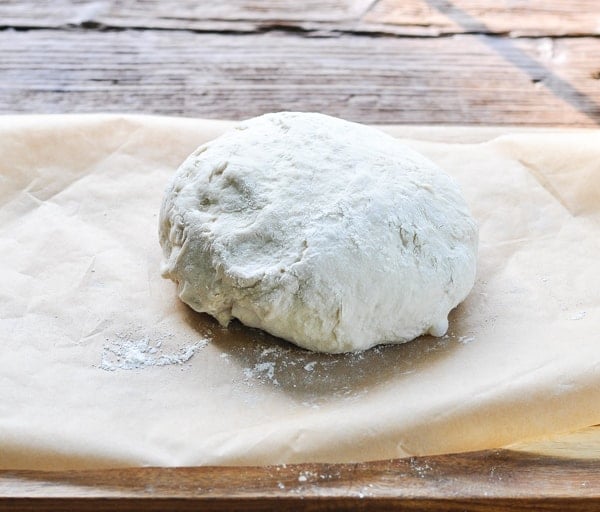
Step 3: Shape Dough into a Ball
To shape the no knead bread, gently nudge the dough from the bowl and dump it onto a piece of lightly-floured parchment paper. Form the dough into a loose ball by gently folding in the edges. I pat my hands with flour since the dough is very sticky. Don’t stress — this doesn’t have to be perfect. We’re making a rustic loaf of bread!
Step 4: Allow the Dough to Rise while the Oven Heats
Give the dough another chance to sit and rest (covered) for about 30-60 minutes. Meanwhile, put the empty Dutch oven (with the LID ON) into the oven. Preheat the oven (with the pot in it) to 475 degrees F.
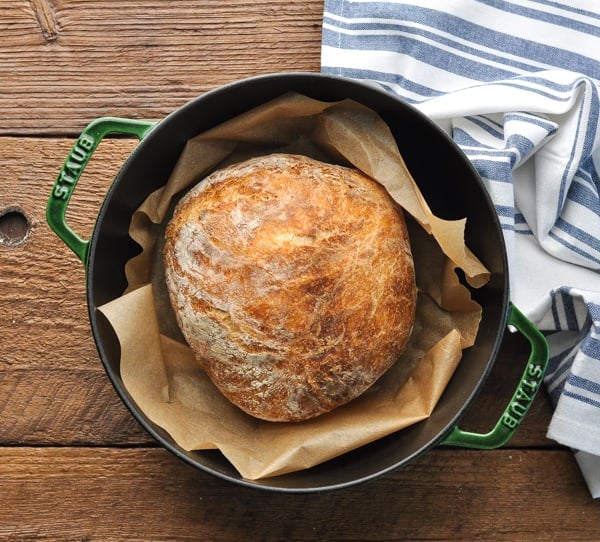
Step 5: Bake the Bread
Once the dough has rested, carefully remove the hot pot from the oven. Remove the lid and transfer the parchment paper and the dough into the pot. Cover the pot, put it back in the oven, and bake the bread for 30 minutes. After 30 minutes, remove the lid and bake for an additional 10-15 minutes. You know the bread is done when the crust is a deep brown color.
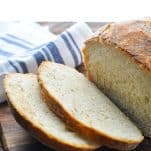
Step 6: Allow the No-Knead Bread to Cool
I know it’s hard, but it’s very important to allow the bread to cool on a wire rack for at least 1 hour before you slice into it. Otherwise the bread will rip and tear when you try to cut it. Promise…it’s worth the wait!
What to serve with No-Knead Bread:
A warm slice of this bread is perfect when slathered in butter for breakfast, lunch, dinner or snack! For a quick morning meal, the toasted bread is also great with jam, peanut butter, or a drizzle of honey and flaked sea salt.
If you’re serving the bread alongside your dinner, here are a few great meals to pair it with:
- Italian Sausage Tortellini Soup, Crock Pot Vegetable Soup, Lemon Chicken Soup with Orzo, Chicken Vegetable Soup, Crock Pot Potato Soup, Minestrone, Velveeta Broccoli Cheese Soup, or Slow Cooker Italian Wedding Soup
- Grilled Scallops or Grilled Shrimp
- Spaghetti and Meatballs, or this Basic Spaghetti Carbonara Recipe
- Grilled Chicken or Roasted Chicken
- Lemon Chicken Piccata, Simple Chicken Marsala Recipe, or a Chicken Divan Casserole
- Baked Shrimp with Tomatoes and Feta
- Spinach Pasta or Chicken Primavera
- Steak Salad
- Tuna Nicoise Salad
- Sheet Pan Cabbage Potatoes and Sausage
Preparation and Storage Tips:
- How to store No Knead Bread: Breads like this no knead bread recipe are called “lean breads” because they do not include any added fat to keep them soft and moist. As a result, they dry out quickly and are best enjoyed on the same day that they’re baked. You can store the loaf of bread wrapped tightly in plastic at room temperature for 1-2 days, but the crust will be less crispy. To keep the crust crispy, store the bread in an open paper bag at room temperature. Day-old bread is delicious when toasted for breakfast!
- To extend the life of your bread, you can wrap the loaf tightly and freeze for up to 2 months.
- How to freeze No-Knead Bread Dough: Prepare the dough as instructed and let it rise for 18 hours. Form the dough into a loose ball, wrap it in plastic wrap, and place the dough in a freezer-friendly container. Freeze the dough for up to 2 months. When ready to bake, allow the dough to come to room temperature for 2-3 hours on the counter, and then bake as directed.
- This dough is pretty forgiving, so you can let it rise for a couple of days, if you prefer. In her book, Ruth Reichl actually recommends punching the dough down in the bowl and then letting it rise again two, three, or even four more times. It will require less time to double in size with each additional rising. While this may yield an even better result, I don’t have the patience for that kind of time commitment, and I don’t think it’s necessary for a delicious loaf of bread.
- Don’t have time to let the dough rest for a full 18 hours? The bread will still be delicious if you only let it rest for up to 10-12 hours. Just remember that more flavor develops the longer it sits.
- What happens if you knead no knead bread? There’s no harm in doing so. The long rising time helps to develop the gluten in the dough and gives the bread more flavor, but kneading the dough by hand may develop the gluten quicker so that you can bake it sooner.

Cook’s Tips and Recipe Variations:
- Bread Flour vs. All-Purpose Flour: All-purpose flour has between 8 and 11 percent protein, while bread flour contains between 12 and 14 percent protein. The extra protein in bread flour results in a slightly higher rise. I highly recommend using bread flour in this recipe; however, if you’re in a pinch and you only have all-purpose flour, the recipe will work with the all-purpose flour, too.
- Instant Yeast vs. Active Dry Yeast: This recipe calls for instant (or rapid-rise) yeast, which you can add directly to your dough. By contrast, active dry yeast must be dissolved in warm water (“proofed”) before combining with other ingredients. I have only used instant yeast for testing this recipe; however, Cook’s Illustrated has a great article with instructions on how to substitute active dry for instant (or rapid rise) yeast, if necessary.
- Make sure that you use warm water when preparing the dough — not too hot and not too cold. You want the water to feel like warm bath water (about 105-110 degrees F). If it’s too hot you will kill the yeast; too cold and the yeast will not be activated.
- If your no-knead bread does not rise, it could be due to any number of reasons. For instance, your yeast may not be fresh. Even with a good expiration date, yeast has a short shelf life once a package is opened (I recommend keeping it in the freezer). It’s also possible that your water was the wrong temperature (see my note above regarding water temp).
- If the inside of your bread is dense and gummy, this is likely the result of two main culprits. First, the dough may not have rested long enough to give the gluten a chance to fully develop. Alternatively, the bread may not be cooked through all of the way. When the bread comes out of the oven, it’s still “cooking” and steaming. That’s why it’s important to wait and let the bread sit for at least an hour before slicing into it.
- I have not tested a double-batch of this dough; however, I have read that you can successfully double the ingredients to make a larger loaf. Just use a 5- or 6-quart Dutch oven to accommodate the bigger bread.
More bread recipes that you might enjoy:
- No-Knead No-Yeast 3-Ingredient Beer Bread
- Cinnamon Sugar Amish Friendship Bread
- Irish Soda Bread
- Skillet Cornbread

Did you make this recipe?
If you enjoyed this recipe, please leave a comment with a 5-star review at the bottom of the post. Thank you!
No Knead Bread Recipe
Ingredients
- 3 cups bread flour
- 1 ½ teaspoons salt
- ½ teaspoon instant yeast
- 1 ⅓ cups warm water
Instructions
- In a large bowl, whisk together the flour, salt and yeast. Stir in water, adding a little bit more (if necessary) to bring the dough together. Cover and leave to rise at room temperature until the dough has doubled in size (about 18 hours). It will spread out in the bowl and look bubbly.
- Place a piece of parchment paper on the counter and dust with flour. Gently nudge the dough from the bowl onto the parchment. Shape the dough into a loose ball by gently folding in the edges. Allow the dough to rest (covered) and continue rising for about 30-60 more minutes.
- While the dough rests, preheat the oven to 475 degrees F and place a 4-6-quart cast iron Dutch oven (with the lid ON) into the oven to heat up.
- Once the dough has rested for 30-60 minutes, carefully remove the hot pot from the oven. Take off the lid and place the parchment paper and dough into the pot. Cover the pot and put it back in the oven to bake for 30 minutes. After 30 minutes, remove the cover and bake for an additional 10-15 minutes (or until the loaf has turned a deep brown color).
- Allow the bread to cool on a rack for at least 1 hour before slicing and serving.
Notes
- Make sure that you use warm water when preparing the dough — not too hot and not too cold. You want the water to feel like warm bath water (about 105-110 degrees F). If it’s too hot you will kill the yeast; too cold and the yeast will not be activated.
- How to store No Knead Bread: Breads like this no knead bread recipe are called “lean breads” because they do not include any added fat to keep them soft and moist. As a result, they dry out quickly and are best enjoyed on the same day that they’re baked. You can store the loaf of bread wrapped tightly in plastic at room temperature for 1-2 days, but the crust will be less crispy. To keep the crust crispy, store the bread in an open paper bag at room temperature. Day-old bread is delicious when toasted for breakfast!
- To extend the life of your bread, you can wrap the loaf tightly and freeze for up to 2 months.
- How to freeze No-Knead Bread Dough: Prepare the dough as instructed and let it rise for 18 hours. Form the dough into a loose ball, wrap it in plastic wrap, and place the dough in a freezer-friendly container. Freeze the dough for up to 2 months. When ready to bake, allow the dough to come to room temperature for 2-3 hours on the counter, and then bake as directed.
- This dough is pretty forgiving, so you can let it rise for a couple of days, if you prefer. In her book, Ruth Reichl actually recommends punching the dough down in the bowl and then letting it rise again two, three, or even four more times. It will require less time to double in size with each additional rising. While this may yield an even better result, I don’t have the patience for that kind of time commitment, and I don’t think it’s necessary for a delicious loaf of bread.
- Don’t have time to let the dough rest for a full 18 hours? The bread will still be delicious if you only let it rest for up to 10-12 hours. Just remember that more flavor develops the longer it sits.
Nutrition
Disclosure: This post may contain affiliate links. I may earn a small commission for my endorsement, recommendation, testimonial, and/or link to any products or services from this website. As an Amazon Associate I earn from qualifying purchases.

2 things…
1. If I want the bread with dinner, and don’t want to start making it at midnight, can I make the bread early evening and let it sit all night and all the next day. So it would be about 24 hours if rising?
2. I am also making ice cream like crazy… not soft serve but regular ice cream. In March I bought the ice cream bowl attachments for my Kitchen Aid mixer. For the past 2 months I’ve been using the internet to find many different and no cook recipes for ice cream. This attachment is great!! Don’t need another appliance to make ice cream. So far I’ve made blueberry sorbet, 2 different chocolate recipes, 2 different strawberry recipes, vanilla, coffee, Dulce de Leche, and today I’m planning on making a caramel pecan ice cream. I know you like soft serve but you may want to look into the ice cream bowl attachment for you Kitchen Aid if you don’t have one.
Hey, Debbie! I’m actually making a loaf right now for dinner this evening. Here’s what I did:
– Stir together the dough in the evening (I made mine after I cleaned up the kitchen from dinner — about 6:00 p.m.)
– Let the dough sit overnight and rise.
– Some time around 12:30 or 1, take the dough out of the bowl and let it rest on the parchment paper for 30-60 minutes.
– Bake the dough in the oven around 1:30 or 2:00. It will come out of the oven some time between 2:15 and 2:45. Let it sit (uncovered) on the counter until dinner.
– The bread needs to rest for at least 1 hour (I think even a bit longer is best) before you slice it, so you don’t want to wait until just before supper to bake the loaf. It will stay warm for at least a couple of hours, so even if you want warm bread with dinner at 5 or 6, you should be fine.
Does that answer your question? There’s plenty of wiggle room with the dough, too. It’s super flexible and hard to “ruin.” If you want to give it a full 24 hours of rising, that’s fine as well. Just remember to allow at least 1+ hours of cooling time. Enjoy!
Hi Blair — I’m a busy ICU physician mom who cooks for 7 almost every evening I can be home (2 grandmas, 3 kids, husband, and me). I have enjoyed your blog and Sunday emails immensely over the past several months in my weekly meal planning search for dinner ideas and new things to cook that our family will enjoy. Many of your recipes have been HUGE hits!
We absolutely love this bread! The only oven-safe Dutch oven we own is a 10-qt cast iron monster. This pot is so huge that even a double recipe of this bread flattens out a bit too widely (although still tastes phenomenal). So today I made a triple batch. I could barely get the heavy beast into the oven myself without asking my husband, but with some extra effort I heaved it in. The loaf came out beautifully!!
Happy Spring! Be well. And thank you again for sharing your life and ideas with all of us. I always feel a little extra peace and joy when reading your stories and cooking your recipes. They help me to remain grounded during unprecedented times in an unsettled world, especially when my work life caring for critically ill patients can seem overwhelming.
Best,
Renee
Hi, Renee! Thank you so much for taking the time out of your busy life to come back here and leave me such a kind note. It makes me so happy to know that the recipes and photos are bringing a little bit of joy to your day. You’re the true hero! A doctor, mom, granddaughter, wife, taking care of patients and still making homemade bread for your crew?! Amazing.
Thank you also for letting me know that the triple loaf worked! That’s so funny to even imagine how heavy the pot must have been, but glad to know that you had a lot of bread for the effort. 🙂
Take care, and have a great week!
I have made a no knead bread my times. The only problem I have is that the crust is too thick. How do you keep that from happening?
Hi, Gerry! It’s hard to know why the crust was too thick with your particular bread. In general, if the bread’s crust is too thick, it’s likely because you’re cooking it too long, too hot, or allowing too much rise time (so that the yeast is exhausted by the time the bread goes in the oven and it doesn’t “spring” when baked). This recipe definitely yields an artisan bread with a relatively thick, chewy crust even when executed perfectly — that’s the best part, in my opinion. 🙂 If you prefer a basic white bread with a thin, soft crust, you might prefer this recipe instead: https://www.theseasonedmom.com/easy-homemade-bread/
Hope that helps!
Hi, Blair! I love your columns! Do you have to use cast iron? Thanks!!
Hi, Nancy! Yes, I think that you do. I haven’t actually tested the bread with something else, but you really want that tight-fitting lid and the heavy-bottomed cast iron Dutch oven. I can’t think of another similar tool that would work as well (but I could be wrong). A Dutch oven is such a great investment piece, though — I highly recommend it! It’s one of my most-used kitchen items, since it’s great for everything from pot roast to soup, bread to fried chicken. You can look for less expensive versions on Amazon (try Lodge brand) that work just as well! Hope that helps. 🙂
Dear Blair, thank you so much for taking the time to respond. I am going to get a Dutch oven. I just love your recipes, your home is beautiful, and so is your family. May God bless you and your family. Take care, Nancy.
You’re so welcome. Thank you for your kind words, Nancy! 🙂
2/21/21
Blair:
Just went to Amazon.com and I will suggest that you also visit them and check out the reviews about the Lodge Dutch oven.
I was very shocked & disappointed.
The one thing that turned me off was that one person told about the dutch oven sticking & cracking on the ceramic stovetop (which I also have; Btw., the manufactuter of my stove does not reccomend that any cast iron (enameled or not be used on the stove).
There are too many negative reviews, which I won’t go into here, but I definitely won’t be getting one. I like my stove, & plan on keeping it for a long time.
If you don’t want to put this review up online, that’s OK with me, but please, do take a look at those reviews. There are even a few pictures on them. Another Btw is that Amazon is not replacing these dutch ovens, mostly because the replacements are just as bad as the first purchace was. This realy tells me something.
Thank You for letting me “bend your ear”.
Sandra W.
Hi, Sandra! That’s good to know! Maybe it’s worth investing in one of the higher-end versions, then. However, I have also had numerous blog readers specifically tell me how much they like their Lodge Dutch ovens (and who haven’t had any bad experiences), so that might still be a valid option for those who don’t want to shell out for the more expensive brands? I can’t personally vouch for any other specific brands that are less expensive, since I haven’t heard similar success stories other than the Lodge. Readers should feel free to chime in, though, if they have other good picks in the less than $100 price range. 🙂
I’ve had a Lodge (from Amazon) for 6 years and it has been great. I am guessing you could find negative reviews for Le Crueset if you looked.
Thank you for sharing!
Questions: (1) Are you coating the top of the bread with extra flour? Is that absolutely essential for this type of bread?
Not a fan of flour on top of a loaf of bread, any kind at all.
( And 2:) I have an analog coated dutch oven sized pot. Could that be used instead, perhaps covering it with non-stick foil & putting a lid over the foil as well? Just a thought here.
Otherwise I’ll be trying the beer bread for sure.
Sandra W.
Hi, Sandra! I only add flour so that I can gently shape the dough into a loaf. It’s not essential, by any means.
I’m not sure about the pot. If it’s heavy cast iron like a Dutch oven, it might work okay so long as you can get a really tight-fitting lid on it. I wouldn’t use something that’s not as heavy as cast iron, though — the bread will likely burn.
Hope that helps!
Hi Blair ! I love all your recipes What can use if I don’t have a Dutch oven? I’m not a bread maker but like to try this. Please help me.
Hi Sonja!
Thank you so much! A Dutch oven-sized, heavy bottomed pot with a tight fitting lid might work for this, but I haven’t tested it and can’t guarantee your results. A Dutch oven truly is the best piece of equipment to ensure your bread turns out well and in my opinion is completely worth the investment! You can find more affordable ones on Amazon. Hope that helps!