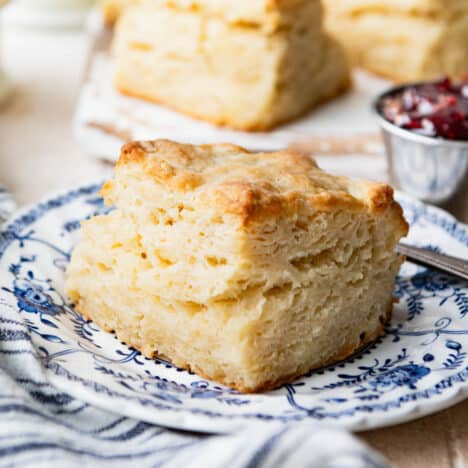
Disclosure: This post may contain affiliate links. I may earn a small commission for my endorsement, recommendation, testimonial, and/or link to any products or services from this website.
Aunt Bee’s easy 3-ingredient biscuit recipe yields flaky, buttery biscuits that rise a mile high — and they only require about 10 minutes of prep!

Table of Contents
If you love biscuits as much as we do, be sure to try these farmhouse-favorite flaky biscuits, a batch of these 3-ingredient buttermilk biscuits, and these classic Southern buttermilk biscuits, too!
I just made these biscuits. Not only are they extremely easy to make, but they are the best I’ve ever made! They’re so light and fluffy, they’re like eating clouds. I’ll use this recipe forever!
– Sandra
How to Make this 3-Ingredient Biscuit Recipe | 1-Minute Video
My great Aunt Bee never steers me wrong — especially in the kitchen — and these easy homemade buttermilk biscuits are no exception! Aunt Bee has hosted many Southern ladies for lunches and brunches over the years, so when she says that an easy 3-ingredient biscuit recipe is flaky and delicious, I don’t question it.

A Few Tips Before You Get Started
- Self-rising flour is a common pantry staple in most Southern households. It’s simply flour with the baking powder and a bit of salt already added. Traditionally made from a softer, lower protein version of all-purpose flour, this variety yields tender, flaky biscuits. I prefer White Lily brand, which is a soft winter wheat flour.
- Buttermilk is essential here, since the acid in the buttermilk reacts with the leavening agents to help the biscuits rise. It also tenderizes the dough. I always use whole buttermilk. If you prefer to make your own buttermilk at home, see my notes below.
- Keep the ingredients VERY cold. Biscuits get their light, fluffy texture when cold butter expands in a very hot oven, creating pockets of steam. That’s why this recipe calls for chilling the cut biscuits for about 10 minutes before baking.
- Fold (or knead) the dough over itself (“laminating”) for about a minute to create visible flaky layers. Don’t do this for too long, though, or you’ll get the dough too warm.
- Do not twist a round biscuit cutter — just punch straight down and pull it straight back out. Twisting the biscuit cutter seals off the edges of the biscuits and they therefore will not rise as high.
- Arrange the biscuits with sides touching or close together. This will help them “climb” in the oven so that you get that great, tall lift!


Directions
Homemade biscuits with a rich buttery taste that are ready in about 30 minutes? Sign me up! You’ll find detailed directions in the recipe card below, but here’s the quick version:
- Cut the butter or grate the butter with a box grater into the flour in a large mixing bowl. Use the tips of your fingers to make sure that the pieces of butter are coated in flour.
- Stir in the buttermilk until a soft dough forms. The amount of buttermilk that you need will vary, depending on the day. Start with ⅔ cup, and then add more if the dough feels too dry and crumbly. If it’s humid or rainy, there’s already moisture in the air and in the flour, so you will likely need less liquid in your dough. On a cold, dry winter day, you may need a bit more buttermilk to bring the dough together.
- Turn the dough mixture onto a lightly-floured surface, and knead the dough for 1 minute (folding it over on itself). This process will help add those flaky layers to the biscuits. Feel free to flour your hands and the countertop, as necessary, to prevent the dough from sticking.
- Pat the dough to ¾-inch thickness (no need to use a rolling pin) and use a biscuit cutter to cut out rounds. Here I used a 2 ½-inch cutter for larger biscuits, but you can choose a 1-½-inch or 2-inch round biscuit cutter to yield small biscuits. Whatever you prefer!
- Arrange the biscuits in a greased skillet or dish.
- Chill the biscuits for about 10 minutes.
- Brush the tops of the biscuits with melted butter.
- Bake until golden brown. Brush with melted butter again and serve!

Serving Suggestions
These 3-ingredients biscuits are suitable for just about any meal, at any time of day. Serve them on their own for breakfast with honey butter, blueberry jam, or apple butter. Add eggs on the side, use them to make an egg sandwich with sausage, bacon, or cheese, or stir up a skillet of sausage gravy. In Virginia, country ham biscuits are a classic snack. We also love biscuits as a side dish with suppers like shrimp soup, chili, fried chicken, crock pot beef stew, ham and bean soup with canned beans, and Dutch oven pot roast.

Preparation and Storage Tips
- Make Ahead: While they’re best served warm, straight-from-the-oven, you can bake the biscuits up to 3 days in advance and store them in an airtight container at room temperature. Reheat day-old biscuits by placing them on a baking sheet in a 300°F oven for about 10 minutes.
- How to Freeze: Allow leftover biscuits to cool to room temperature, then wrap tightly in an airtight container or Ziploc freezer bag and store in the freezer for up to 3 months. Thaw on the counter overnight or in the microwave for a few seconds. Reheat in the oven as instructed above.
- How to Freeze Biscuit Dough: You can freeze the dough before baking the biscuits. After cutting out your biscuits, arrange them on a parchment-lined baking sheet. Pop the tray in the freezer for an hour or so. Once the biscuits are frozen, transfer them to a gallon-sized freezer bag or airtight container. Store the frozen biscuit dough for up to 3 months. Bake directly from frozen, adding about 5 extra minutes to the total baking time.

I have always wanted to learn to make biscuits! Thanks to you and Aunt Bee for super recipe! See old dogs can learn new tricks! 61 years young!
– Stacy

Did you make this recipe?
If you enjoyed this recipe, please leave a comment with a 5-star review at the bottom of the post. Thank you!

Aunt Bee’s 3-Ingredient Biscuit Recipe
Ingredients
- 2 cups self-rising flour (I prefer White Lily brand)
- ¼ cup very cold butter, cut into pats, plus additional for brushing (I prefer salted butter)
- ⅔ – ¾ cup very cold buttermilk
Instructions
- Preheat the oven to 425°F. Spray an 8-inch or 9-inch round pan with a light coat of cooking spray and set aside. Place flour in a large bowl. Use a pastry cutter or forks to work the butter into the flour until the lumps are about the size of large peas. Alternatively, you can freeze the butter and use the large holes on a box grater to grate the butter into the flour. Then use your hands to make sure that the flour pieces are coated with flour.
- Add ⅔ cup of buttermilk to the flour mixture. Use a wooden spoon or spatula to stir until a soft dough forms. It should hold together when pressed, but shouldn't be too wet. Add small amounts of additional buttermilk slowly, as needed, until the dough reaches this consistency.
- Turn the dough out onto a lightly floured surface. Knead for about 1 minute (folding the dough back over on itself), adding flour to the counter and your hands, as necessary, to prevent sticking. Pat the dough to ¾-inch thickness. Use a biscuit cutter to cut out the individual biscuits. Firmly press the cutter down into the dough, but do not twist. Twisting the biscuit cutter seals off the edges of the biscuits and they therefore will not rise as high. I used a 2 ½ -inch cutter here, which yielded 6 large biscuits. You can also use a smaller 1 ½- or 2-inch cutter to cut out more biscuits. Roll out the dough once or twice more to use up the remaining dough scraps.
- Arrange the biscuits in the prepared pan. At this point, the dough will be a bit warmer from working with it, so I like to place the pan of biscuits in the freezer for about 10-15 minutes to chill again.
- Just before you put the biscuits in the oven, brush the tops with melted butter.
- Bake for 14 -15 minutes, or until the biscuits are a light golden brown on top. Brush the tops of the biscuits with additional melted butter when they come out of the oven; serve warm.
Video
Notes
- Make sure that your self-rising flour is fresh. When the package is old or expired, the leavening agents in the flour may not activate properly and your biscuits will not rise.
- How to Make Buttermilk at Home: You can make 1 cup of homemade buttermilk by using regular milk + either lemon juice or white vinegar. To do so, pour 1 tablespoon of freshly squeezed lemon juice or 1 tablespoon of white vinegar into a measuring cup. Add enough milk to equal 1 cup. Give it a stir, let it sit for about 5 minutes, and then use it in the recipe as directed.
- How to Make Self-Rising Flour: If you don’t have a bag of self-rising flour in your pantry, that’s no problem. Combine 2 cups of all-purpose flour with 2 teaspoons of baking powder and ½ teaspoon of salt.
Nutrition
3 Ingredient Biscuit Recipe Variations
- Lard or Shortening. You can replace 2 tablespoons of the butter with 2 tablespoons of either shortening or lard. While butter has more flavor, the shortening or lard will give the biscuits an even lighter, puffier texture.
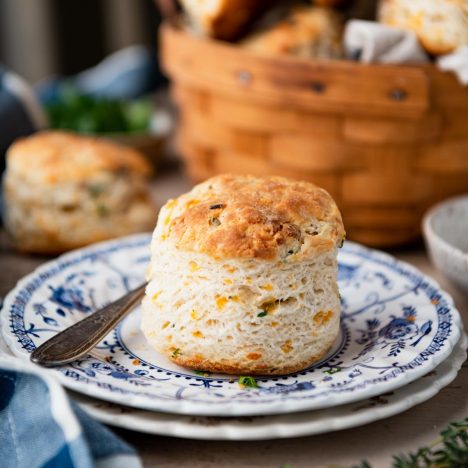
- Add Cheese. Grated cheddar cheese or Parmesan cheese are delicious additions to the biscuit dough.
- Herbs. Mix in chopped fresh herbs such as parsley, basil, or chives for a bright, savory addition.
- Brush with garlic butter.
- You might also like these 4-ingredient heavy cream biscuits.

More Popular Biscuit Recipes to Try
Cheddar Biscuits with Chives and Bacon
50 minutes mins
Sweet Potato Biscuits
33 minutes mins
Flaky Biscuits
45 minutes mins
This recipe was originally published in September, 2018. It was updated in October, 2024.


Gorgeous biscuits, Blair! We love buttermilk biscuits, and yes, a store-bought kind doesn’t come close (I actually have an old post about buttermilk biscuits on my blog). Great tip to brush the tops with butter while they are baking, I’ll try that. I always keep buttermilk in the fridge, it lasts forever. If not used to bake biscuits or pancakes, it is a great marinade for chicken breast.
Thanks, Mila! Extra butter is always a good thing! 🙂
Tip, the young things who nuke everything practically. WAXED PAPER, A juice glass, or size of choice, Keep it floured will serve as a cutter.. Grandma always, pinched off a biscuit size piece and stored covered in fridge with watery buttermilk covering. to start her next mornings batch.. She used Lard as shortening.. She made biscuits every morning, iron skillet Traditional Yellow Cornbread every dinner. She never used a cutter in her life, just got used to what the weight/size of a biscuit was. Depression Era. Nothing went to waste. 13 when she started cooking.
No, grandma wasn’t 13 when she started cooking. She was 13 by the time she had all her basic cooking skills. She had been cooking with her Momma since she was old enough to stand on a chair and stir! She still had things she hadn’t mastered, but she could put a basic meal on the table during harvest time when Momma was harvesting and canning like crazy & didn’t have time to cook dinner. My 80 year old mother tells a story about her everyday cooking when she was about 15 years old. They were going to have a visiting missionary lady come for dinner one night, but her mother had to be away for the day. My mom was just expected to fix dinner – and she did. Roast chicken, homemade gravy a vegetable and a salad. My grandma (her mom) arrived home with just enough time to tidy up before the missionary arrived. When they sat down to the table, my mom brought the food to the table & my grandma asked her “Where are the potatoes”. My mom looked surprised & said, “Well, I figured we were having bread & gravy like we usually do.” Grandma was embarrassed, but the missionary was delighted. To her it was home-cooking like her own mother had made during the depression. To my mom it was just a fun story, but I was always impressed that Grandma just trusted a 15 year old to make a “company dinner”. Most 15 year old girls know a lot about math & science – which is good – but they aren’t prepared to feed their future families. Yes, men can cook too, but marriage isn’t a given these days & knowing how to feed yourself is a life skill everyone should have.
did we have the same grandma’s <3 blessings,
Sounds so interesting ..
No wastage is awesome . I teach my kids all the time to not waste in fact we try and do something new to anything that is potentially about to go in dustbin (of course I mean leftover that is edible not rotten )
I am baking these biscuits because this time while making yogurt at home the milk didn’t set well, never mind I got perfect buttermilk to try these lovely buttery biscuits .
We are loving it .
Thank you for this recipe. So easy to follow and everyone loved them! They were delicious. I made a double batch for biscuits and gravy. I’ll be making them again and everyone asked for the recipe.
You’re very welcome, Penny. We’re so glad you enjoyed it!
I just made these, they turned out Fabulous!! Thank you, I was about to give up on biscuit baking.
Thanks, Kathy! That’s wonderful. I’m so glad that you’ve found a go-to recipe. Biscuits are LOVE! 🙂
Add a little sugar to flour mix. Blueberry Cranraisins, chocolate chips,, etc and you have scones. I cut cold butter into small chunks and freeze in snack baggies. Always ready for biscuits or scones.
Yes! Perfect idea, Linda! 🙂
Tell me about your buttermilk
Marainade.
Just made these biscuits. They’re amazing and couldn’t be simpler to make. Using salted butter is a great idea.
Wonderful! Thank you, Norman! It makes me happy to know that you’re enjoying Aunt Bee’s biscuits, too. 🙂
Just made these, could not be easier! Delicious and flaky biscuits! Thank you for sharing the recipe!
Thank you for trying it out, Carla! We’re so glad you enjoyed it!
Followed the directions and the result was beautiful, flaky, wonderfully raised, tasty biscuits! Thank you!
I’m not a good cook and have tried biscuits in the past with lackluster results. My wife, my most honest critic, absolutely loved them and asked that i make them again!
We’re so glad they turned out well for you, Dennis! Thank you for trying them out.
I am so going to try this. Unfortunately we do not get buttermilk in stores here so will make my own using your tip in the blog post. Pinned this right away and definitely trying this over weekend! Thanks for sharing such an amazing recipe.
Awesome! Enjoy the biscuits! 🙂
I always use salted, but either will work — so go with your preference! 🙂
It’s funny, I remember my mom melting the Crisco in a saucepan, adding the milk, then the flour and pinching dough, rolling it into a ball and flattening them on the baking sheet. They were delicious and we kept a plate of them on the stove and just grabbed one whenever we wanted! Mmmmmmmmmmmmm.
Sounds delicious!!!!
Why are my biscuits not rising?
Hi, SAJ! Since I wasn’t in your kitchen, it’s hard to know for sure. My two first guesses would be: (1) that you were using regular all-purpose flour rather than self-rising flour; OR (2) the self-rising flour that you used was old and therefore the leavener in the flour mix was no longer working. Hope that helps!
When you say white vinegar is distilled white vinegar?
Yes. 🙂
Tank you!
Thank you!
I made these biscuits once before and they are best I ever made or tasted and I come from a longline of biscuit makers. Just take the time to read the instructions and ingredients before proceeding and make sure any missteps are yours and not the author of the recipe.
Thank you so much, Mae!❤️
These biscuits look absolutely WONDERFUL!
But they look a LOT BIGGER than 1 1/2″!
Might the biscuit cutter be 2 1/2″?
I’ve never used anything smaller than 2″, and wonder how they would work with biscuits and gravy.
Thank You for your wonderful website!
Hi! These are truly the smaller size, but I think the close-up photos make them look larger. That said, I’ve made them with the 2 and 2.5-inch biscuit cutters as well, and they work beautifully no matter which size you choose. I would stick with the larger size that you prefer!
Hey there, I literally never comment on recipes but I just really wanted to let you know that these biscuits were phenomenal! There are thousands of buttermilk biscuit recipes on the internet and I feel like I’ve probably tried at least half of them but this recipe stands out. It was so easy and the directions were so clear and simple that my 3-year-old and I were able to get these prepared in less than half an hour. Thank you so much for sharing!
That’s amazing, Courtney! I’m so happy to know that your family is enjoying these biscuits as much as we do. 🙂 I really appreciate your kind words and the fact that you took the time to come back here and leave a note. 🙂
I am having trouble getting my biscuits done with the temp and baking time suggested. Maybe my oven runs a little cooler than yours. Other than that, this recipe is easy to follow and the finished product is oh so amazing and delicious!!! ????
Thanks, Tasia! 🙂
Dear Blair,
Thank you so much for sharing this wonderful recipe. The biscuits came out good but I think I have done some mistake. So it was not as fluffy and flaky as yours. And just one query. When you say 1 cup it means 150gms or 235gms and 1/4 is equal to 60gms or more. Please reply. It will be good help for me…
Regards
Hi, Mamata! In general, 1 cup of self-rising flour is 4 ounces or 113.398 grams. So for this recipe you would need 226.796 grams. That said, I don’t ever weigh my flour for this particular recipe. Instead, I just adjust the amount of buttermilk that I use until the biscuits reach the right consistency — not too wet, but holding together and not too dry. Hope that helps!
This was my first time using this recipe. It was super quick and easy (I used the grated frozen butter method), and my daughter, who is not a biscuit person, ate two and told me that she liked them. This is a keeper.
Thank you, Alice! We’re so glad it was a hit.
The amount of fat needed is the same regardless of the type of fat being used. Melted or not; butter, lard or Crisco, 1/4 cup is how much to use!
Made these using the smaller biscuit cutter and then deep fried! Talk about a wonderful creation. You have to try them fried with sausage gravy.
OH MY GOSH — deep fried! That’s genius! I bet they were amazing! 🙂
will this recipe work if I drop into simmering chicken stock to make dumplings?
Hi, Jackie! I’m honestly not sure — I’ve never tried it that way, but I think it would probably work. I always use these Bisquick dumplings, though: https://www.theseasonedmom.com/bisquick-dumplings/
🙂
I just made chicken and dumplings using your biscuit recipe! They were the best dumplings I ever made!
Awesome! I’m so happy to hear that, Sharon. Thank you for letting me know!
Could you add grated cheese to this recipe?
Absolutely! Cheese is a delicious addition. I often add about 1/2 cup of grated cheddar to my biscuits. I prefer grating the cheddar by hand from a block, since it tends to melt and incorporate into the biscuits better than the pre-shredded packaged cheese. Enjoy!
My biscuits never have a smooth top: look like mountain peaks: even if I roll: taste good though!
Hi! There’s a recipe card at the bottom of the post that lists the exact measurements for each ingredient. I’ll copy and paste them here, too:
2 cups self-rising flour
¼ cup very cold butter, cut into pats, plus additional for brushing
2/3 – 3/4 cup buttermilk
I jused this recipe to make buttermilk biscuits tonight. I’ve tried several times to make them, but something is usually lacking. These were perfect and my husband was so impressed!
Yay! So glad that they were a hit, Christa! They’re my go-to recipe as well. 🙂
Hi, Sara! You can do it a couple of different ways. If you’re just defrosting one or two biscuits at a time, you can pop a frozen biscuit in the microwave for about 20 seconds to thaw, and then put it in the oven (or toaster oven) at 350 degrees to continue warming through and to get crisp on the outside again (about 5 minutes or so). If you have time to thaw the frozen biscuits on the countertop first, then just reheat with the same instructions that you would use for room temp biscuits (as described in the recipe card). Finally, if you want to reheat a whole batch of biscuits straight from the freezer, you can use the same reheating instructions in the 350 degree F oven, tenting loosely with foil, but you’ll just need to keep them in the oven much longer — probably closer to 20-30 minutes. Hope that helps!
Hi, CIndy! I’ve never actually tried that (I always freeze after baking), but I imagine it would work fine. You’ll just need to increase the baking time when cooking directly from the freezer. Enjoy!
Hi, Connie! Step 1 in the recipe box says to preheat the oven to 425 degrees F. You’ll bake the biscuits at 425 for about 12-15 minutes. Enjoy!
Trying these for the first time. Making tonight, and putting in frig uncooked overnight. Will bake in the morning. Any idea if this will work?
Hi, Dorothy! I would pop them in the freezer overnight — not the fridge. The refrigerator won’t stop the leavening from activating, but the freezer will. Then just bake from frozen in the morning and extend the baking time by a few minutes to make sure that they’re cooked through. Enjoy!
I am 72 years old and have, over the years, attempted biscuits many times. Usually the results were somewhere between hockey pucks and clay pigeons. I was almost in tears when my husband could eat these without cracking a tooth. WE LOVED THEM, especially the buttermilk tang.
That’s amazing, Sue! I’m so glad that they were a success! Thanks for letting me know. 🙂
Any adjustments needed for high elevation? I live at about 7,000 feet.
This recipe is identical to the one my grandmother gave me. I’ve yet to have biscuits that rise but the flavor makes up for it.
Hi, Jenna! I’ve never baked at high elevation, so I have no idea. I found this helpful article on King Arthur Flour’s website, which might give you some adjustments to try: https://www.kingarthurbaking.com/learn/resources/high-altitude-baking
Hope that helps!
I have always wanted to learn to make biscuits! Thanks to you and Aunt Bee for super recipe! See old dogs can learn new tricks! 61 years young!
That’s wonderful, Stacy! I’m so glad that this recipe was the winner. 🙂
This is the best recipe! Tried numerous recipes and this is far the best! Mahalo (thank youJ for sharing!
Thank you!! So glad that you love the biscuits!
Can the dough be frozen for later, or should I bake them and freeze them after
Hi Nellie! You can freeze the dough before baking the biscuits. After cutting out your biscuits, arrange them on a parchment-lined baking sheet. Pop the tray in the freezer for an hour or so. Once the biscuits are frozen, transfer them to a gallon-sized freezer bag or airtight container. Store the frozen biscuit dough for up to 3 months. Hope this helps!
I live at 5100 feet, will I need to adjust my ingredients ?
Thanks
Hi, John! I’ve never actually baked at high elevation, so I’m no expert when it comes to making modifications. I’ve never had the opportunity to test at the higher level. That said, this article is really helpful in that regard: https://www.allrecipes.com/article/high-altitude-cake-baking/
You might start by trying a couple of those suggestions, for instance raise the oven temperature by 25 degrees and increase the buttermilk by 1-2 tablespoons. Hope that gets you started!
Would love to have this this reciepe to try (seeing this on my phone). Never had a recipe that worked. Based on the reviews this the one I nreed
That’s great, Patsy! I hope you’ll give these biscuits a try. Let me know how you like them!
I have celiac but my daughter doesn’t. I made these using bobs redmill extra fine pastry flour and David’s baking powder bc I couldn’t find self rising. They came out amazing for my daughter and my guests. Currently trying them with bobs red mill gluten free one to one. Will let you know if it translates. Thanks for a super quick and easy glutenfilled recipe! My dinner guests thanked me graciously
That’s so great to hear, Camille. Thank you! Definitely let us know how the gluten-free version works. I’ve never baked with that flour, and I know that it might be helpful to others. 🙂
Your recipe turned out heavy and didn’t rise like other recipes I’ve tried. My ingredients were all fresh so I don’t know why and they were a little heavy and tough
Can I freeze these ahead and warm up for my Thanksgiving meal?!
Yes, absolutely! Have a great holiday!
Patsy. The secret to making bisquits is to make them quite soft. You may have to add more milk.
Very disappointed. Wish I could show picture. Biscuits look anemic. I make good homemade buttermilk biscuits but was looking for a quicker recipe. This did not work at all.
Hi, Charlotte! I wonder if maybe the leavener in the self-rising flour was old and therefore didn’t activate the biscuits to rise? I’ve never had them come out flat or “anemic” looking. Sorry that they weren’t a hit.
Needs at least 1 cup milk or 1.25 cups. I go by looks & feel but, .75 is not enough! And they didn’t rise very much even though I added baking powder. Going back to my tried & true recipe using AP flour. SR just doesn’t do it for me. They tasted good though!
Really easy and very tasty! We even made it into one big biscuit and cooked it that way. Everyone agreed we will make this one again! FYI excellent with some honey!
Yum! Thank you, Michele! We’re so glad you enjoyed it and agree that you can never go wrong with a bit of honey.
My husband tried a long time to find a biscuit that would work without shortening and still be soft and flaky; he never found one till now. 🙂 I gave up making biscuits years ago because that was one thing I never got the hang of cooking. He did add an egg the second time he made them bc they were more crumbly than he wanted. I don’t know if he tried any of the other tips. He has mentioned that he wants to try them with cheese. This is how he makes biscuits now, and we’ve had them several times since I ran across your recipe. Thanks so much for sharing with us!!
That’s so good to hear, Kathyren! Thanks for your note, and I’m glad to know that you’re enjoying the biscuits. 🙂
Has anyone tried with cheese?
Hi, Surpe! Yes, cheese is a great addition. You’ll need about 1/2 cup (more or less, to taste) of grated cheddar (or other similar cheese). Enjoy!
Why is there no salt or even sugar in this recipe??? I can’t imagine biting into a biscuit and not being able to taste sweetness or saltiness. What kind of white people flavorlessness is this?
Hi, Taylor! The self-rising flour and the butter both include salt.
I know this comment is old but I just can’t read this and not comment….
Its ignorant people like this guy in the world that cause alllllllllll the problems!
Get some intellect and make your own darn biscuits!
Geesh! Lord give me strength!
Bless us all……
Blair….thank you for sharing your recipes with us all.
WOW!
I add a little salt, but no sugar. I have another recipe that calls for just a little sugar and I actually like this one better because you really get a good buttermilk flavor. Just put some butter and molasses or jelly if you want some sweet-you should just try it!
“WHITE PEOPLE” flavorlessness. They are delicious and my doctor approved them for me considering that I cannot have very much salt. The PERFECT healthy biscuit.
@Taylor if you knew half of what you thought you did, you’d know the butter is salted, as is self rising flour. Why make it about race?!
My husband and his family who are black love these biscuits. They say they have good flavor. I’m white and when I’m mad at my husband I don’t use salt or other seasonings in our food so he will know I’m mad lol. Seriously though, they do have flavor and if you choose, you can put a tablespoon of sugar or an extra 1/2 tsp of salt if it’s not to your liking as is. It’s called tweaking a recipe
Thank you, Sherry! I’m glad to know that your family enjoys them! 🙂
LOL this is the same recipe my Gramdmama had and she was from Kentucky. They are DELICIOUS!!!
You can’t beat a classic recipe!
Just wondering: should these biscuits be baked in a glass pan, or will a square metal pan be OK to use? I don’t happen to have a round glass pan for this recipe, but do have a square 8″ glass pan.
Really would like to try these.
Thank you ahead of time for the answer
Sandra W.
Hi, Sandra! You can use a metal pan, a cast iron skillet, or even just a baking sheet. I like to pack them in a pan fairly tightly to help them rise high, but even the flat baking sheet is fine so long as the edges of your biscuits are touching. Hope you enjoy!
This is truly a wonderful, easy biscuit recipe. As a young girl, I won a blue ribbon from my biscuits entered into our county fair. All that to say, I made biscuits many times in early adulthood and then just stopped.
This recipe has changed all that. Thank you, and if you have not tried it, you should! Have a blessed day!
Thank you SO much, Jennie! It makes me happy to know that this recipe has brought you back to your biscuit-baking roots! 🙂
A great recipe. A keeper. I put my buttermilk (I like whole buttermilk, nothing low-fat) in the freezer for 10-15, then melted my butter and added it to the super cold, ice forming around edges of buttermilk. It clots into tiny pieces perfectly for stirring into flour! Yeah! Also, I froze some unbaked biscuits for later. They rose nicely as well. I live at 9300 ft, so rising can be a concern!
Thanks Aunt Bee!
Thanks for all of your helpful feedback! I’m so glad that you enjoyed the biscuits!
Can hardly wait to make these!! Thank you for great recipes and instructions.
Wonderful! Hope you enjoy, Gail!
I followed the recipe exactly, except I set the oven at 330 degrees. I used a cast iron skillet. The biscuits took a long time to cook, say 20-22mim. I finally took them out of the oven. The tops were as white as when I put them in and the bottoms were only slightly browned. The texture was very dense, sort of like hockey pucks. I threw them all out. The flour was fresh. Dunno what happened.
After freezing them cut out, how long would you say that they need to bake at? Same temp & a longer time? Making these this week!
Hi, Erin! Same temp, but you’ll likely need to add a few extra minutes (maybe 3-5 minutes more?). Just keep an eye on them as they get close! 🙂
Thanks for the recipe! If going the froze dough route, could you bake these from frozen or do you need to thaw?
Hi, Tina! Yes, you can definitely bake them from frozen. Just add a minute or two to the suggested cooking time, and they should be perfect. 🙂
I’m so excited to find the perfect buscuit! I have tested many recipes and this is my favorite. Writing it down to save! Thank you for sharing!
That’s great, Lindsay. I’m so glad that you love them. Thank you!
I just made these biscuits. Not only are they extremely easy to make, but they are the best I’ve ever made! They’re so light and fluffy, they’re like eating clouds. I’ll use this recipe forever!
Yay! So glad that you love them, Sandra!
I don’t know what I did wrong. I followed the recipe exactly and my biscuits turned out very heavy, no flavor, and did not rise at all. I opened a brand new bag of Pilsbury self rising flour, used salted butter, and full fat buttermilk. I just don’t get it. I was so excited.
My husband said they were the best biscuits he has ever had! I did freeze the butter and grated it into the flour. Very easy and tasty biscuits!
Yay! That’s wonderful, Sandra!
These are perfect! I use the frozen butter trick and add a little kosher salt for taste.
Thank you so much, Phillip!
Tasty but didn’t raise much even though I just bought the baking powder. I did have to sub. sour cream with milk for buttermilk(too expensive for me). I added a little grated cold cheese and garlic powder. Don’t you feel bad if these are not like the picture. I have been baking for 45 yrs. and was a pastry chef. BUT I can’t make biscuits that look like this! It is super frustrating! I had no trouble making eclairs, danish etc.
Hi Kat,
We’re sorry they didn’t rise much. We do try to provide as many tips as possible in the post. However, we’re glad you enjoyed the taste!
Very easy to make with lots of great hints. Thanks for the recipe!
Thanks, Diane!
I used this as the basis for a blackberry shortcake. Delicious!
I love that idea. Thanks, Shelley!
Hello! Blair, I wanted to know. If, I don’t have Self-rising Flour, can I uses Baking Powder, in my Flour, to make my Biscuits? And, do I’ve to uses Baking Soda as well?
Thanks for hearing me out. And, I’m looking forward to hearing back from you soon.
Hi Virginia!
You can make 1 cup of self-rising flour by placing 1 cup of all-purpose flour in a bowl. Whisk in 1 teaspoon of baking powder and ¼ teaspoon of salt.
This recipe calls for 2 cups of self-rising flour, so you would need to combine 2 cups of all-purpose flour with 2 teaspoons of baking powder and ½ teaspoon of salt.
Hope that helps!
Amazing! They have become a classic!
Thank you, Phillip!
I love this recipe! I don’t even do the folding, just drop them on baking dish to cook. Everyone in the family begs me to make these.
Thank you, Dianne! We’re so happy it’s such a hit.
Would regular All-Purpose flour work as well?
Hi Nassera! We haven’t tested it but it should work with the proper adjustments. The general rule of thumb is to substitute one cup of all-purpose flour, 1 teaspoon baking powder, ½ teaspoon salt, and ¼ teaspoon baking soda for every cup of self-rising flour. Hope that helps!
Excellent. I grate my butter, put it in the freezer, measure my flour, put it in the freezer, both for 15 minutes. When ready to make, I dust my surface and measure my buttermilk. I bring out my flour and butter, mix together with dough whisk, add buttermilk until it all comes together, drop on my floured surface to knead. I cut each biscuit, placing them on parchment on a cookie sheet, then to my freezer for flash freezing. When ready to bake I follow the directions. They cook beautifully and RISE UP high, and taste delish!!!!!
If I want my biscuit sweet for perhaps a shortcake, I brush the tops with butter and sprinkle with turbinado sugar. Viola, dessert! Thanks Blair!
Such a great idea to turn it into dessert! We’re so glad you enjoy the recipe and appreciate you taking the time to leave your feedback!
I just wanted to “Thank you” for all of these awesome recipes. I am going to try them all. I know it takes a lot of time and patience to make all of this to happen so beautifully. I was looking through your recipes and remembered my Mom and Grandmother making a few of these. You brought back some wonderful memories, Thank you , God Bless you and yours .
Your note made my day, Linda. I’m so glad that you’re enjoying the recipes. I hope that you get to try a couple of them soon!
I love this recipe. I’ve been making them for a couple of years and they never disappoint. Super easy and they come out great every time.
Thank you, Barbara! I’m so happy to hear that!