This crispy roasted yellow squash with Parmesan and fresh herbs requires just 3 ingredients and 10 minutes of prep. Serve the summer squash alongside just about any of your favorite entrees — from bbq chicken to grilled steaks, pasta to fried fish. The simple, flavorful recipe works equally well with zucchini, too!
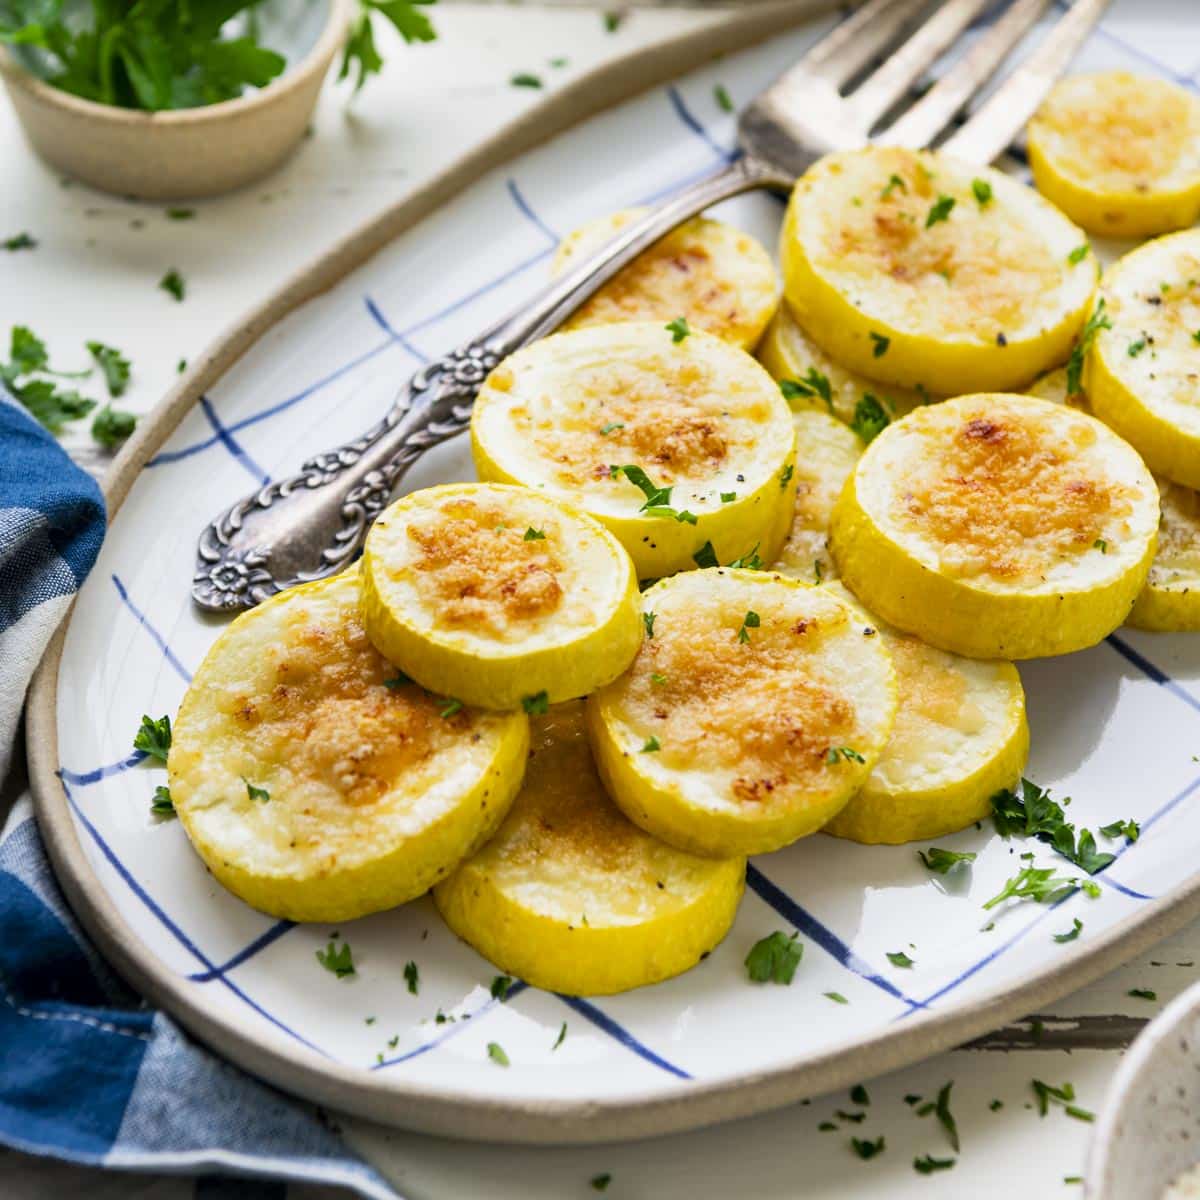
Table of Contents
How to Roast Yellow Squash | 1-Minute Video
Super easy and incredibly delicious!! Will be a regular recipe for us.
– Robin
There always seems to be a bumper crop of fresh zucchini and yellow squash during the months of July and August in Central Virginia. We throw the mild veggies into chocolate cake and quick bread, turn it into fries, and use it to make casseroles. You can always find them at farmers’ markets, too!
When my neighbor, Mrs. Peachey, gave me a bag of her homegrown yellow squash a couple of weeks ago and told me about her recipe for roasted yellow squash, I was instantly intrigued. We love new ways to turn fresh vegetables into tasty sides, and this simple dish does not disappoint!

Why You’ll Love this Recipe
While we enjoy other summer squash recipes such as a cheesy zucchini gratin or a batch of fresh muffins when time allows, the best weeknight sides are those that come together at the last minute with simple ingredients. No rushed trips to the grocery store, and no hours spent slaving over a hot stove.
Instead, this oven roasted yellow squash requires just 10 minutes of prep time — and it tastes delicious! Crispy, browned Parmesan cheese sits on top of the tender squash. Feel free to garnish with fresh herbs if you’ve got them, but it’s certainly not necessary. The flavorful, easy side dish goes well with almost any entrée!

Ingredients
This is a quick overview of the simple ingredients that you’ll need for a batch of oven roasted yellow squash with Parmesan and herbs. As always, specific measurements and complete cooking instructions are included in the printable recipe box at the bottom of the post.
- Yellow summer squash: part of the larger “summer squash” family, yellow squash comes in two varieties: crookneck and straightneck. Crookneck squash has larger seeds and a thicker, waxier skin, and its shape can make it harder to slice into rounds. As a result, I prefer yellow straightneck squash for this recipe. Its close green cousin, classic zucchini, also works well — or use a combination of the two.
- Olive oil: the fat that adds flavor, prevents the vegetables from sticking to the pan, helps them brown while they bake, and helps the seasoning adhere to the squash.
- Kosher salt and black pepper: enhance the other flavors in the dish. I don’t count these in my list of “3 ingredients!” Feel free to try other variations, such as Italian seasoning, garlic powder, seasoned salt, chili powder, paprika, red pepper flakes (for a spicy kick), or our favorite all-purpose seasoning blend.
- Grated Parmesan cheese: freshly-grated Parmesan is best, if available. Otherwise, feel free to use a can of the pre-grated stuff…they both work!
- Optional garnish: fresh parsley, thyme, or basil are a delicious finishing touch if you have them in your garden, but they’re certainly not necessary.

How to Roast Yellow Squash
Sometimes simple is best, and Mrs. Peachey’s roasted summer squash is the perfect example of an easy recipe that allows the vegetables’ flavor to shine. It’s our favorite way to prepare this delicious veggie with minimal effort!
- Toss together squash rounds, olive oil, salt and pepper.
- Arrange squash in a single layer on a rimmed baking sheet.
- Top with Parmesan cheese.
- Roast in a preheated oven for 12-14 minutes, or until the squash is tender.
- Transfer to the broiler for 1-2 more minutes, or until the cheese on top is crisp and golden brown.
- Garnish with chopped fresh herbs, if desired. For a special touch and added crunch, sprinkle with chopped nuts such as toasted almonds, pecans or walnuts before serving.

Serving Suggestions
This tasty side dish goes well with almost any of your favorite dinners, like marinated grilled pork tenderloin, smothered pork chops, grilled beef tenderloin, flank steak marinade, London broil marinade, beef tips and rice, the best grilled hamburgers, golden chicken, Crock Pot ranch pork chops, stuffed shells with meat, marinated grilled salmon, baked fish with rice, sundried tomato pasta, baked ziti with sausage, chicken tortellini bake, broccoli alfredo pasta bake, chicken bacon pasta, linguine with clam sauce, crock pot chicken pot pie, Ritz chicken casserole, million dollar baked spaghetti, this easy chicken parmesan recipe, dump-and-bake chicken marsala, Italian casserole, crescent roll stromboli, pasta with the best spaghetti sauce recipe, easy baked spaghetti, a classic tuna noodles casserole, ham and cheese sliders, and this old fashioned Sloppy Joes recipe.

Storage
This dish is best when enjoyed immediately, while the squash is still crisp on top. Leftovers will last in an airtight container in the fridge for 3-4 days. I don’t recommend storing leftovers in the freezer, as the vegetables will have a mushy, watery texture when thawed.


Tips for Success
- How to Cook Yellow Squash so it’s Not Mushy: Slice the squash rounds thicker than you would typically slice for sautéing. A good ½-inch thick disc is perfect, because it becomes tender in the oven, but doesn’t turn to mush. If you prefer a more crisp-tender texture, I recommend slicing the rounds even thicker. The other key to avoiding mushy squash is just not over-cooking it. Keep an eye on the rounds and pull them out of the oven before they become too tender.
- You do not need to peel yellow squash before cooking. The skin is thin enough that it’s best left intact. This makes prep time faster, and the skin also helps the squash hold its shape in the oven.
- If you wait to harvest yellow squash until it’s very large, the skin will be thicker, the seeds will be larger, and the taste and texture will not be nearly as good as the smaller, less-mature version. That said, nobody wants to throw away homegrown veggies! Instead of using the over-sized squash in this recipe, I recommend saving that big guy for a loaf of bread or a batch of muffins. Just scoop out the huge seeds and grate the squash to use in a baking recipe like you would use zucchini.
This was unexpectedly really, really good!!!!! Season well (I used salt, pepper, and Greek seasoning) and don’t cut too thin. Definitely my go to recipe for yellow squash.
– Angela

More Yellow Squash Recipes

Southern Squash Casserole
55 minutes mins
Secret Ingredient Jiffy Cornbread
40 minutes mins
Boursin Cheese Pasta with Summer Veggies
25 minutes mins

Did you make this recipe?
If you enjoyed this recipe, please leave a comment with a 5-star review at the bottom of the post. Thank you!
Watch How to Make It

Roasted Yellow Squash
Ingredients
- 1 lb. yellow summer squash (about 2 medium), cut into ½-inch rounds
- 1 tablespoon olive oil
- Kosher salt and ground black pepper, to taste
- 3 tablespoons grated Parmesan cheese
- Optional garnish: chopped fresh herbs such as parsley, thyme, or basil
Instructions
- Preheat oven to 400°F. Place squash rounds in a large bowl. Drizzle with olive oil and season with salt and pepper to taste. Toss to coat.

- Arrange squash in a single layer on a rimmed baking sheet. Top with Parmesan cheese.
- Roast in the oven for 12-14 minutes, or until squash is tender. Transfer to the broiler for 1-2 more minutes, or until the cheese on top is crispy and golden brown.
- Garnish with fresh herbs and season with additional salt and pepper if desired. Serve immediately.


Notes
- How to Cook Yellow Squash so it’s Not Mushy: Slice the squash rounds thicker than you would typically slice for sautéing. A good ½-inch thick disc is perfect, because it becomes tender in the oven, but doesn’t turn to mush. If you prefer a more crisp-tender texture, I recommend slicing the rounds even thicker. The other key to avoiding mushy squash is just not over-cooking it. Keep an eye on the rounds and pull them out of the oven before they become too tender.
- You do not need to peel yellow squash before cooking. The skin is thin enough that it’s best left intact. This makes prep time faster, and the skin also helps the squash hold its shape in the oven.
- Use freshly-grated Parmesan cheese for the best flavor and texture. If you don’t have fresh Parmesan from a wedge, you can use a can of pre-grated Parmesan instead.
Nutrition
This recipe was originally published in July, 2021. It was updated in July, 2024.


I Can Say That Everything Looks Great
Thank you, Joe! We hope you enjoy.
I’ve made three of your recipes in the past week, all easy and delicious. I don’t particularly enjoy cooking, but your recipes take the stress out of it especially since I know the outcome will be great. This squash dish was so incredibly easy and tasty. Thanks for bringing joy into meals in my house.
This made our day, Ouida! Thank you for trying the recipes and taking the time to leave feedback. We hope you continue to enjoy them!
I was only allowed to read a bit of recipe when it was interrupted by many ads. So frustrating.
Hi Linda,
We understand your frustration and do apologize for the inconvenience. We do our best to keep ads to a minimum but don’t always have control over their placement. We do hope you continue to enjoy the recipes!
What to do/adjust if wanting to use frozen sliced squash?
We don’t recommend using frozen squash for this recipe as it is likely to become very soggy. You could try roasting from frozen, adding more baking time as needed.
Is your kitchen open to the public?
If only! We hope you enjoy the recipe.
Soooo tasty!
Thank you, Russell!