These easy ham and cheese sliders on Hawaiian rolls are a quick, freezer-friendly, make-ahead meal that’s perfect for busy weeknight dinners, tailgates, and potlucks. The buttery brown sugar sauce makes them sweet, savory, and impossible to resist.
Sometimes called “funeral sandwiches” because they’re a staple at Southern gatherings, these baked sliders are a crowd-pleasing option that always disappears fast.
If you love sliders on Hawaiian rolls, try my Hanky Panky sliders or Kentucky Hot Brown sliders next. You can find more favorites in our Sandwich Recipes collection.
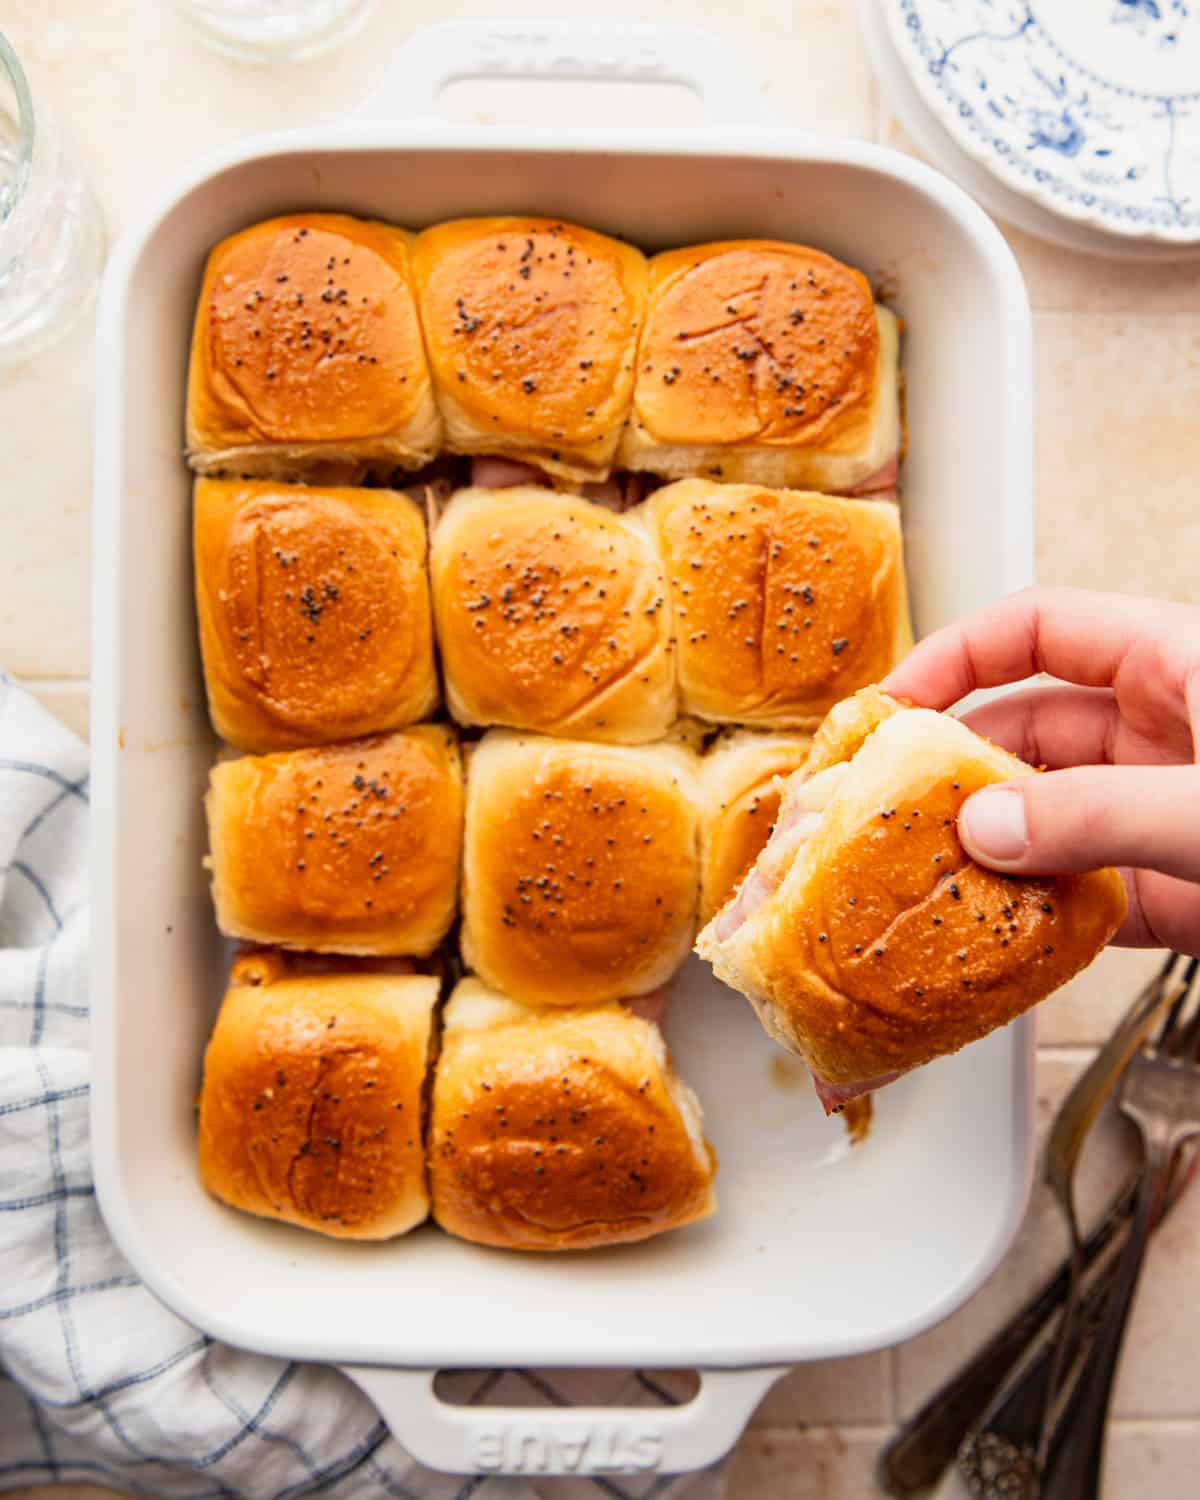
Table of Contents
Before You Get Started
A few quick tips will help you get the best results every time:
- Pour the butter sauce on top. This allows the sauce to slowly melt down through the seams of the rolls as they bake, coating the tops and edges. The butter and brown sugar encourage light browning and give the tops that soft-but-slightly-crisp finish everyone loves.
- Use the smallest side of a box grater to finely grate the onion. This helps the onion blend smoothly into the butter without any large chunks.
- King’s Hawaiian rolls are the best choice. The soft, sweet rolls pair perfectly with the salty ham and savory butter sauce. Other slider buns work, but Hawaiian rolls really make this recipe shine.
How to Make Ham and Cheese Sliders
This recipe comes together quickly and can be assembled in advance for easy entertaining. Here’s how to make them:
Step 1: Assemble the Sliders
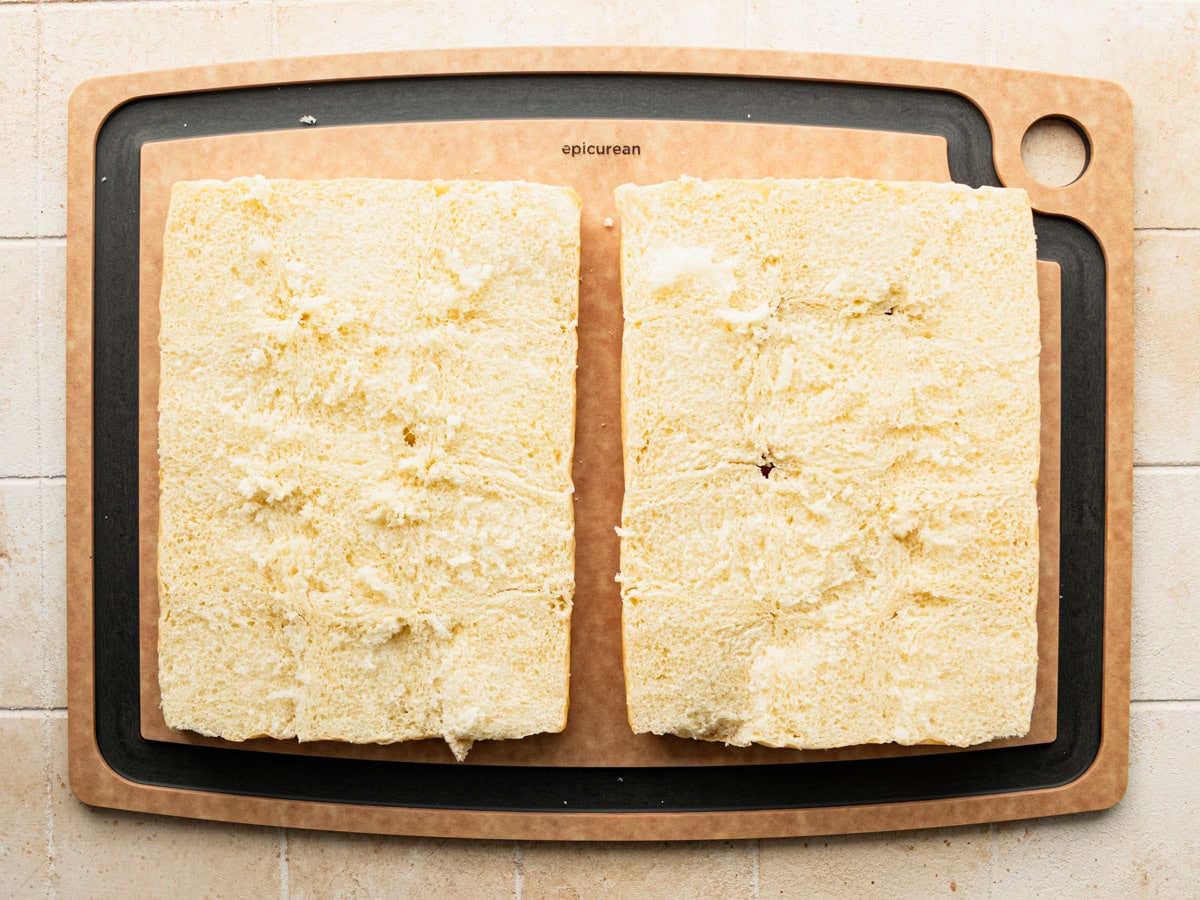
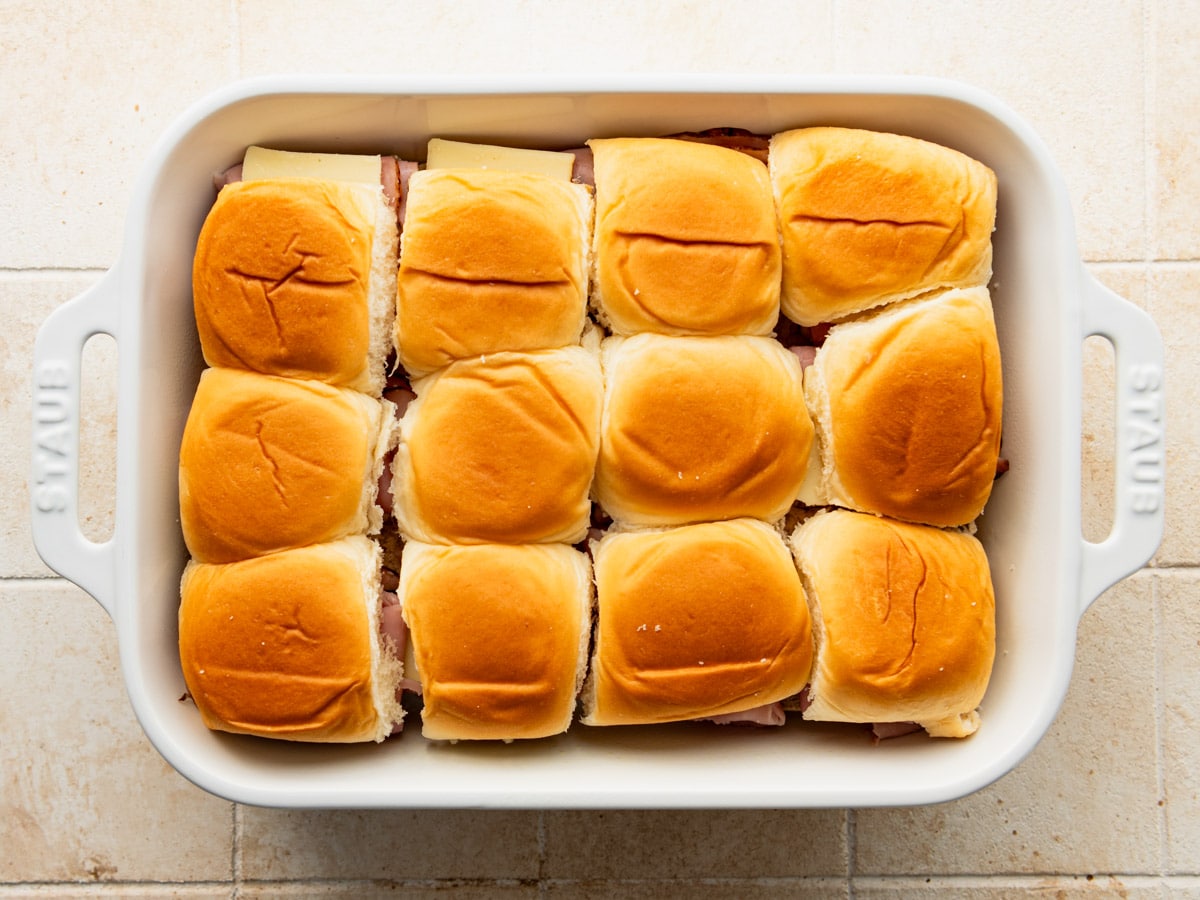
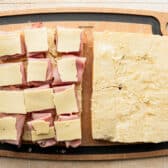
Lightly grease an 11 x 7-inch baking dish so the sliders don’t stick. Using a serrated knife, slice the entire package of Hawaiian rolls in half horizontally, keeping the rolls connected.
Place the bottom half of the rolls into the dish (or on a cutting board), then layer the ham evenly on top, folding the slices as needed so they fit neatly. Top with the cheese, breaking the larger slices into quarters so that they fit the individual rolls.
** Tip: Keeping the rolls together makes assembly quicker and helps the sliders hold their shape as they bake.
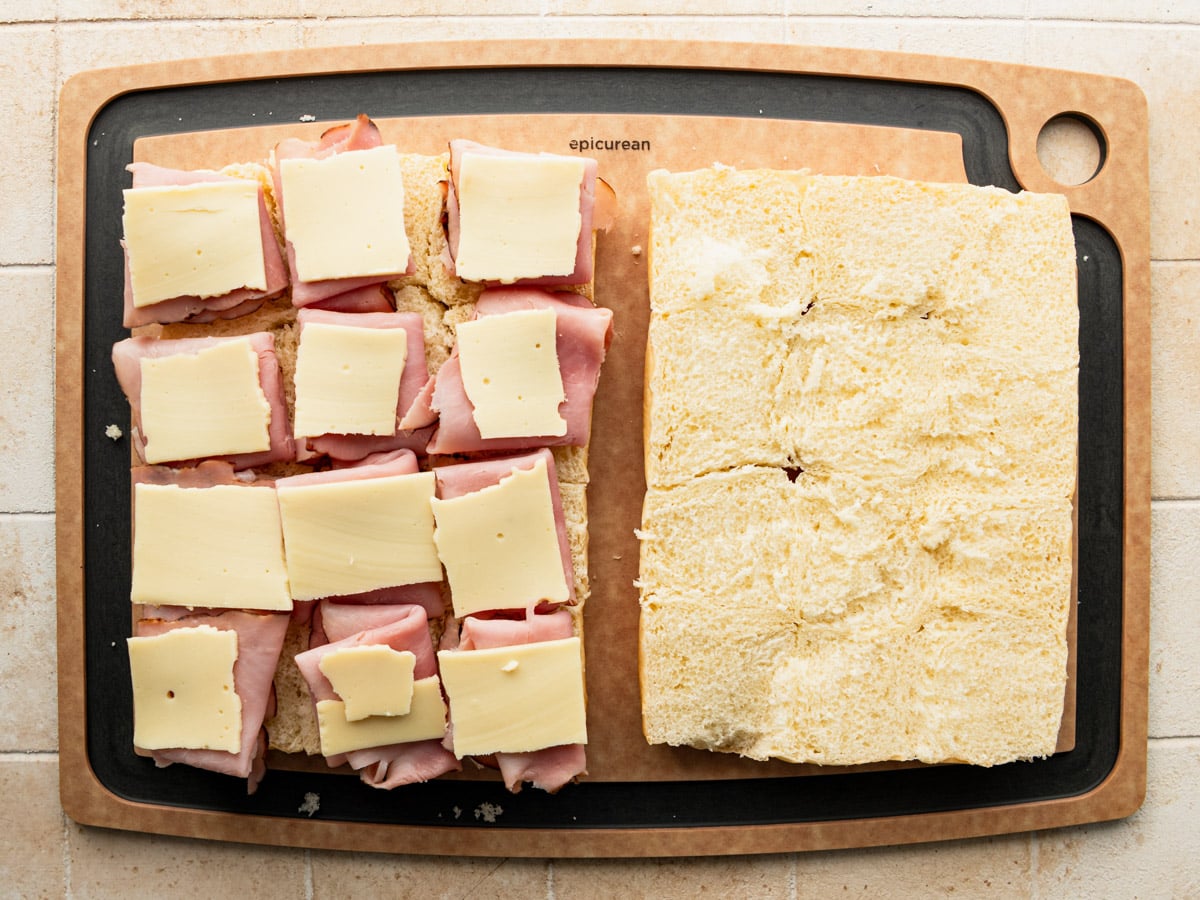
Place the top half of the rolls back on to close the sandwiches, and place them in the baking dish if you’re working on a cutting board.
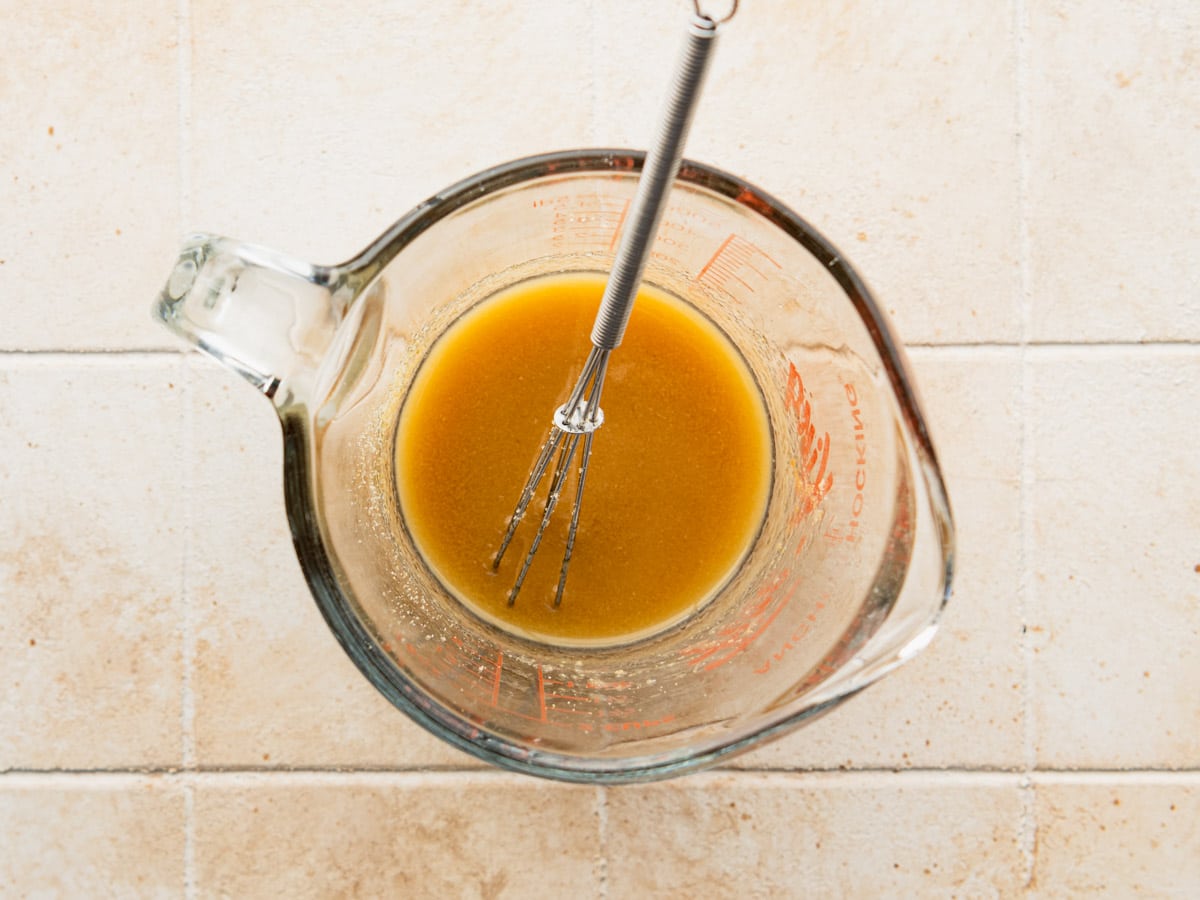
Step 2: Make the Butter Sauce
In a small bowl or glass measuring cup, whisk together the melted butter, brown sugar, Worcestershire sauce, garlic powder, and onion powder until the sugar dissolves and the mixture is smooth.
This sweet and savory butter sauce is what gives the sliders their signature flavor and helps the rolls bake up tender and golden.
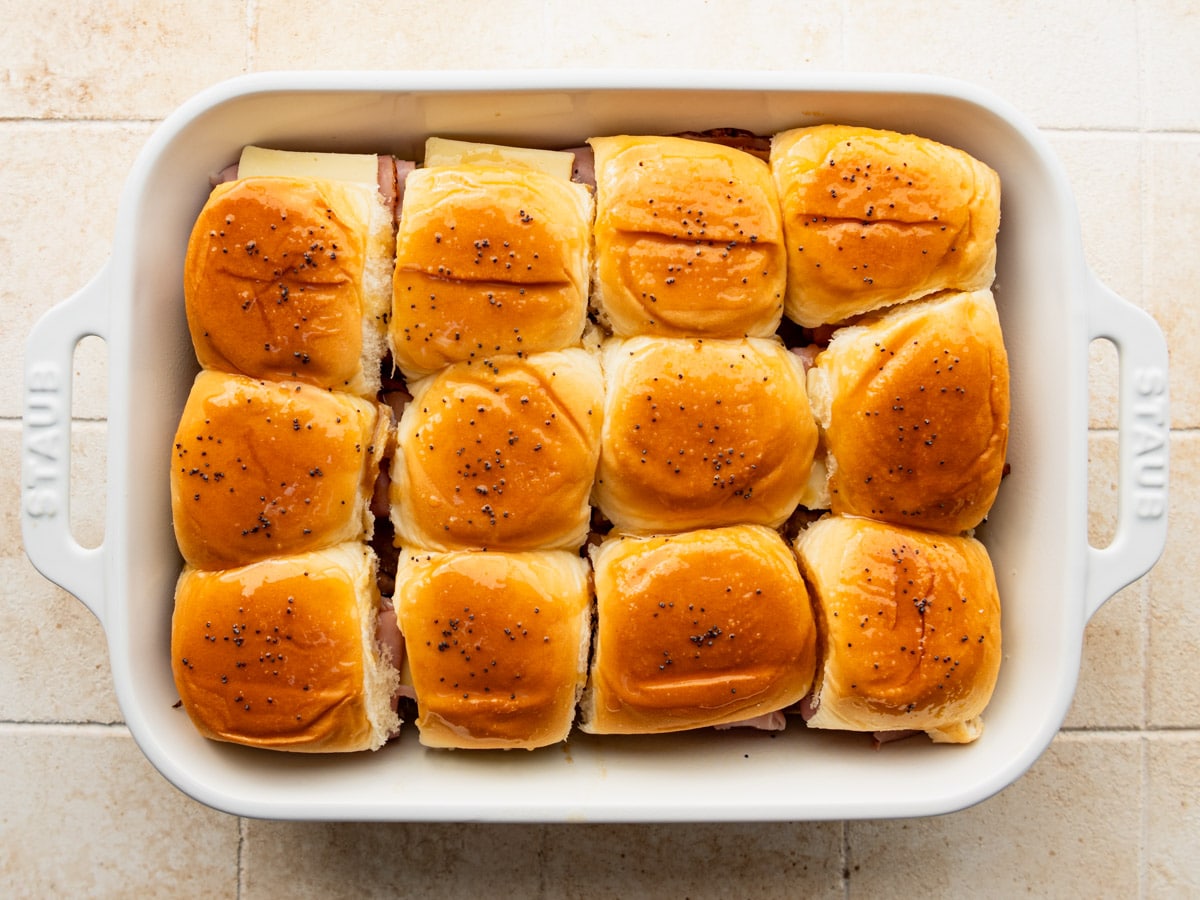
Step 3: Pour and Spread the Sauce
Slowly drizzle the butter sauce over the tops of the rolls, then use a pastry brush to spread it evenly so every roll is coated. Pouring the sauce over the top allows it to seep down between the rolls as they bake, flavoring the sandwiches without making the bottoms greasy.
If you like, sprinkle poppy seeds or sesame seeds over the top for a classic finishing touch.
Step 4: Cover and Bake
Cover the dish tightly with foil. You can bake the sliders right away, or cover and refrigerate them for later. When ready to bake, let refrigerated sliders sit at room temperature for about an hour so they heat evenly.
Preheat the oven to 350°F and bake the sliders covered for about 25 minutes. Keeping them covered at first helps the cheese melt and warms everything through.
Step 5: Uncover and Finish Baking
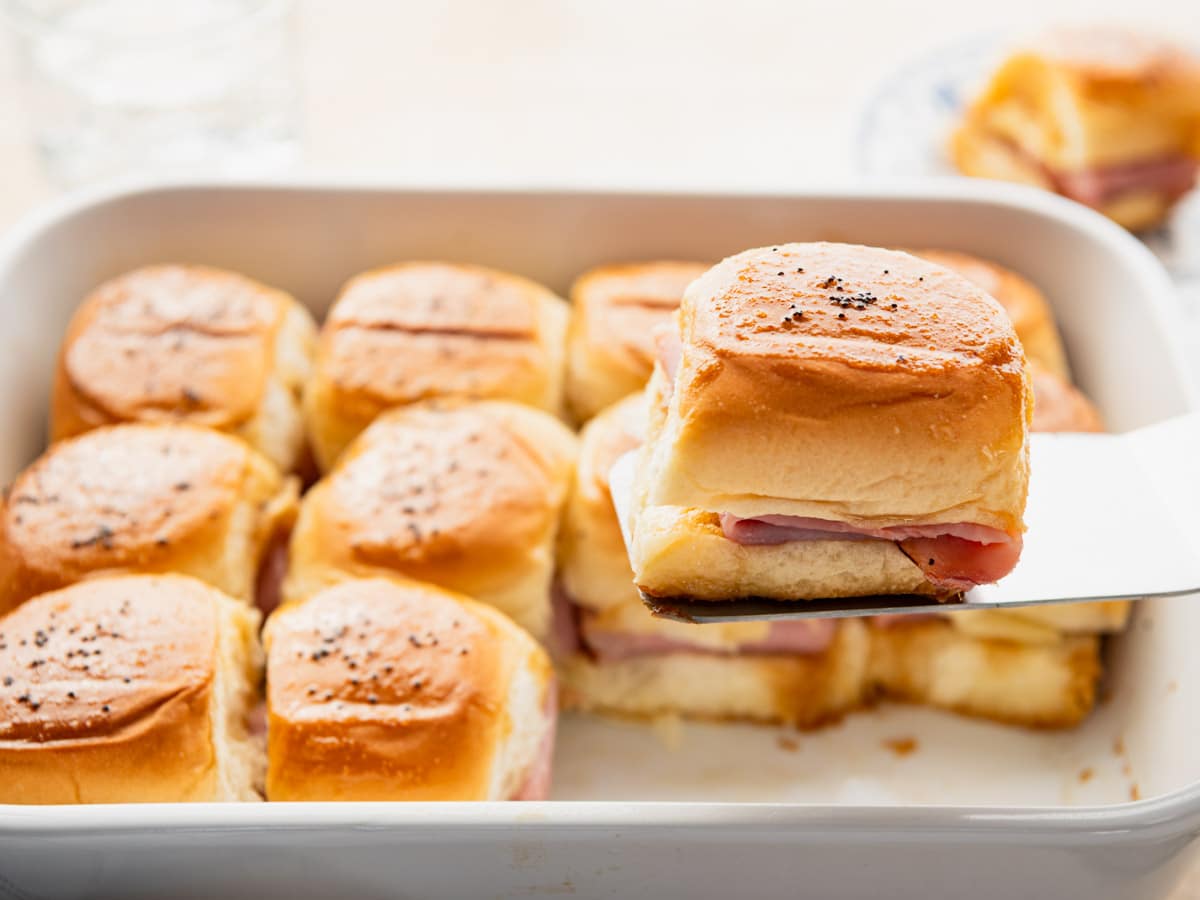
Remove the foil and continue baking for another 5 to 10 minutes, just until the tops of the rolls are lightly browned. Keep an eye on them during this step, since the brown sugar can cause the tops to brown quickly.
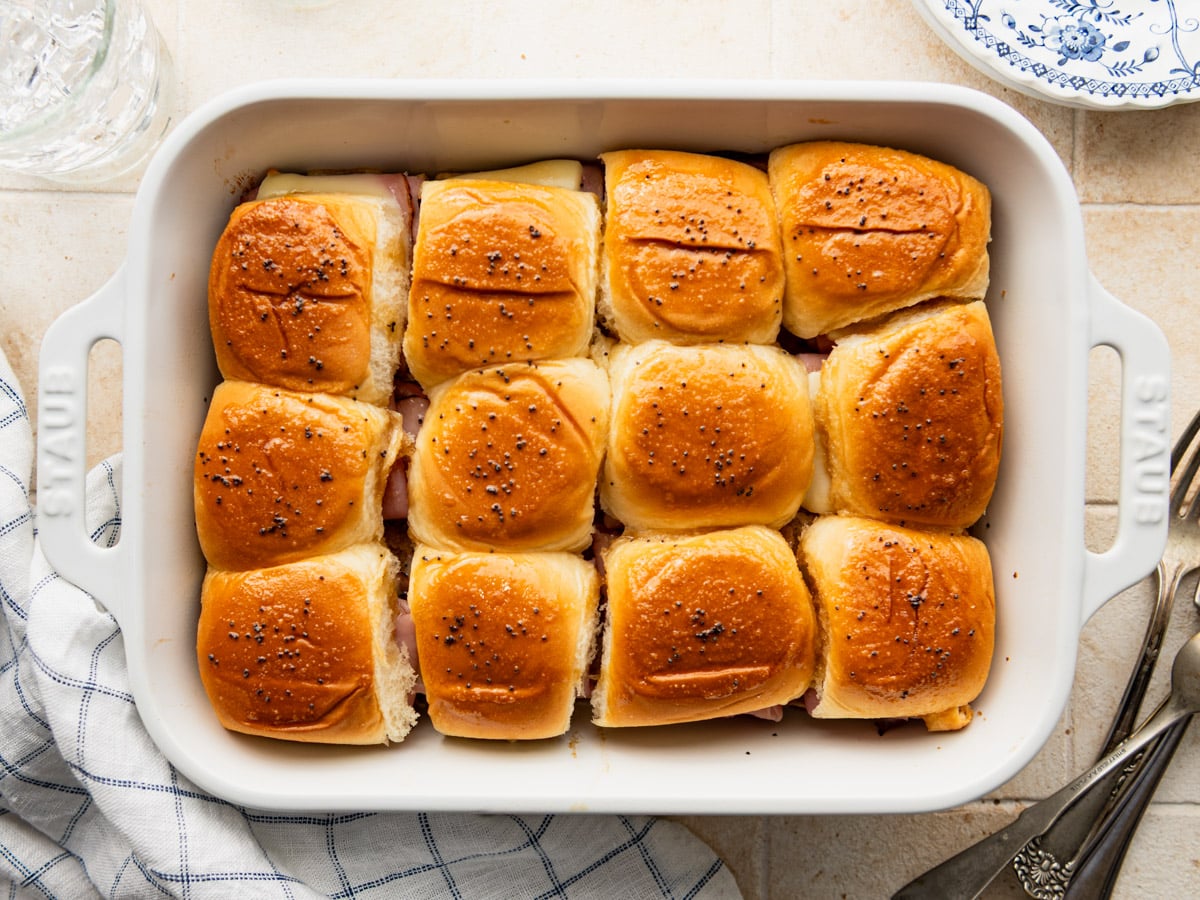
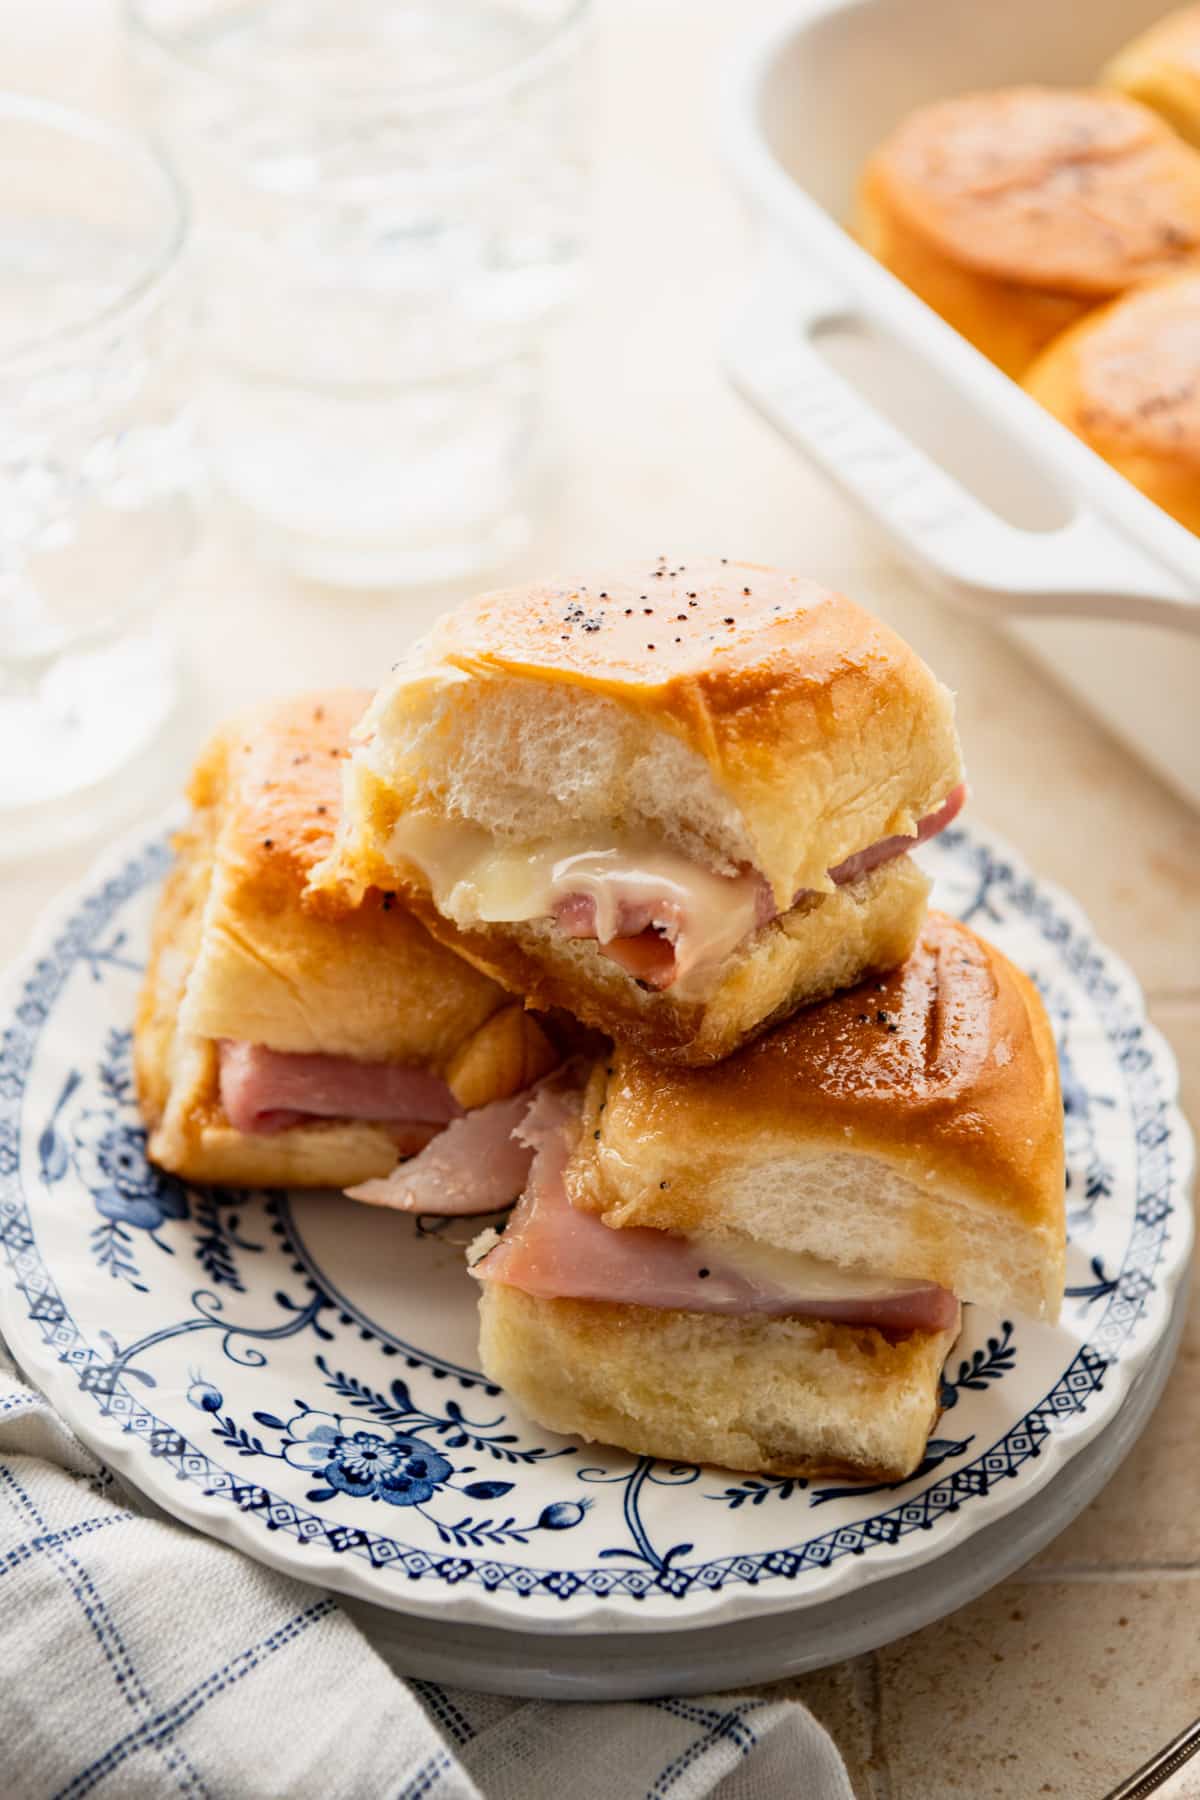
Step 6: Rest and Serve
Let the sliders rest for a few minutes before cutting and serving. This brief rest helps the cheese set slightly and keeps the sandwiches from sliding apart when you lift them from the pan.
Variations and Customizations
These sliders are easy to customize based on what you have on hand or your family’s preferences:
- Skip the poppy seeds and sesame seeds if you don’t have them or don’t care for them. The sliders taste great without them.
- Try different cheeses. Swiss, cheddar, American, or provolone all melt beautifully.
- Swap the meat. Turkey, roast beef, or chicken work well. You can even add a slice of bacon for extra flavor.
- Try different rolls. Potato slider buns or plain dinner rolls also work well.
Serving Ideas
For a weeknight dinner, pair these sliders with an easy potato salad, Southern macaroni salad, or potato chips.
If you’re serving them as part of a party or game day spread, here are some favorites that go well with the sliders:
Storage and Make-Ahead Tips
Make Ahead: Assemble the sliders, cover tightly, and refrigerate for up to 24 hours before baking. This makes them perfect for prepping the night before a party or busy day.
Freeze for Later: Assembled (unbaked) sliders can be wrapped tightly and frozen for up to 3 months. Bake directly from frozen, adding 5-10 minutes to the baking time to ensure the cheese fully melts.
Store Leftovers: Keep baked sliders in an airtight container in the refrigerator for 3-4 days.
Reheat: Cover with foil and warm in a 350°F oven for 5-10 minutes, or microwave individual sliders for 30-60 seconds.
Keep Warm at a Party: Cover the pan with foil to trap heat and moisture. You can also wrap sliders individually in foil and keep them in a slow cooker on the “warm” setting for a few hours.
Frequently Asked Questions
What kind of cheese is best for ham and cheese sliders?
Swiss, cheddar, and American are all great choices. Swiss has a classic flavor that pairs well with ham, while cheddar adds a sharper taste. Use whatever your family prefers or what you have on hand.
How do I keep ham and cheese sliders from getting soggy?
Pour the butter mixture over the tops of the rolls and spread with a pastry brush so that it doesn’t just pool at the bottom. This keeps all the flavor without the soggy bottom.
How many sliders should I make per person?
Plan on 2-3 sliders per person for a main dish, or 1-2 per person if you’re serving them as part of a larger appetizer spread.
Can I make these in an air fryer?
Yes, but you’ll need to work in batches. Air fry at 350°F for 5-7 minutes, checking to make sure the tops don’t brown too quickly.
More Slider and Sandwich Recipes

Did you make this recipe?
If you enjoyed this recipe, please leave a comment with a 5-star review at the bottom of the post. Thank you!

Hawaiian Roll Ham Sliders
Equipment
- 11 x 7 baking dish
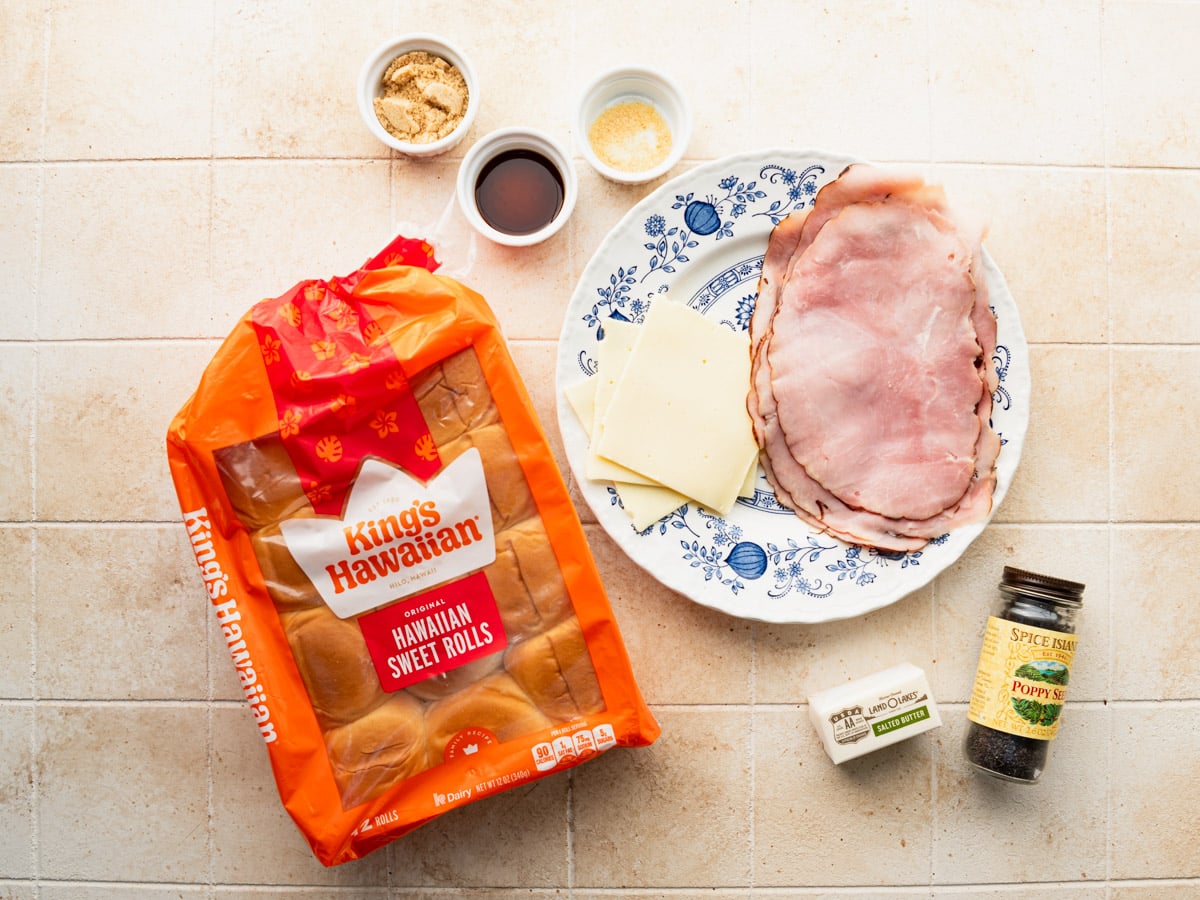
Ingredients
- 1 (12 ounce) pkg. King’s Hawaiian sweet rolls, halved horizontally
- 8 ounces thinly sliced country ham or deli ham of choice
- 3 slices Swiss cheese, Provolone cheese, American cheese, or sharp cheddar cheese, cut into fourths
- 4 tablespoons salted butter, melted
- 1 tablespoon packed light brown sugar
- ¾ teaspoon Worcestershire sauce
- ⅛ teaspoon garlic powder
- ⅛ teaspoon onion powder
- Optional garnish: poppy seeds and sesame seeds
Instructions
- Lightly grease an 11 x 7-inch baking dish with nonstick cooking spray.
- Top the bottom of each roll with a slice of ham (folded as necessary to fit on the slider bun) and a square of cheese.

- Add the tops of the rolls to close the sandwiches. Arrange them in the prepared baking dish.
- In a small bowl or glass measuring cup, whisk together the melted butter, brown sugar, Worcestershire sauce, garlic powder, and onion powder until the sugar dissolves and the mixture is completely combined.
- Drizzle the sauce over the rolls, using a pastry brush to make sure that the top of each roll is nicely coated with the butter mixture. Sprinkle with poppy seeds or sesame seeds if desired. Cover with foil.
- Bake the sliders right away, or cover and refrigerate for up to 8 hours.
- When ready to bake, allow the sliders to sit on the counter and come to room temperature for about an hour (if they’ve been chilled in the fridge). Preheat the oven to 350°F.
- Bake the sliders covered for 25 minutes. Remove the foil cover and continue baking until the tops of the rolls are lightly browned, about 5-10 more minutes.


Notes
- Make ahead: Assemble, cover tightly, and refrigerate up to 24 hours before baking.
- Freeze for later: Wrap assembled (unbaked) sliders tightly and freeze up to 3 months. Bake from frozen, adding 5-10 minutes to baking time.
- Reheat leftovers: Cover with foil and bake at 350°F for 5-10 minutes, or microwave 30-60 seconds.
- Swap the cheese: Swiss, cheddar, American, or provolone all work well.
- Swap the meat: sliced turkey, roast beef, or rotisserie chicken are great here too.
- Try mustard: Add yellow mustard or Dijon to the sandwiches for a zestier flavor.
- Poppy seeds or sesame seeds are optional: The sliders taste great without them.
Nutrition
Originally published in September, 2018, this post was updated in December, 2025.


How could you go wrong with a stick of butter! My family will love this!
Exactly! It’s bound to be good! 🙂
I love this idea freezing for later. It’s perfect for people like me – as we always have left over rolls. Instead of letting the buns go stale, I will make a filling for the leftover buns and freeze for later.
Thanks, Harriet! That’s exactly right! It’s perfect for leftover rolls, and you can just assemble however many rolls you have at a time. It doesn’t have to be a full dozen. 🙂
Such a good meal! My girls ask me to make this all the time! I make two batches and the husband takes them to work for lunch!
Thank you, Ashley!!! 🙂
I’ve made these several times now and they’re always a big hit!
Awesome! Thanks, Joelle!
Made them tonight…delicious….my family really enjoyed
Is there a breakfast version?
Hi, Melissa! No, not specifically — but I think you could definitely add scrambled eggs to the sandwiches and enjoy them for breakfast or brunch. Let me know if you give it a shot! 🙂
Hi, I was wondering if you can make these ahead & stick in the fridge & then heat in the morning? Will the bun get soggy?
Absolutely! The buns won’t get too soggy, and they kind of crisp up in the pan when they bake. Enjoy!
I made these before but I’ve never frozen… Do you recommend letting them in the fridge before putting them in the oven?
Hi, Heather! You can do it either way — thaw in the fridge overnight or bake directly from the freezer. If you bake them while they’re still frozen, you’ll need to add some time to the total baking. It will probably take closer to 25-30 minutes for them to heat through. Enjoy!
Thank you for sharing this yummy recipe….absolutely delicious! My beautiful Mom, who has passed away, loved to make these! They were the hit of a July 4th party we attended each year! My Mom only made one change….she starting using country ham sliced very thin. It means the world to me to have this recipe again! Thank you for the cherished memories!
Laurie
That’s great, Laurie! I bet the country ham is great, too. It would add a nice, salty touch! 🙂
Can these be individually wrapped in foil and placed in a slow cooker to warm up, instead of using an oven?
Hi, Jennifer! That’s a great idea. I think it should work fine! 🙂
Fantastic dinner idea. Made 2 days ahead and kept covered in fridge with damp tea towel and foil. Then took away the tea towel and heated – so easy. After a busy day when we were late from work/school such an easy dinner and we were fighting for leftovers. Will become a go-to recipe for away days when we get home late and hope to try with all the other fillings you suggest.
Thank you, Ali! I’m so happy to hear that!
The spread for the inside of these sliders is the real innovation. What a lot of great flavor! I used ham off the bone from the deli, and Swiss cheese sandwich slices—1/2 slice per slider. Aunt Millie’s Hawaiian rolls were what my store had, which I sliced with a bread knife. I didn’t grease the pan, and it was fine. I could only fit 8 sliders in a 9×13 pan, so you might want to grab an aluminum pan from the dollar store before making these. This recipe is a keeper.
Thank you for the feedback, Cindy! We’re so glad you enjoyed the recipe.