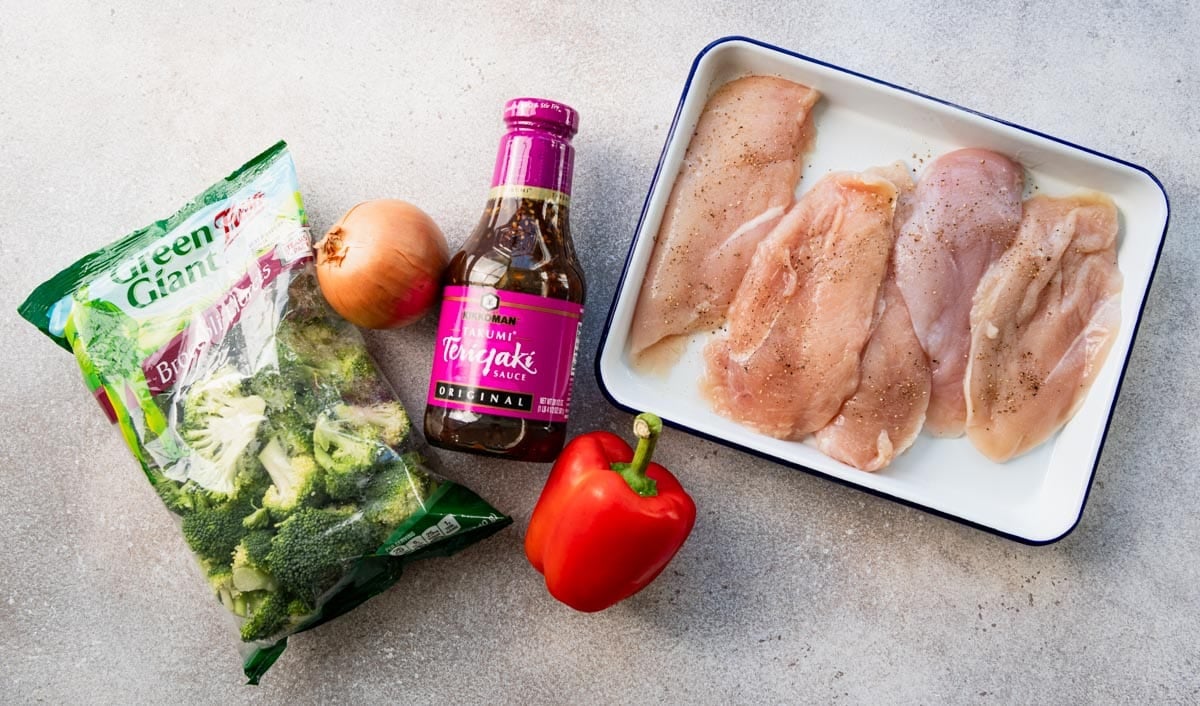
With just 5 minutes of prep and only 5 ingredients, this baked teriyaki chicken with broccoli, peppers, and onions is an easy, family-friendly dinner for busy nights. Tender, juicy chicken bakes in a rich, sweet-and-savory sauce for a meal that tastes like you spent hours in the kitchen.
For more easy Asian-inspired dinners, try this 10-minute beef teriyaki skillet, Instant Pot brown sugar chicken, aloha chicken and rice, or moo shu pork.
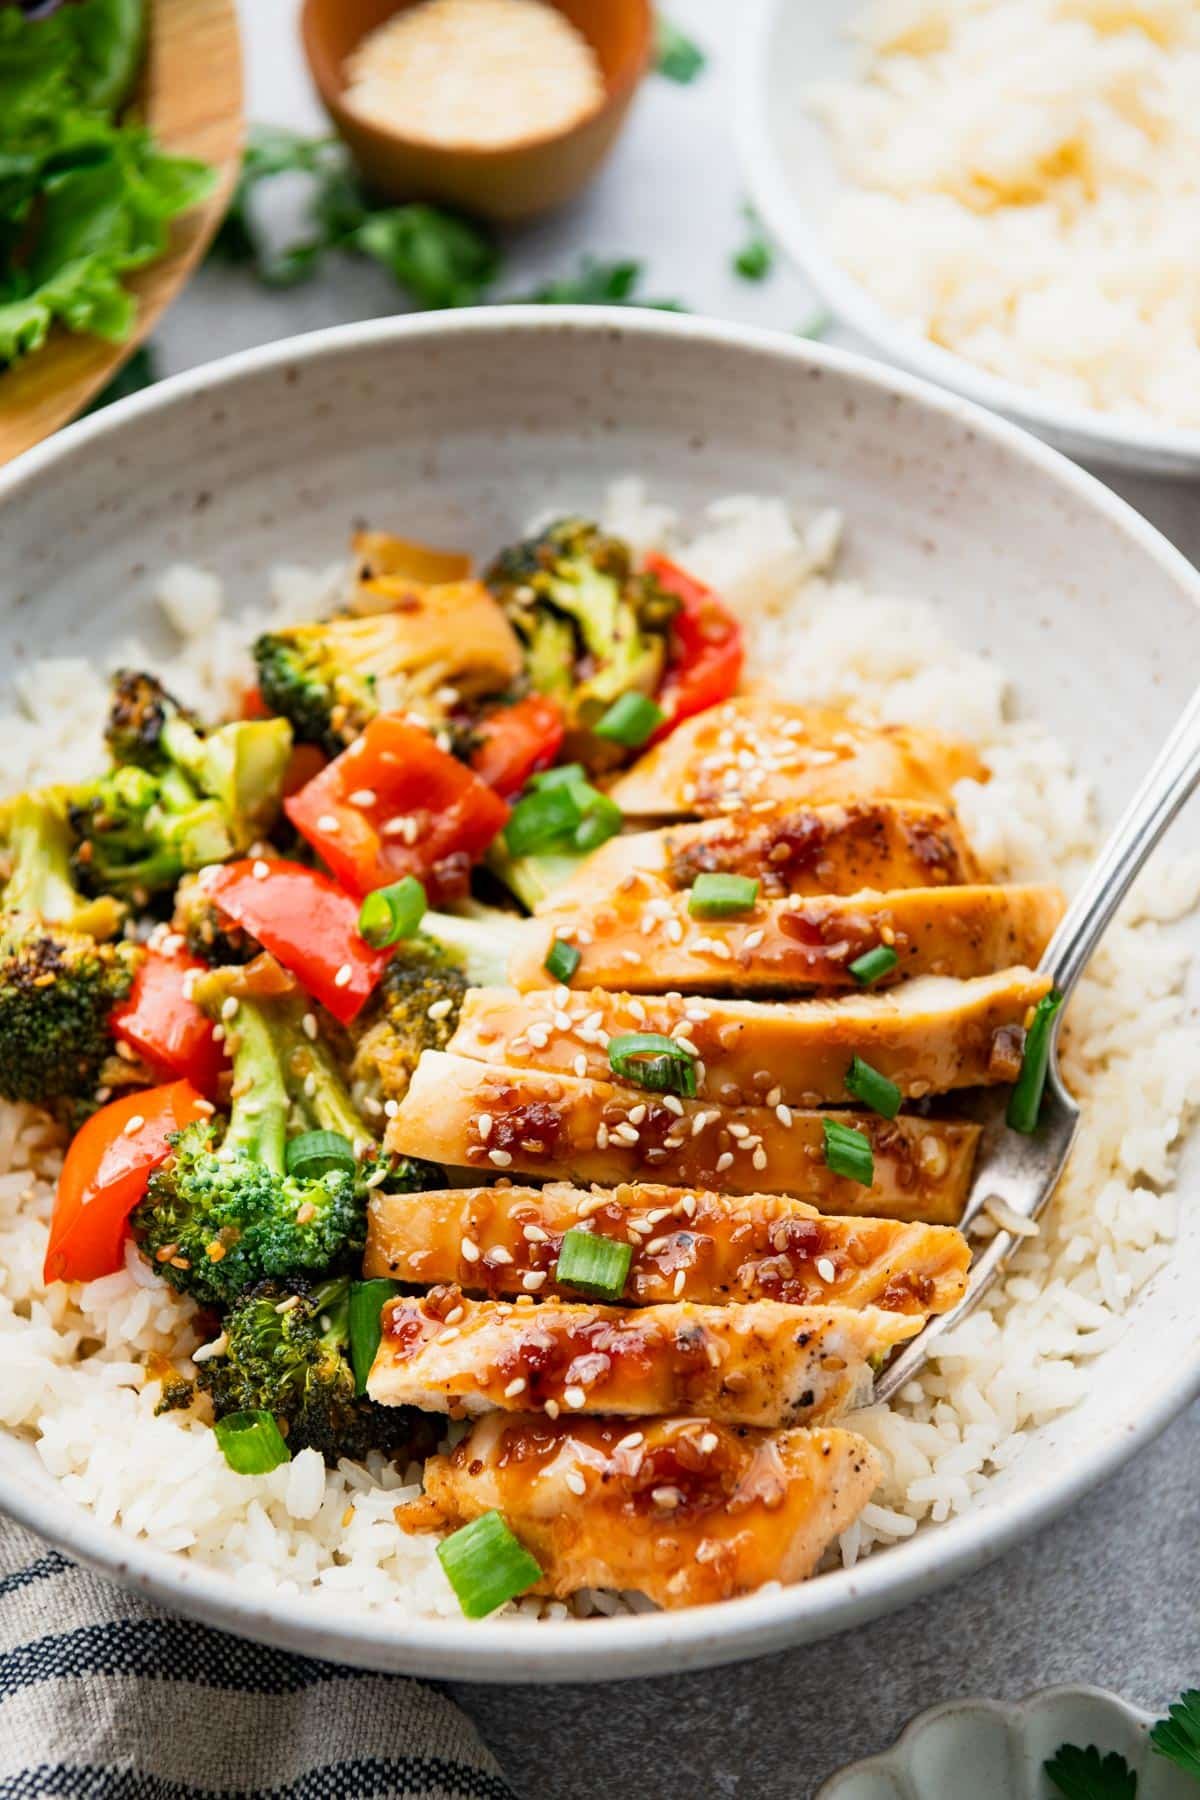
Table of Contents
Why You’ll Love This Recipe
- Minimal prep. Everything goes into one dish and the oven does the work. No browning, searing, or stovetop sauces to worry about.
- Just 5 ingredients. Chicken, vegetables, and a bottle of teriyaki sauce make a complete dinner without a long grocery list.
- Family-approved. The sweet and savory sauce wins over even picky eaters.
Before You Get Started
A few tips to make sure this dish turns out perfectly:
Use a thick teriyaki sauce. Look for a rich, syrupy sauce like Soy Vay Veri Veri Teriyaki or Kikkoman Takumi Teriyaki. Thin, watery sauces (with a texture like soy sauce) won’t coat the chicken properly and will make the dish too runny.
Start with small chicken breasts. This recipe is designed for chicken breasts around 5 ounces each. If yours are larger, cut them into smaller cutlets so they cook evenly and stay juicy. You can also use boneless, skinless chicken thighs if you prefer dark meat.
Cover the dish for the first half of baking. This traps moisture and prevents the sauce from burning before the chicken cooks through. You’ll remove the foil halfway through to let everything caramelize and the sauce thicken.
A Note on Teriyaki Sauce
Store-bought is the easiest option and works beautifully in this recipe. Just make sure it’s thick and syrupy, not thin like soy sauce.
Homemade works great too. Whisk together soy sauce, brown sugar, garlic, ginger, and a little cornstarch to thicken. Use about 1¼ cups in place of the bottled sauce.
Either way, the key is a sauce thick enough to glaze the chicken rather than pool at the bottom.
How to Make Baked Teriyaki Chicken
This recipe comes together quickly with almost no hands-on work. Here’s how to do it:
Step 1: Prep the Vegetables
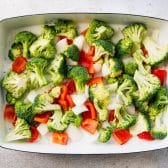
Place the broccoli florets, chopped bell pepper, and onion in the bottom of a 9×13-inch baking dish. Drizzle with about a tablespoon of olive oil and season lightly with salt and pepper.
Toss everything to coat.
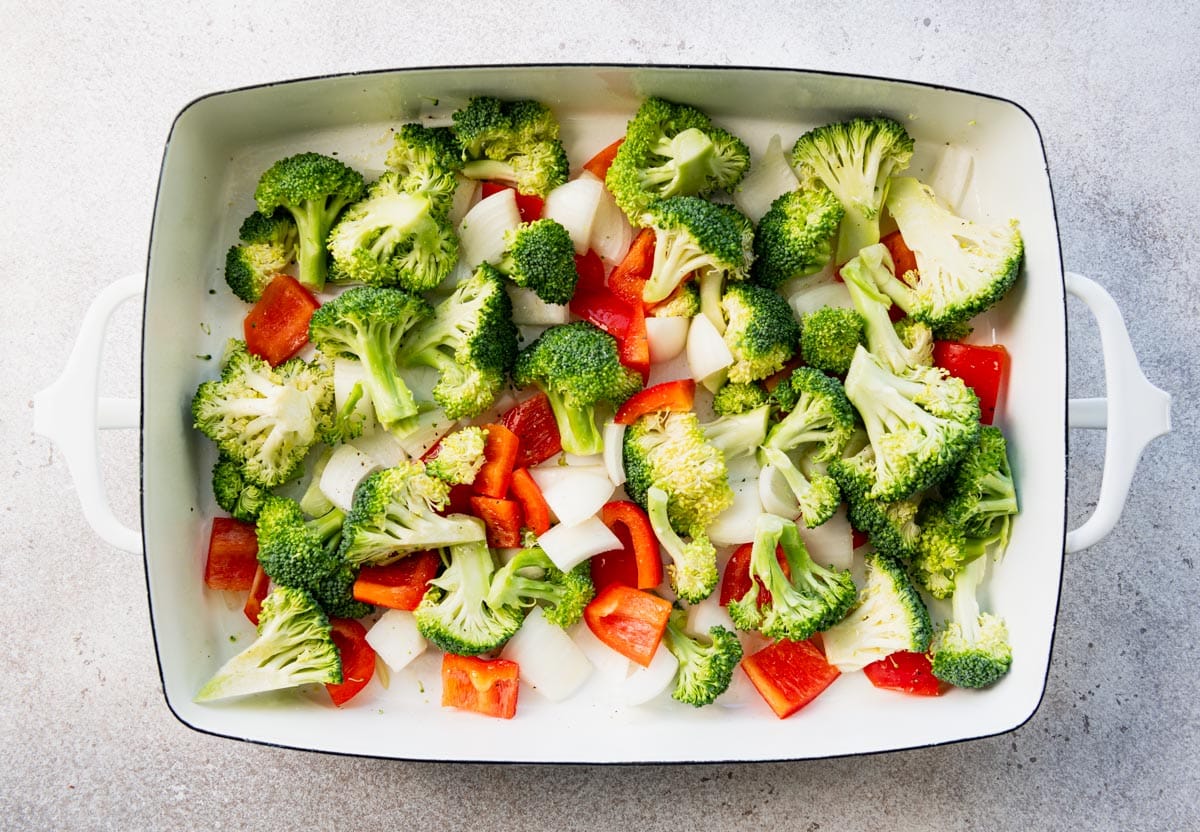
** Shortcut Option: To make things easier, look for pre-chopped vegetables in the produce section. Many grocery stores sell broccoli florets and diced peppers ready to go, or you can grab them from the salad bar.
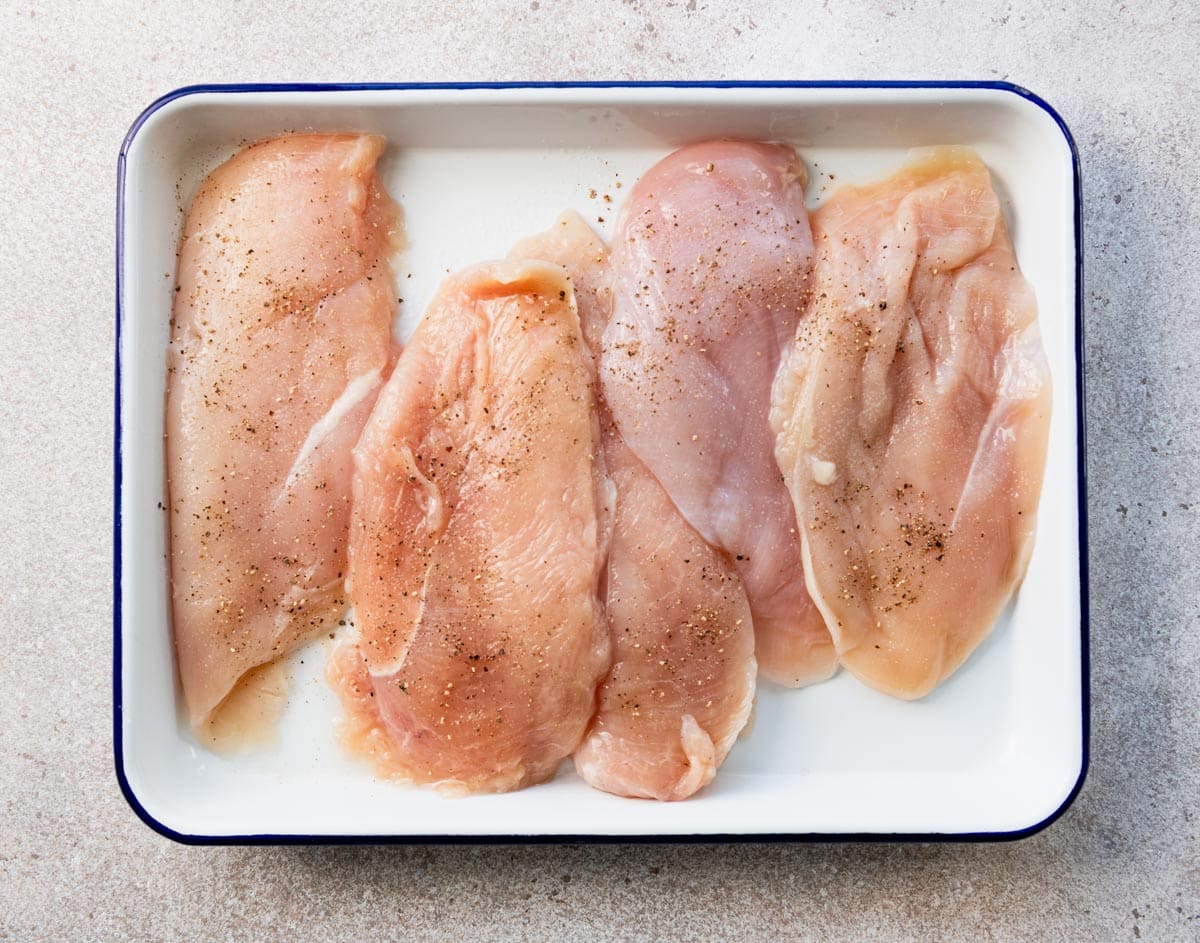
Step 2: Season and Arrange the Chicken
Season the chicken breasts with a little salt and pepper on both sides. Don’t go too heavy on the salt since the teriyaki sauce is already well-seasoned.
Nestle the chicken on top of the vegetables.
Step 3: Add the Sauce and Bake
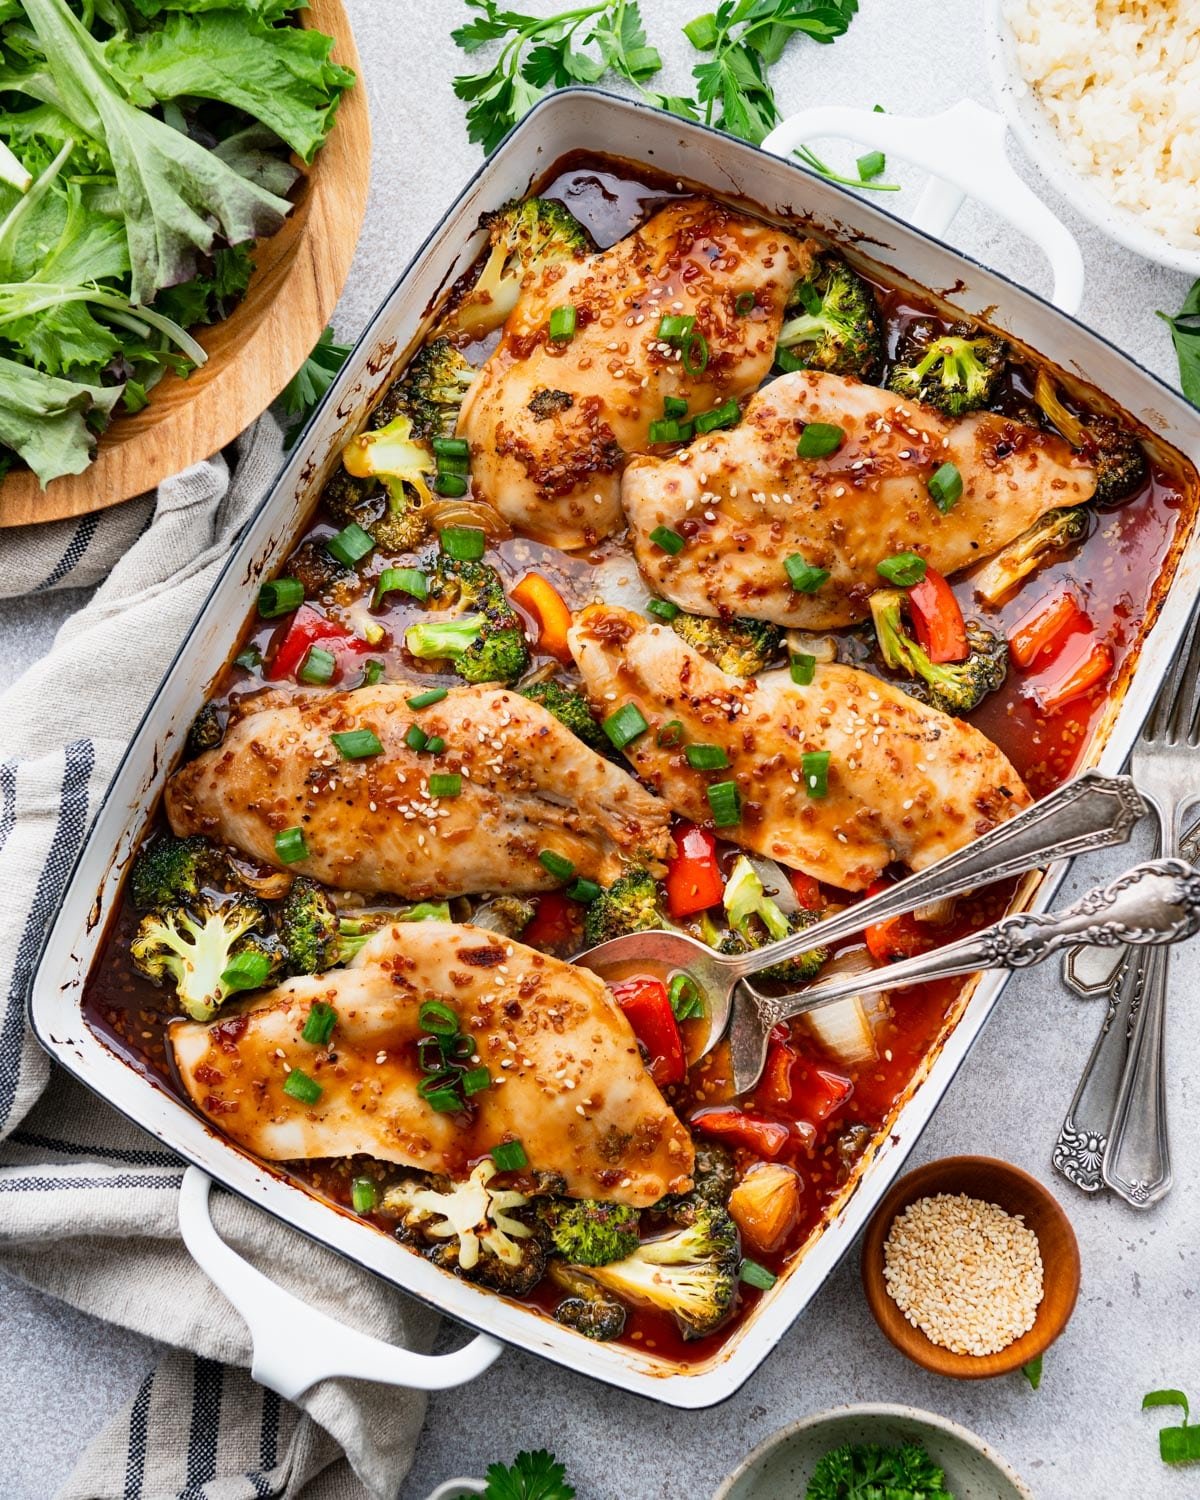
Pour the teriyaki sauce over the chicken and vegetables, then gently toss or spoon the sauce around to coat everything.
Cover the dish tightly with aluminum foil and bake at 425°F for 15 minutes. This higher temperature helps the sauce simmer and thicken while keeping the chicken moist.

Step 4: Finish Uncovered
Remove the foil, gently stir the vegetables, and return the dish to the oven uncovered for another 10 to 15 minutes. The chicken is done when a meat thermometer inserted into the thickest part reads 165°F.
Tip: If you want a more charred, caramelized finish on the chicken, transfer the dish to the broiler for 1 to 2 minutes at the very end. Keep a close eye on it since the sugary sauce can burn quickly.
Step 5: Garnish and Serve
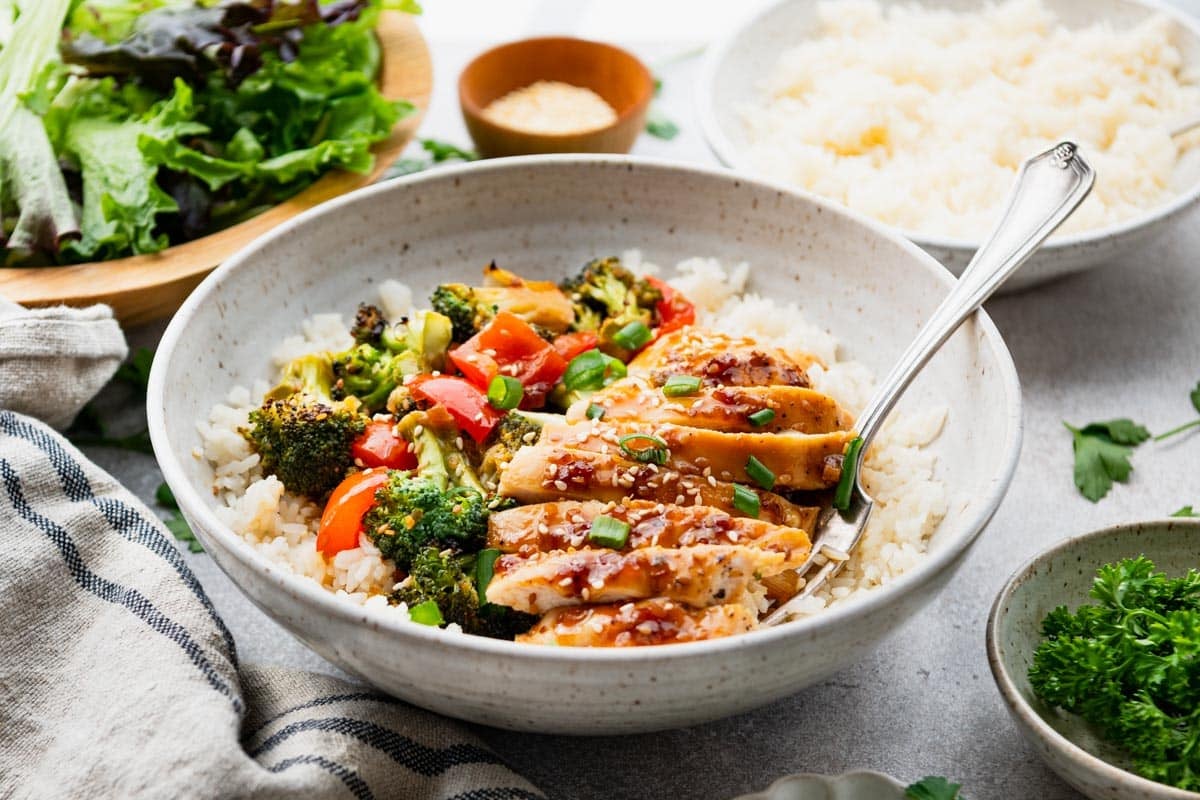
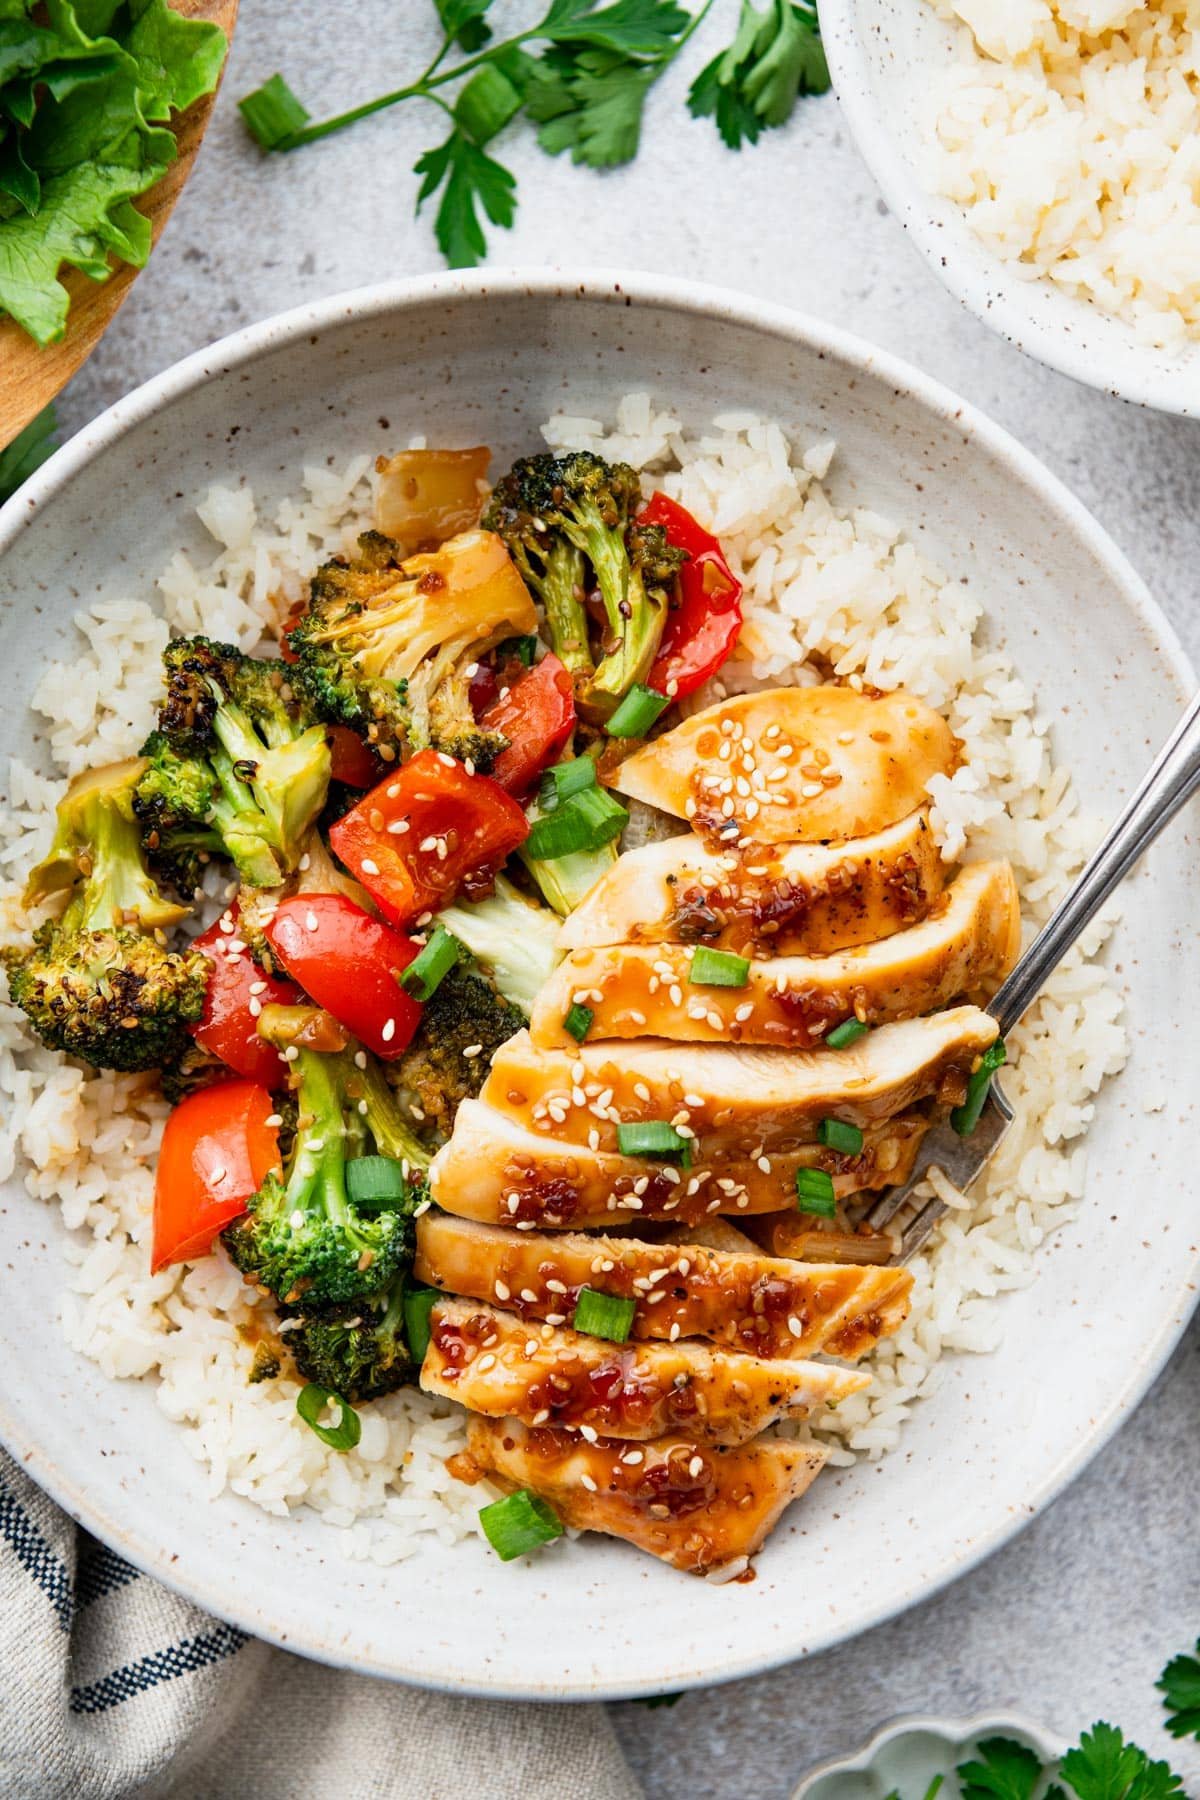
Top with sliced green onions and toasted sesame seeds for a pop of color and flavor.
Serve over rice and enjoy!
Recipe Variations
- Use chicken thighs instead of breasts for richer flavor and more forgiving cook times.
- Double the recipe on a large rimmed baking sheet to feed a bigger crowd.
- Add more flavor with fresh minced garlic or grated ginger mixed into the sauce.
- Make it tropical by stirring a splash of pineapple juice into the sauce or adding drained pineapple chunks at the end.
Serving Suggestions
This baked teriyaki chicken is a complete meal on its own, but it’s even better served over a bed of sticky white rice or cauliflower rice for a lighter option.
For sides, try pairing it with:
- Ramen noodle salad for a crunchy, tangy contrast
- Sesame ginger snap pea salad for something fresh and bright
- Baked store-bought egg rolls for a fun appetizer
- Simple steamed edamame or a cucumber salad
Don’t forget fortune cookies for a sweet finish!
Storage and Make-Ahead Tips
Make it ahead: Assemble the dish up to 24 hours in advance and keep it covered in the fridge. When ready to bake, let it sit on the counter for 30 to 60 minutes to take the chill off. You may need to add a few extra minutes to the baking time if the dish is still cold.
Store leftovers in an airtight container in the refrigerator for 3 to 4 days. Reheat gently in the microwave or in a covered dish in the oven at 350°F until warmed through.
Freeze the chicken (without vegetables) for up to 3 months. The vegetables tend to get mushy when frozen and thawed, so it’s best to enjoy those fresh or make a new batch of veggies when reheating.
Frequently Asked Questions
Does teriyaki sauce go on before or after cooking the chicken?
For this recipe, the teriyaki sauce goes into the dish before baking. It essentially marinates and glazes the chicken as it cooks, infusing everything with flavor.
What temperature should I bake teriyaki chicken at?
Bake at 425°F. This higher temperature cooks the dish faster and helps the sauce reduce and thicken, especially once the foil comes off.
How do I know when the chicken is done?
Use a meat thermometer to check that the internal temperature reaches 165°F in the thickest part of the chicken breast. This ensures the chicken is fully cooked and safe to eat.
Can I use bottled teriyaki sauce or do I need to make my own?
Bottled sauce works great and keeps this recipe super simple. Just make sure you choose a thick, rich sauce rather than a thin one. If you prefer homemade, you can substitute about 1¼ cups of your own teriyaki sauce.
Can I use chicken thighs instead of chicken breasts?
Absolutely. Boneless, skinless chicken thighs work well here. They’re a bit more forgiving and stay moist even if slightly overcooked. You may need to add 5 to 10 minutes to the baking time depending on thickness.
My second time making this, the first time was with no veggies, but I have them this time. Grandkids love the chicken teriyaki, and I love how easy it is! Will be made here often! Thanks!
– Lois C.
More Easy Chicken Dinners to Try
- Buffalo Chicken Pasta Bake
- Baked Chicken Tzatziki with Rice
- Healthy General Tso Chicken
- Baked Sweet and Sour Chicken
- Sesame Chicken Noodles
Want more dinners with minimal prep? You’ll find plenty of ideas in my Dump-and-Bake Recipes hub.

Did you make this recipe?
If you enjoyed this recipe, please leave a comment with a 5-star review at the bottom of the post. Thank you!

Baked Teriyaki Chicken
Ingredients
- 4-6 small boneless skinless chicken breasts (about 5 ounces each), or boneless skinless chicken thighs
- 1 ¼ cups thick teriyaki sauce (such as Soy Vay Veri Veri Teriyaki or Kikkoman Takumi Teriyaki)
- 12 ounce package fresh broccoli florets (about 5 cups)
- 1 medium red bell pepper, seeded and chopped
- 1 small yellow onion, chopped (about 1 cup)
- Kosher salt and ground black pepper, to taste
- 1 tablespoon olive oil
- Optional for serving: cooked rice, sliced green onions, toasted sesame seeds
Instructions
- Preheat oven to 425°F (220°C). Spray a 9×13-inch baking dish with nonstick cooking spray.
- Season the chicken lightly with salt and pepper on both sides. Set aside.

- Place the broccoli, bell pepper, and onion in the prepared dish. Drizzle with olive oil, season lightly with salt and pepper, and toss to coat.
- Arrange the chicken on top of the vegetables. Pour the teriyaki sauce over everything and toss gently to coat.
- Cover the dish tightly with aluminum foil and bake for 15 minutes.
- Remove the foil, gently stir the vegetables, and return the dish to the oven uncovered. Bake for 10 to 15 more minutes, or until a meat thermometer reads 165°F in the center of the chicken.
- For a charred finish, broil for 1 to 2 minutes (watch closely to prevent burning).
- Serve over rice and garnish with green onions and sesame seeds.


Notes
- Chicken size matters. This recipe works best with small chicken breasts (about 5 ounces each). For larger breasts, cut them in half or extend the baking time by 10 to 15 minutes.
- Choose the right sauce. Use a thick, syrupy teriyaki sauce. Thin sauces won’t coat properly and will make the dish watery.
- Cover first, then uncover. Keeping the dish covered for the first 15 minutes prevents burning and keeps the chicken moist. Uncovering allows the sauce to thicken and caramelize.
- Check the temperature. The chicken is done when it reaches 165°F internally.
- Broil for extra char. A minute or two under the broiler adds nice caramelization, but watch closely since the sugary sauce can burn fast.
- Make ahead: Assemble and refrigerate up to 24 hours in advance. Let it come to room temperature before baking.
- Storage: Leftovers keep 3 to 4 days refrigerated. Chicken (without vegetables) freezes well for up to 3 months.
Nutrition
Originally published in March, 2017, this post was updated in January, 2026.


Do you know of a homemade recipe for a teriyaki sauce? I don’t know if my store has the right kind of sauce?
Hi, Marion! This is my homemade teriyaki sauce: https://www.theseasonedmom.com/teriyaki-salmon/
I’m sure you can find a thick teriyaki sauce at your local grocer or Walmart, though. It doesn’t have to be the brands that I mention here — anything similar should be fine.
Very easy recipe and absolutely delicious!
Thanks, Grammy!
Easy & delicious! We’ve had it multiple times now.
Thank you, Shay! We’re so glad you enjoy it.
Hi there-
Can this be assembled and refrigerated overnight the day ahead of baking?
Hi, B! Yes! Here are the prep-ahead instructions:
Assemble the dish up to 24 hours in advance. Keep it covered in the fridge until ready to bake. When ready to bake, allow the dish to sit on the counter and come to room temperature for at least 30-60 minutes. If the dish is still cold when it goes into the oven, you’ll likely need to extend the baking time.