This simple Chicken Kiev recipe is a delicious combination of baked, stuffed chicken breast, garlic butter, and a golden, crunchy coating. You’ll love the bright herbs, the crispy exterior and the tender, juicy meat. It’s a classic, old-fashioned dinner that makes mealtime feel special!

Baked Chicken Kiev
If your regular chicken dinners have become boring and uninspiring, then this easy Chicken Kiev recipe is the perfect way to mix up your routine. You need to allow plenty of time for the butter to chill, but there’s nothing difficult about this process. Just roll up the pounded chicken, coat each roll in a crispy breading, and pop it in the oven. We skip the pan-frying process in favor of a faster, hands-off recipe. Add rice, pasta, or crusty bread for a delicious dinner that the whole family will love!
What is Chicken Kiev?
Chicken Kiev is a dish that typically consists of a chicken fillet that’s pounded flat, rolled around cold butter, coated with eggs and breadcrumbs, and then baked or pan-fried. The origin of the dish is unknown; although many attribute the recipe to Eastern European, Russian or Ukrainian chefs who were influenced by French haute cuisine during the 18th and 19th centuries. Ukrainian oral tradition credits the Continental hotel restaurant in Kiev with the invention of these “Kiev-style cutlets” at the beginning of the 20th century. By the 1940s and 50s, Chicken Kiev had become “a symbol of Russian haute cuisine” and was often served in high-end Soviet restaurants (source).
Modern Convenience Food
By the middle of the 20th century, Chicken Kiev found its way to British and American culture. Most often, “Kiev” took the form of frozen or prepared convenience foods that included a variety of stuffed and breaded chicken cutlets. Today, we’re taking it back to an authentic Chicken Kiev recipe that includes pounded chicken cutlets rolled around chilled garlic and herb butter, dipped in egg and a crispy coating, and then baked to golden perfection. It’s so much better than the frozen version, and it’s worth every bit of effort!
Chicken Kiev vs. Chicken Cordon Bleu
You might be familiar with a similar rolled chicken entrée called Chicken Cordon Bleu. The primary difference between Chicken Cordon Bleu and Chicken Kiev is the filling. Chicken Kiev is stuffed with chilled butter, while Chicken Cordon Bleu is stuffed with ham and cheese. Otherwise, the preparation and ingredients for these two recipes is almost identical.

How to Make Homemade Chicken Kiev
Since this easy Chicken Kiev is baked instead of pan-fried, I opted to coat the chicken rolls in Corn Flakes crumbs rather than plain breadcrumbs. The Corn Flakes have much more flavor and a crunchier texture than breadcrumbs, giving the finished dish a golden, crispy exterior that tastes like it’s been fried! This is the same method that my grandmother used for her Baked Eggplant Parmesan to accomplish that fried taste and texture in an oven-baked entrée.
Ingredients
- Butter
- Chives, parsley and thyme
- Garlic
- Flour
- Eggs
- Dijon mustard
- Corn Flakes crumbs
- Chicken breasts
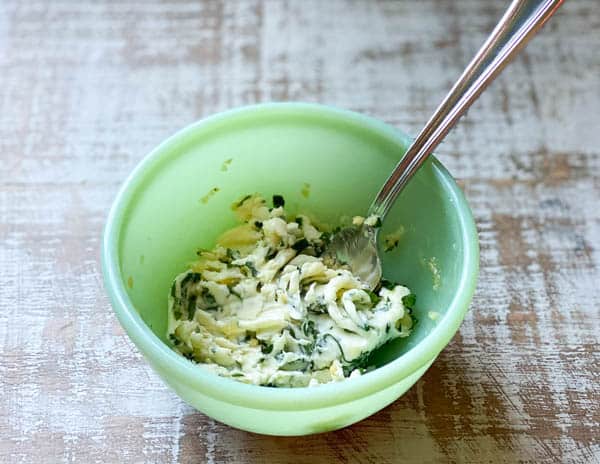
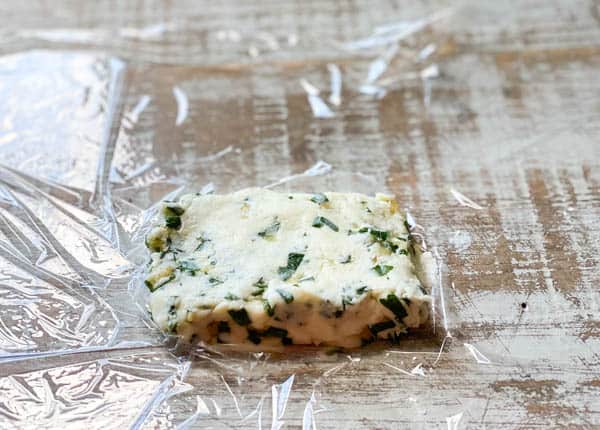
Step 1: Make Garlic and Herb Butter
Stir together softened butter, chives, parsley, thyme and garlic until completely combined.
Shape the butter into a rectangle (I use my fingers for this step), wrap tightly, and freeze or refrigerate until firm.
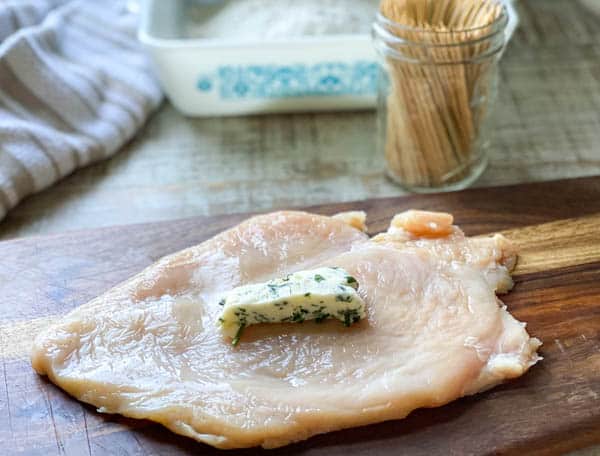
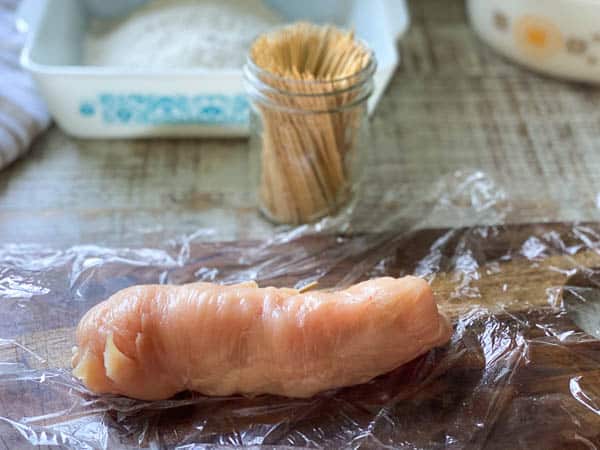
Step 2: Stuff and Roll Chicken
Cut the chilled butter into 4 pieces, and then place a piece of butter in the center of each chicken cutlet.
Starting on one of the long edges, roll the chicken tightly around the butter, tucking in the short sides as you go. Secure the chicken roll with toothpicks.
Step 3: Bread the Chicken
Dredge the chicken rolls in flour, dip in an egg and Dijon mixture, and then roll in the Corn Flakes crumbs to coat. Place on a wire rack on top of a baking sheet.

Step 4: Bake
Bake the chicken in a 425 degree F oven for about 30 minutes, or until the chicken reaches an internal temperature of 165 degrees F. You may need to tent the meat loosely with foil about halfway through the baking time in order to prevent excessive browning on top.

Serving Suggestions
This versatile garlic butter and chive chicken goes well with a variety of sides. Here are a few easy options:
- Mashed Potatoes or Garlic and Parmesan Cauliflower Mash
- Rice or buttered egg noodles
- Potato Pancakes
- Zucchini Fritters
- Roasted Cabbage
- Braised Red Cabbage
- Sauteed Zucchini
- Amish Green Beans with Brown Butter
- Garlic Roasted Broccoli
- Wedge Salad or a simple green salad dressed with Balsamic Vinaigrette
- Creamed Peas
- Sauteed Spinach
- Brown Sugar Roasted Carrots
- Roasted Asparagus
Make Ahead
To prep ahead, you can make the garlic and herb butter mixture at least 3-4 days in advance and keep it chilled in the refrigerator until ready to use. You can also assemble the chicken rolls (before breading) and keep them wrapped tightly in the refrigerator for up to 1 day or in the freezer for up to 2 months. Thaw frozen chicken rolls in the refrigerator overnight. Bread the meat with the flour, egg and Corn Flakes just before baking.
Storage
This dish is best when served warm, immediately from the oven. Leftovers will keep in an airtight container in the refrigerator for 3-4 days, but the chicken will get soggy as it sits. You can also freeze the baked chicken in an airtight container for up to 2 months.
Tips for the Best Chicken Kiev Recipe
- For a shortcut, look for “thin-sliced chicken breasts” or “chicken cutlets” in the meat section at the grocery store. This will save you the step of pounding your chicken flat.
- Fresh herbs are always best, but you can substitute with a smaller amount of dried herbs in a pinch. I’ve included those suggested measurements in the recipe below.
- Corn Flakes are the best option for baked Chicken Kiev. You can substitute with panko breadcrumbs, but they are definitely not as crispy and they’re lacking the flavor that you get from the crushed cereal.
- Line your baking sheet with foil. Some of the butter may drip out of the chicken as it cooks, so the foil lining makes clean-up quick and easy!
- Place the chicken on a wire rack on top of the baking sheet. This helps the meat get crispy on all sides, and prevents the bottom from becoming soggy.
- To avoid excessive browning on top, tent the chicken loosely with foil about halfway through the baking time.

More Baked Chicken Recipes To Try

Did you make this recipe?
If you enjoyed this recipe, please leave a comment with a 5-star review at the bottom of the post. Thank you!

Chicken Kiev
Ingredients
- ¼ cup salted butter, softened at room temperature
- 1 tablespoon minced fresh chives (or 1 teaspoon dried chives)
- 1 tablespoon minced fresh parsley (or 1 teaspoon dried parsley flakes)
- 1 teaspoon minced fresh thyme leaves (or ¼ teaspoon dried thyme)
- 1 clove garlic, minced
- 1 cup all-purpose flour
- 4 large eggs
- 1 tablespoon Dijon mustard
- 1 cup Corn Flakes crumbs
- 4 boneless, skinless chicken breasts, pounded to an even ¼-inch thickness (about 2 lbs. total)
- Salt and pepper, to taste
Instructions
- In a small bowl, stir together butter chives, parsley, thyme and garlic until completely combined. Transfer to a large piece of plastic wrap and shape into a 3-inch by 2-inch rectangle. Wrap tightly and freeze until firm, about 30 minutes.
- Preheat oven to 425 degrees F. Place a wire rack on top of a rimmed baking sheet and spritz with cooking spray. Set aside.
- Place flour in a small shallow dish. Whisk the eggs and Dijon mustard in a separate shallow dish. Place the Corn Flakes crumbs in a third dish.
- Cut the chilled butter into 4 rectangular pieces. Place one piece of butter in the middle of each piece of chicken. Starting at a long side, tightly roll up the chicken, tucking in the short sides as you roll. Secure with toothpicks.
- Season the chicken with salt and pepper. One at a time, dredge the chicken rolls in the flour, then dip in the egg mixture and roll in the Corn Flakes crumbs.
- Place chicken rolls on the wire rack. Bake, uncovered, for 30-35 minutes, or until the internal temperature of the chicken reaches 165 degrees F. Tent loosely with foil about halfway through the cooking time if the outside of the chicken starts to get too dark. Remove toothpicks and serve.


This recipe sounds amazing. Do you think I could also put an asparagus spear in with it?
Hi, Janet! Yes, I do! I think that would be great. If your asparagus is relatively thick, I would steam it in the microwave or boil it first to soften it a bit, because it probably won’t get completely cooked through in the oven when wrapped in the chicken. Enjoy!