This chocolate icebox cake is one of those old-fashioned desserts that feels like a little bit of magic. You stack crisp chocolate wafers with fresh whipped cream, tuck it in the fridge overnight, and the cookies quietly soften into a cool, sliceable cake. Just 5 ingredients, no oven, and it always disappears first at a summer cookout!
More icebox cakes:

What Is an Old-Fashioned Icebox Cake? It’s a no-bake dessert made by layering whipped cream and chocolate wafers, then chilling it until the cookies soften into cake. The recipe goes back to the 1920s, when Nabisco started printing it on the back of their chocolate wafer boxes, and it has been a nostalgic favorite ever since.
It is cool, creamy, and rich with chocolate, with none of the fuss of a layer cake.
Before You Get Started
Get these few things right and you will end up with clean, sliceable layers instead of a soupy mess.
- Whip the cream until stiff. Keep the cream and your bowl cold, then beat just until the peaks stand up. That is what holds your layers in place.
- Choose your cookies first. Chocolate wafers give you the classic sliced log, while chocolate graham crackers make an easy layered dish. You really cannot go wrong either way.
- Chill it overnight. This is where the magic happens, so try not to rush it. The cookies need time to soften into that dreamy, cake-like texture. Four hours is the minimum.
How to Make Chocolate Icebox Cake
You have two ways to go here. Chocolate wafers give you that traditional sliced-log look, and chocolate graham crackers make a simple layered dish.
I am walking you through the wafer version below, but you will find both methods in the recipe card.
Step 1: Whip the Cream
Grab a large chilled bowl and beat the heavy cream, powdered sugar, vanilla, and salt with an electric mixer until you get stiff peaks.
→ Chill the Bowl and Beaters: Cold cream whips up faster and holds its shape better, so I always chill the bowl and beaters for 15 to 30 minutes first.
Stop as soon as the peaks stand up on their own, because over-whipping will turn your cream grainy.

Step 2: Anchor the Base
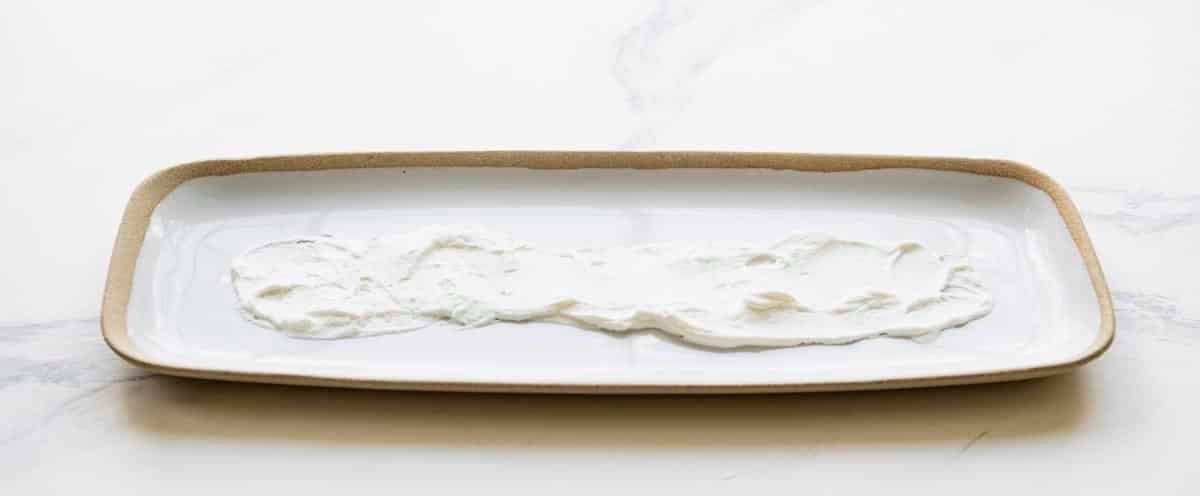
Spread a thin stripe of whipped cream down the middle of a long serving platter. This little trick holds the cookies in place so nothing slides around on you while you build.
Step 3: Stack the Cookies
Spread about a tablespoon of whipped cream on a chocolate wafer, top it with another, and keep going until you have a stack of about 5.
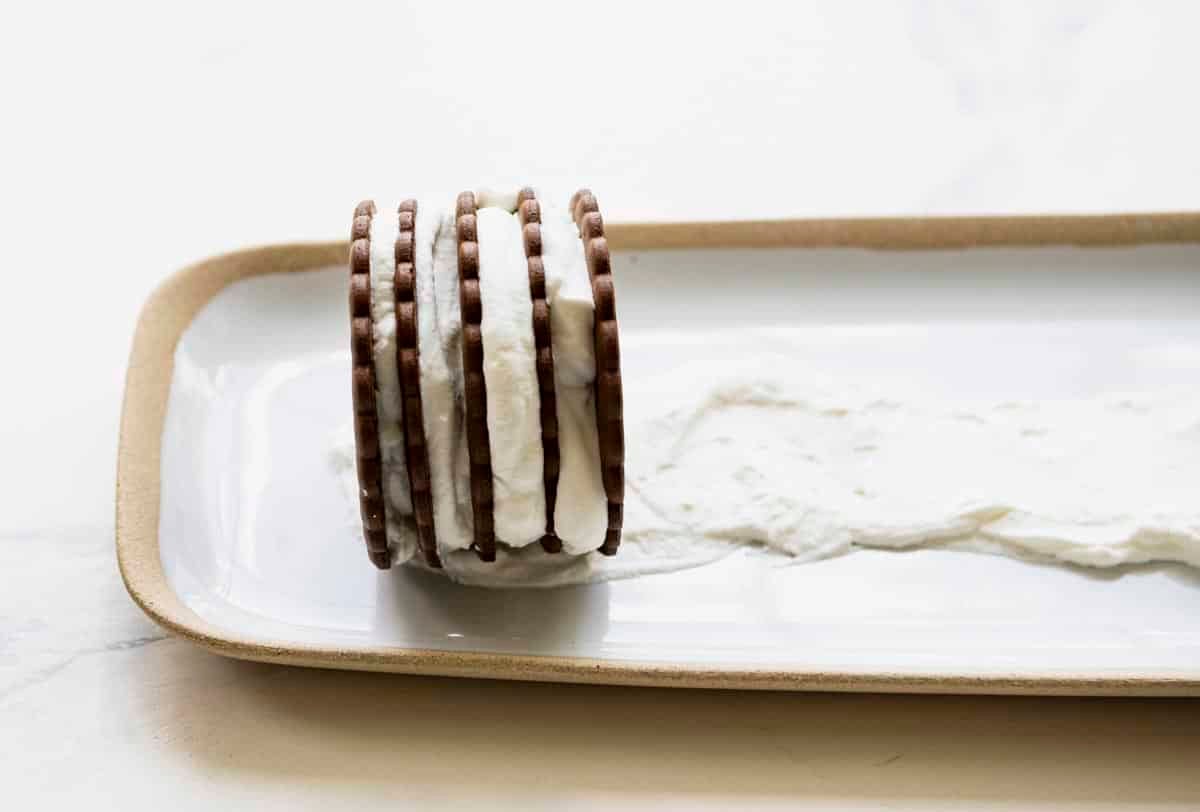
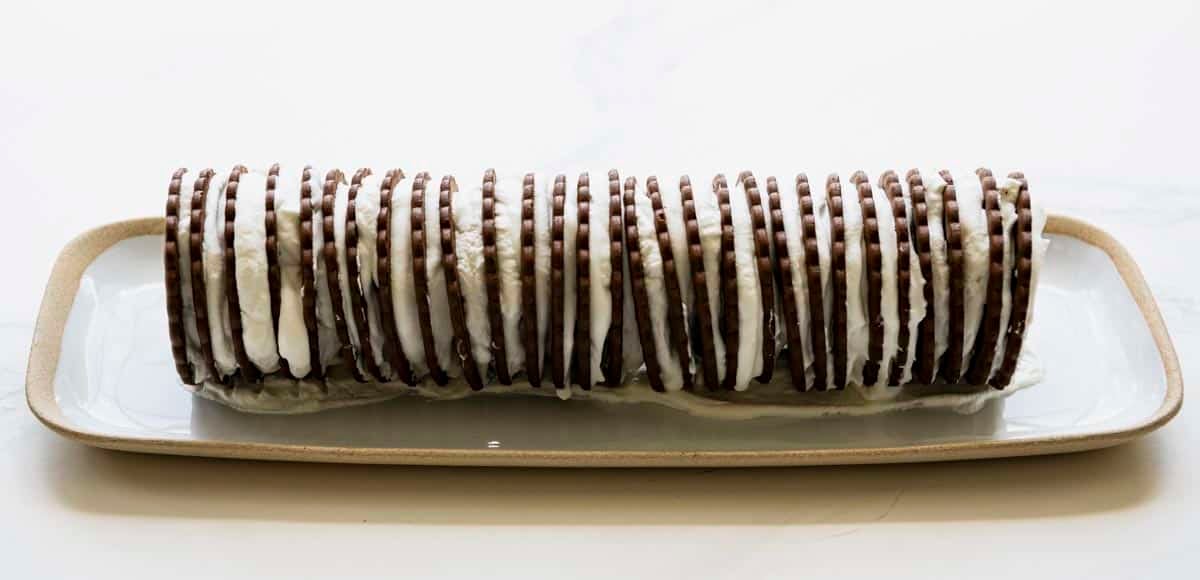
Lay the stack on its side like a log, then repeat to build one long log down the length of the tray. Do not worry about making it neat, since you are going to cover the whole thing in cream next anyway.
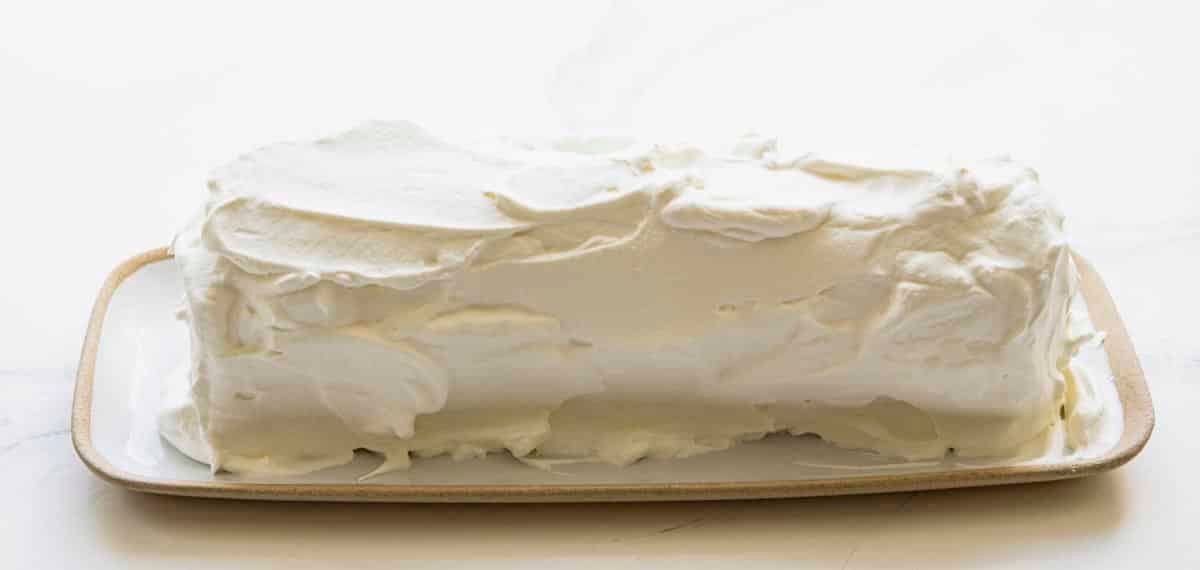
Step 4: Frost the Cake
Spread the rest of the whipped cream over the top and sides in a nice, thick layer. An offset spatula makes this part quick and easy.
Step 5: Garnish and Chill
Finish with chocolate sprinkles, crushed cookies, or chocolate shavings if you like, then cover loosely and refrigerate for at least 4 hours. Overnight is even better.
As it sits, the wafers soak up the cream and soften into that sliceable, cake-like texture that makes this dessert so special.

⇢ Make it your own. Swap in sliced bananas, fresh berries, or a layer of pudding for a different spin. For another layered no-bake treat that uses the same chill-and-soften trick, my Banana Pudding is worth a look.
⇢ Slice on the diagonal. Cutting at an angle shows off the chocolate-and-cream stripes in every piece.

Made these with my family for fun. I’d never made an icebox cake before, so this was my first time. The assembly was super fast and easy. I was expecting these to be good, but holy cow they blew me away. I was not expecting for the crackers to have such a perfect texture. Amazing! It was so hard to not eat it all at once!
– Rebecca B.
Storage and Make-Ahead Tips
The best part is that this cake is meant to be made ahead, which makes it a lifesaver when you are entertaining.
Store: Keep the cake loosely covered in the fridge at all times. Leftovers will keep for 3 to 4 days, but it is honestly best within the first two.
Freeze: Wrapped up tightly, the cake freezes for up to 1 month. Just thaw it in the fridge before serving.
Frequently Asked Questions
What can I use instead of Nabisco chocolate wafers?
I hear you, those Nabisco Famous Chocolate Wafers and chocolate graham crackers can be tricky to track down these days. A couple of good stand-ins are Goya Maria Chocolate Cookies or Dewey’s Bakery Brownie Crisp Cookies. Both give you that thin, crisp chocolate layer that softens up so nicely in the cream.
Can I use Cool Whip or canned whipped cream instead of homemade?
Cool Whip works just fine as a shortcut, and you will need about 7 cups of thawed Cool Whip to stand in for the homemade. I would steer clear of the canned, spray-style whipped cream, though. It is just too airy and tends to deflate between the layers.
Can I make this for a crowd?
Absolutely, and it is a great one for a potluck. Just scale up the cream and cookies and build a longer log, or switch to the graham cracker method in a 9×13-inch dish for easy squares. It doubles beautifully.

More Cookout-Friendly Desserts
Easy, quick and delicious. I found the chocolate wafers at both Publix and Kroger.
– Marianne

Did you make this recipe?
If you enjoyed this recipe, please leave a comment with a 5-star review at the bottom of the post. Thank you!

Chocolate Icebox Cake
Ingredients
- 3 ½ cups very cold heavy whipping cream
- ½ cup powdered sugar (confectioners' sugar)
- 1 teaspoon vanilla extract
- ¼ teaspoon salt
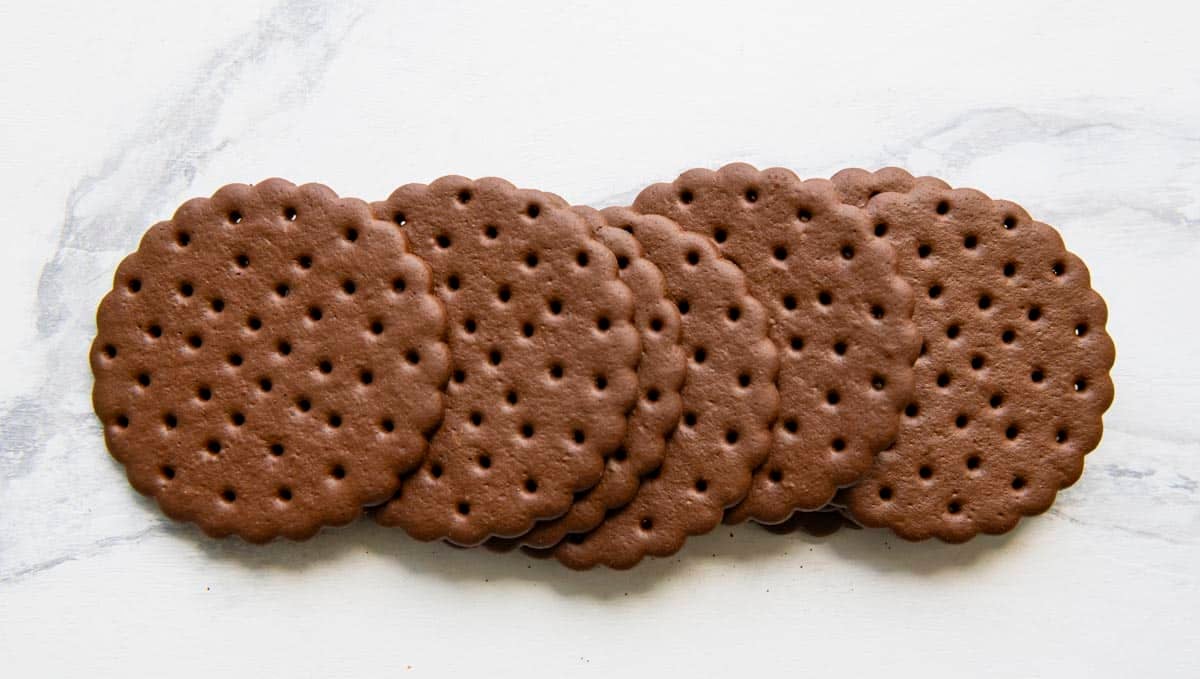
- 9 ounces chocolate wafer cookies (about 29 wafers) (or 40 chocolate graham crackers)
- Optional garnish: chocolate sprinkles, crushed chocolate wafer cookies or graham cracker crumbs, or shaved chocolate curls
Instructions
- In a large bowl that has been chilled in the freezer for about 10 minutes, use an electric mixer to beat the heavy cream, powdered sugar, vanilla, and salt until stiff peaks form.


CHOCOLATE WAFER COOKIE INSTRUCTIONS
- Spread a very thin stripe of whipped cream down the middle of a serving platter (I use one that is about 14 inches long by 5 inches wide). This helps hold the cake in place.
- Spread about 1 tablespoon of whipped cream onto a chocolate wafer. Top with another wafer to make a sandwich, add another tablespoon of cream, and stack a third. Keep going until you have about 5 cookies sandwiched together, then lay the stack on its side like a log on the platter.
- Repeat with the remaining cookies to build one long log down the platter.
- Use the rest of the whipped cream to frost the top and sides of the cake. An offset spatula makes this quick and even.
- Garnish with sprinkles, crushed cookies, or chocolate shavings if you like. Cover loosely and refrigerate for at least 4 hours, though overnight is best. The cookies will soften in the cream into a sliceable, cake-like texture.
- Slice on the diagonal so you can see the chocolate-and-cream stripes in every piece.


ALTERNATE CHOCOLATE GRAHAM CRACKER INSTRUCTIONS
- Spread a very thin layer of whipped cream in the bottom of a 9×13-inch dish.
- Add a layer of graham crackers, breaking them as needed to fit. Gently spread ¼ of the whipped cream over the crackers. Repeat the layers until you have used four layers of crackers and the final ¼ of the cream on top.
- Garnish with crushed chocolate grahams, sprinkles, or grated chocolate. Cover loosely and refrigerate for at least 4 hours, though overnight is best. Slice into squares to serve.
Notes
- Hard-to-find cookies: Both Nabisco Famous Chocolate Wafers and chocolate graham crackers can be tough to find in stores. Goya Maria Chocolate Cookies or Dewey’s Bakery Brownie Crisp Cookies make great substitutes that soften nicely in the cream.
- Whipped cream shortcut: Homemade tastes best, but you can substitute about 7 cups of thawed Cool Whip. Avoid canned, spray-style whipped cream, which is too airy and deflates between the layers.
- Chill for the right texture: A minimum of 4 hours lets the cookies soften, but overnight gives you the best sliceable, cake-like result.
- Store: Keep loosely covered in the fridge at all times. Leftovers last 3 to 4 days, though they are best within the first two.
- Freeze: Wrapped tightly, the cake freezes for up to 1 month. Thaw in the fridge before serving.
Nutrition
Originally published in May, 2020, this post was updated in June, 2026.


My mother made that often. She used those chocolate wafer cookies. The recipe Was on the package. I have trouble finding those cookies now. I also use them to make bourbon balls at Christmas. They make a delicious base instead of the vanilla wafers. Ask Sallie. She loves those chocolate bourbon balls I make.
It’s definitely a classic! I find the chocolate wafer cookies locally at Yoder’s, since I can’t usually get them at our Food Lion. Great tip about the bourbon balls. I always make mine with nilla wafers since that’s how my grandmother made them, but I’ll have to try the chocolate twist next. 🙂
If I can’t find the chocolate wafers, I have used Tate’s chocolate chip cookies instead and it gives it a deeper flavor. Probably won’t go back to the wafers.
Thank you for the feedback, Donn!
Love this recipe. Where do you buy those cool Nestle chocolate curls? It looks beautiful topped like that.
Hi, Teresa! I actually picked them up in the cake decorating section at my little local Food Lion grocery store. 🙂
Thank you for a JOYFUL KITCHEN MADE WITH your WONDERFUL RECIPES Hell’s Kitchen disappears with your kind teaching and serenity
Thank you so much for your kind note, Marvine!
Would it be possible to use canned whipped cream, such as Redi-whip? I’m looking for a quick alternative to whipping the cream and I’ve spotted mint flavored canned whipped cream and thought it would be a good idea. I don’t like Cool Whip so I wouldn’t use that. Thanks!
Hi, Marie! I’m worried that the canned whipped cream would be too “airy” and will just deflate when layered. My recommendation for a short cut would be Cool Whip. You’ll need a total of about 7 cups of thawed Cool Whip here. Hope that helps!
Easy, quick and delicious. I found the chocolate wafers at both Publix and Kroger.
Excellent. Thanks for that tip, Marianne. So glad that you enjoyed it!
Made these with my family for fun. I’d never made an icebox cake before, so this was my first time. The assembly was super fast and easy. I was expecting these to be good, but holy cow they blew me away. I was not expecting for the crackers to have such a perfect texture. Amazing! It was so hard to not eat it all at once!
I’m so happy to hear that, Rebecca! Thank you for taking the time to come back here and let me know. 🙂
I have a question rather than a comment. There are three adults in the house we have a lot of food wasted. Can you tell me how to make meals for 3 servings instead of multiple servings? I have tried to look up on my phone but everything comes up for multiple servings.
Hi SallyAnn,
You can adjust the serving size for any recipe on our site by simply typing in the number of servings you want in the serving size box on our recipe cards.
Just keep in mind that some recipes will work better than others when adjusted for 3 servings!
Oh my! This brings back such loving memories of my grandma! My sister & I we’re so intriqued with the layers when sliced. I should make it for my grands!
Thanks, Susan. I bet your grandchildren will love it. My boys devour this dessert! 🙂