These simple sheet pan fajitas bake in the oven on one tray for a quick and easy weeknight dinner! Zesty seasoning coats bell peppers, onions, and beef, creating restaurant style steak fajitas with very little effort. Served with a stack of soft, warm flour tortillas, a bed of salad greens, or a bowl of rice, it’s a family-friendly meal that everyone can agree on.

Table of Contents
If you love fajitas, be sure to try these sheet pan chicken fajitas, classic flank steak fajitas, skillet shrimp fajitas, and this dump-and-bake chicken fajita casserole, too!
How to Make Sheet Pan Fajitas | 1-Minute Video
What to Know Before You Get Started
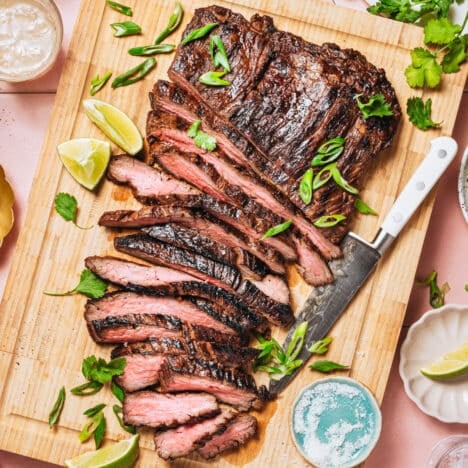
- Skirt steak and flank steak are the best cuts of beef for sheet pan fajitas. The skirt steak is a little bit more tender than the flank steak, so it can be cooked more without getting tough or chewy (in other words, choose skirt steak if you prefer your meat well done). By contrast, flank steak (shown here) is leaner, so it’s best when cooked rare or medium-rare.
- Let the beef come to room temperature for 20-30 minutes before cooking. This will help it cook evenly.
- A seasoning blend adds zesty flavor to fajita meat and vegetables. While it’s similar to taco seasoning, fajita seasoning usually has fewer ingredients, a little bit less chili powder, and a more mild profile than taco seasoning. You’ll find a lot of the same herbs and spices in both; however, such as chili powder, salt, cumin, paprika, garlic, and onion. When preparing this recipe, you can control the heat in your homemade fajita seasoning.
- Don’t want to prepare your own fajita seasoning? For a shortcut, you can purchase a packet of store-bought seasoning instead.

Directions
Our family loves fajitas, so I just combined our favorite grilled steak fajitas recipe with our favorite sheet pan chicken fajitas, and this easy weeknight dinner was born! The sheet pan fajitas are baked instead of grilled or seared in a skillet. That way there’s no need to tend to the stovetop or fire up the grill. They’re also easy to cleanup!
You’ll find detailed instructions in the recipe card below, but here’s the overview:
- Coat a large, rimmed baking sheet with oil or nonstick spray.
- Stir together the fajita seasoning blend.
- Place the steak in the center of the prepared baking sheet. Arrange the bell peppers and onion in a single layer around the edges.
- Drizzle olive oil over the meat and veggies and toss to coat.
- Sprinkle the seasoning mixture over everything, and toss to coat again.
- Bake on the middle rack in a 450°F oven for about 12-15 minutes, or until the steak reaches the desired level of doneness. Stir the veggies and flip the steak over halfway through to ensure even cooking. The total cooking time will vary depending on the size, thickness, and temperature of your meat when you cook it, as well as on your preferred level of doneness. A meat thermometer is always the best way to know when your steak is ready to come out of the oven.
- Drizzle with fresh lime juice.
- Let the steak rest on a cutting board for 5-10 minutes so that the juices have a chance to redistribute.
- Slice the steak into ¼-inch strips, since these thin strips are a hallmark of fajitas. It’s important to make sure that you slice the beef against the grain (perpendicular to those lines that you see in the meat). This will yield tender, juicy strips of steak for your fajitas!

Serving Suggestions
Whether you serve the steak and vegetables in flour tortillas, in rice bowls, or on top of salads, a variety of toppings add flavor to every bite. Try fresh cilantro, shredded lettuce, pico de gallo, salsa, cheese, sour cream, guacamole, avocado, lime wedges, sliced green onion or chives, or pickled red onion. On the side, you might like to serve the fajitas with black bean and corn salad, Mexican cornbread, tortilla chips with salsa, Spanish rice, refried beans, ranch-style beans, or a tostada de tinga.

Preparation and Storage Tips
- Make Ahead: You can prepare the fajita seasoning mix in advance and keep it stored in an airtight container in the pantry for up to 3 months. If you make fajitas regularly, triple or quadruple the ingredients to make a larger batch to have on hand. You can also slice the vegetables up to 24 hours in advance. Store the prepped ingredients in an air-tight container in the refrigerator. At the end of a busy work day, you’ll just have to toss everything together and pop the tray in the oven.
- How to Store: Leftovers will keep in an airtight container in the refrigerator for about 3 days. You can freeze baked fajitas; however, I find that the meat is the only component that keeps well. Wrapped tightly, the steak will stay fresh in the freezer for up to 2 months. The vegetables tend to have a mushy, watery texture when thawed, so I don’t recommend freezing them.
- How to Reheat: Reheat the fajitas in a skillet over low heat for about 5 minutes, or in the microwave for 30-60 seconds (until warmed through).

More Flank Steak Recipes to Try
Flank Steak Marinade
2 hours hrs 20 minutes mins

Steak Salad
1 hour hr 18 minutes mins

Pepper Steak with Onion
1 hour hr 35 minutes mins

Did you make this recipe?
If you enjoyed this recipe, please leave a comment with a 5-star review at the bottom of the post. Thank you!
Watch How to Make It

Sheet Pan Steak Fajitas
Ingredients
Fajita Seasoning
- 2 tablespoons paprika
- 2 tablespoons chili powder
- 2 ½ teaspoons kosher salt
- 2 teaspoons cumin
- 2 teaspoons onion powder
- 2 teaspoons garlic powder
- 1 teaspoon dried oregano
- ½ teaspoon cayenne (reduce or omit for a mild version)
Fajitas
- 1 flank steak (approximately 1 ½ – 2 ½ lbs. total)
- 2 sweet bell peppers (any color), thinly sliced
- 1 large onion, thinly sliced
- 2 tablespoons olive oil
- Juice from 1 lime, plus extra lime wedges for serving
- Optional, for serving: salsa, 8 fajita-size flour tortillas (warmed), sour cream, shredded cheese, guacamole, cilantro, salsa, tomatoes
Instructions
- Preheat the oven to 450°F (230°C). Coat a large, rimmed baking sheet with oil or nonstick spray.
- Prepare the Fajita Seasoning: In a small bowl, stir together paprika, chili powder, salt, cumin, onion powder, garlic powder, oregano, and cayenne.

- Season the Steak and Vegetables: Arrange steak in the center of the prepared sheet pan, with the bell peppers and onion in a single layer around the edges. Drizzle the veggies with olive oil; toss to coat. Rub olive oil on both sides of the steak as well.
- Sprinkle the vegetables with the seasoning blend; toss to coat again. Rub additional seasoning into both sides of the meat. You might not need all of the seasoning for this meal, so if you have some extra you can set it aside in an airtight container in the pantry for up to 3 months.
- Bake the Steak and Vegetables: Bake for 12-15 minutes, or until the steak reaches the desired level of doneness and the vegetables are crisp-tender, stirring the veggies halfway through and flipping over the steak. A meat thermometer should read 125-130°F for rare, 135°F for medium rare, and 145°F for medium. Drizzle the meat and vegetables with lime juice. Remove the steak from the pan and place on a cutting board. Tent loosely with aluminum foil while the steak rests for 5-10 minutes. Slice the steak against the grain of the meat (perpendicular to the lines that you see), on a diagonal.
- Serve the Fajitas: Serve the sliced steak with the vegetables in warm tortillas with all of your favorite toppings.


Notes
- Flank steak or skirt steak both work well.
- Reduce or omit the cayenne for a milder version.
- Let the steak rest before slicing.
- Always slice against the grain for tender bites.
- Use a meat thermometer for the most accurate results.
- Warm tortillas in the oven during the last few minutes of baking.
- Add mushrooms or zucchini if desired.
- Store leftovers in the refrigerator for up to 3 days.
- Freeze cooked steak for up to 2 months.
- Serve in tortillas, rice bowls, or over salad greens.
Nutrition
Recipe Variations
- This fajita seasoning has a small amount of “heat,” thanks to a little bit of cayenne. I would consider it comparable to “medium” salsa. If your family prefers a spicier fajita, you can increase the amount of cayenne or serve the fajitas topped with jalapeños. By contrast, if you want a more mild fajita seasoning, I suggest cutting the amount of cayenne in half (or omit it altogether and just use ground black pepper).
- I like soft, warm flour tortillas with fajitas, but you can also serve the fajitas with corn tortillas, over rice, or on top of salad.
- Use chicken breast to make sheet pan chicken fajitas with this recipe. You’ll need about 1 ½ lbs. of boneless skinless chicken breasts or chicken thighs for that dish.
- While they’re less traditional, you can add other veggies to the sheet pan, such as sliced zucchini or fresh mushrooms.
This recipe was originally published in May, 2022. It was updated in July, 2024.


Wow! Maybe a little ambitious for me and my kitchen just at the moment but worth working up to for sure! Sure looks good.
I so much enjoy checking your blog every morning to see what’s new. Thanks, Blair!
Thank you, Marion! 🙂