Homemade biscuits don’t have to be fussy. This 3 ingredient biscuit recipe is quick, simple, and always reliable!
With just self-rising flour, cold butter, and tangy buttermilk, you’ll have tall, flaky biscuits on the table in about 30 minutes. Perfect for beginners and seasoned bakers, this recipe is one you’ll turn to again and again.

Table of Contents
Before You Get Started
My great Aunt Bee never steered me wrong — especially in the kitchen — and these easy 3-ingredient biscuits are no exception! Here are a few of her best tips to help your biscuits turn out light, tall, and buttery:
- Self-rising flour is key. It already has the leavening and salt included, which gives the biscuits their classic lift. White Lily is my go-to.
- Keep your ingredients cold. Cold butter and buttermilk create the steam that makes biscuits fluffy.
- Don’t twist your cutter. Press straight down and lift straight back up so your biscuits rise high.
- Fold gently. A few turns of the dough builds flaky layers without overworking it.
- Chill before baking. A quick rest in the fridge helps the biscuits puff beautifully in the oven.
Step-by-Step: How to Make This 3 Ingredient Biscuit Recipe
- Cut in the butter. Start with flour in a large mixing bowl. Cut cold butter into small pieces or grate frozen butter with a box grater. Toss it in the flour so every piece is coated.
- Shortcut Tip: grating frozen butter makes the dough come together faster.

- Mix with buttermilk. Stir in the buttermilk until you have a soft dough that just holds together.
- Get the Texture Right: Add a splash more buttermilk if it feels too dry and crumbly, or a little bit of extra flour if it’s too sticky. You definitely do not want a wet dough.

- Shape and cut. Turn the dough out on a floured counter. Fold it over itself a few times, then pat it into a ¾-inch thick slab. Use a biscuit cutter to punch out rounds.
- Remember: press down, don’t twist. Otherwise you seal off the edges of the biscuits and they won’t rise as high.

- Chill and bake. Place the biscuits close together in a cast iron skillet or dish. Chill in the refrigerator for 10 minutes, then brush the tops with melted butter and bake until golden. Finish with another swipe of butter when they come out of the oven.

Serving Suggestions
These biscuits work for breakfast, lunch, or supper:
- Spread with honey butter, blueberry jam, this blackberry jam recipe, or apple butter.
- Sandwich with eggs, sausage, or bacon.
- Pair it with fried cabbage.
- Smother with sausage gravy or stuff with country ham.
- Serve as a side with corn chowder, chicken corn chowder, chicken and noodles, crock pot beef stew, Brunswick stew, chicken and sausage gumbo, Dutch oven pot roast, chili, chili mac, or ham and bean soup with canned beans.

Preparation and Storage Tips
- Make Ahead: Biscuits are best warm from the oven, but you can bake them up to 3 days ahead. Store at room temperature in an airtight container. Warm them in a 300°F oven for about 10 minutes.
- How to Freeze Biscuits: Let baked biscuits cool, then freeze in an airtight bag or container for up to 3 months. Reheat straight from frozen in the oven.
- How to Freeze Biscuit Dough: Cut out the biscuits, place on a tray, and freeze until solid. Transfer to a freezer bag and bake from frozen, adding about 5 extra minutes.
Recipe Variations
- Lard or Shortening. You can replace 2 tablespoons of the butter with 2 tablespoons of either shortening or lard. While butter has more flavor, the shortening or lard will give the biscuits an even lighter, puffier texture.
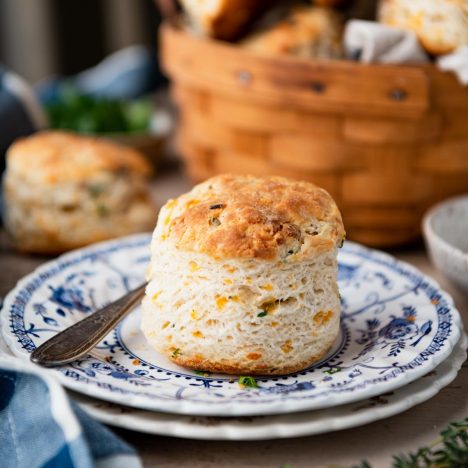
- Add Cheese. Stir in shredded cheddar or Parmesan for cheesy biscuits.
- Herbs. Mix in chopped fresh herbs such as parsley, basil, or chives for a bright, savory addition.
- Brush with garlic butter right out of the oven.
- You might also like these 4-ingredient heavy cream biscuits.
Frequently Asked Questions
- Why didn’t my biscuits rise? Usually the flour is expired (so the leaveners don’t activate), you used all-purpose flour instead of self-rising, or the cutter was twisted and sealed the edges.
- Can I make these without buttermilk? Yes, mix 1 cup of milk with 1 tablespoon of vinegar or lemon juice and let it sit for 5 minutes.
- Can I use all-purpose flour instead? Yes, you can make your own self-rising flour by adding 2 teaspoons of baking powder and ½ teaspoon salt for every 2 cups of flour.
- How do I get them extra fluffy? Keep the ingredients cold, fold gently, and chill the dough before baking.
- Can I make drop biscuits instead? Yes, spoon the dough onto a sheet pan instead of cutting into rounds.

I just made these biscuits. Not only are they extremely easy to make, but they are the best I’ve ever made! They’re so light and fluffy, they’re like eating clouds. I’ll use this recipe forever!
– Sandra

Did you make this recipe?
If you enjoyed this recipe, please leave a comment with a 5-star review at the bottom of the post. Thank you!
Watch How to Make It

3 Ingredient Biscuits
Ingredients
- 2 cups self-rising flour (I prefer White Lily brand)
- ¼ cup very cold butter, cut into pats, plus additional for brushing (I prefer salted butter)
- ⅔ – ¾ cup very cold buttermilk
Instructions
- Preheat the oven to 425°F. Spray an 8-inch or 9-inch round pan with a light coat of cooking spray and set aside. Place flour in a large bowl. Use a pastry cutter or forks to work the butter into the flour until the lumps are about the size of large peas. Alternatively, you can freeze the butter and use the large holes on a box grater to grate the butter into the flour. Then use your hands to make sure that the flour pieces are coated with flour.

- Add ⅔ cup of buttermilk to the flour mixture. Use a wooden spoon or spatula to stir until a soft dough forms. It should hold together when pressed, but shouldn't be too wet. Add small amounts of additional buttermilk slowly, as needed, until the dough reaches this consistency.

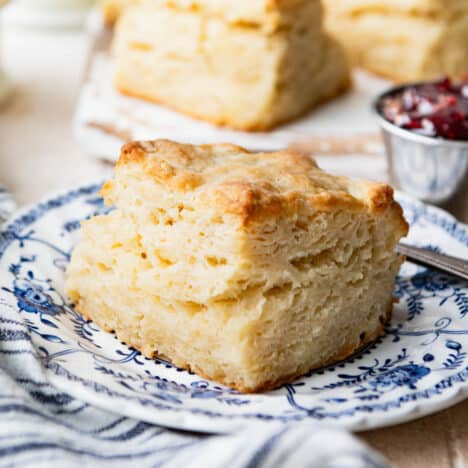
- Turn the dough out onto a lightly floured surface. Knead for about 1 minute (folding the dough back over on itself), adding flour to the counter and your hands, as necessary, to prevent sticking. Pat the dough to ¾-inch thickness. Use a biscuit cutter to cut out the individual biscuits. Firmly press the cutter down into the dough, but do not twist. Twisting the biscuit cutter seals off the edges of the biscuits and they therefore will not rise as high. I used a 2 ½ -inch cutter here, which yielded 6 large biscuits. You can also use a smaller 1 ½- or 2-inch cutter to cut out more biscuits. Roll out the dough once or twice more to use up the remaining dough scraps.

- Arrange the biscuits in the prepared pan. At this point, the dough will be a bit warmer from working with it, so I like to place the pan of biscuits in the freezer for about 10-15 minutes to chill again.

- Just before you put the biscuits in the oven, brush the tops with melted butter.

- Bake for 14 -15 minutes, or until the biscuits are a light golden brown on top. Brush the tops of the biscuits with additional melted butter when they come out of the oven; serve warm.
Notes
- Make sure that your self-rising flour is fresh. When the package is old or expired, the leavening agents in the flour may not activate properly and your biscuits will not rise.
- How to Make Buttermilk at Home: You can make 1 cup of homemade buttermilk by using regular milk + either lemon juice or white vinegar. To do so, pour 1 tablespoon of freshly squeezed lemon juice or 1 tablespoon of white vinegar into a measuring cup. Add enough milk to equal 1 cup. Give it a stir, let it sit for about 5 minutes, and then use it in the recipe as directed.
- How to Make Self-Rising Flour: If you don’t have a bag of self-rising flour in your pantry, that’s no problem. Combine 2 cups of all-purpose flour with 2 teaspoons of baking powder and ½ teaspoon of salt.
Nutrition
I have always wanted to learn to make biscuits! Thanks to you and Aunt Bee for super recipe! See old dogs can learn new tricks! 61 years young!
– Stacy
More Popular Biscuit Recipes to Try
Cheddar Biscuits with Chives and Bacon
50 minutes mins

Sweet Potato Biscuits
33 minutes mins
Flaky Biscuits
45 minutes mins
If you love biscuits as much as we do, be sure to try these farmhouse-favorite flaky biscuits, a batch of these 3-ingredient buttermilk biscuits, and these classic Southern buttermilk biscuits, too!
Originally published in September, 2018, this post was updated in October, 2025.


Gorgeous biscuits, Blair! We love buttermilk biscuits, and yes, a store-bought kind doesn’t come close (I actually have an old post about buttermilk biscuits on my blog). Great tip to brush the tops with butter while they are baking, I’ll try that. I always keep buttermilk in the fridge, it lasts forever. If not used to bake biscuits or pancakes, it is a great marinade for chicken breast.
Thanks, Mila! Extra butter is always a good thing! 🙂
Tip, the young things who nuke everything practically. WAXED PAPER, A juice glass, or size of choice, Keep it floured will serve as a cutter.. Grandma always, pinched off a biscuit size piece and stored covered in fridge with watery buttermilk covering. to start her next mornings batch.. She used Lard as shortening.. She made biscuits every morning, iron skillet Traditional Yellow Cornbread every dinner. She never used a cutter in her life, just got used to what the weight/size of a biscuit was. Depression Era. Nothing went to waste. 13 when she started cooking.
No, grandma wasn’t 13 when she started cooking. She was 13 by the time she had all her basic cooking skills. She had been cooking with her Momma since she was old enough to stand on a chair and stir! She still had things she hadn’t mastered, but she could put a basic meal on the table during harvest time when Momma was harvesting and canning like crazy & didn’t have time to cook dinner. My 80 year old mother tells a story about her everyday cooking when she was about 15 years old. They were going to have a visiting missionary lady come for dinner one night, but her mother had to be away for the day. My mom was just expected to fix dinner – and she did. Roast chicken, homemade gravy a vegetable and a salad. My grandma (her mom) arrived home with just enough time to tidy up before the missionary arrived. When they sat down to the table, my mom brought the food to the table & my grandma asked her “Where are the potatoes”. My mom looked surprised & said, “Well, I figured we were having bread & gravy like we usually do.” Grandma was embarrassed, but the missionary was delighted. To her it was home-cooking like her own mother had made during the depression. To my mom it was just a fun story, but I was always impressed that Grandma just trusted a 15 year old to make a “company dinner”. Most 15 year old girls know a lot about math & science – which is good – but they aren’t prepared to feed their future families. Yes, men can cook too, but marriage isn’t a given these days & knowing how to feed yourself is a life skill everyone should have.
did we have the same grandma’s <3 blessings,
Sounds so interesting ..
No wastage is awesome . I teach my kids all the time to not waste in fact we try and do something new to anything that is potentially about to go in dustbin (of course I mean leftover that is edible not rotten )
I am baking these biscuits because this time while making yogurt at home the milk didn’t set well, never mind I got perfect buttermilk to try these lovely buttery biscuits .
We are loving it .
Thank you for this recipe. So easy to follow and everyone loved them! They were delicious. I made a double batch for biscuits and gravy. I’ll be making them again and everyone asked for the recipe.
You’re very welcome, Penny. We’re so glad you enjoyed it!
I just made these, they turned out Fabulous!! Thank you, I was about to give up on biscuit baking.
Thanks, Kathy! That’s wonderful. I’m so glad that you’ve found a go-to recipe. Biscuits are LOVE! 🙂
Add a little sugar to flour mix. Blueberry Cranraisins, chocolate chips,, etc and you have scones. I cut cold butter into small chunks and freeze in snack baggies. Always ready for biscuits or scones.
Yes! Perfect idea, Linda! 🙂
Tell me about your buttermilk
Marainade.
Just made these biscuits. They’re amazing and couldn’t be simpler to make. Using salted butter is a great idea.
Wonderful! Thank you, Norman! It makes me happy to know that you’re enjoying Aunt Bee’s biscuits, too. 🙂
Just made these, could not be easier! Delicious and flaky biscuits! Thank you for sharing the recipe!
Thank you for trying it out, Carla! We’re so glad you enjoyed it!
Followed the directions and the result was beautiful, flaky, wonderfully raised, tasty biscuits! Thank you!
I’m not a good cook and have tried biscuits in the past with lackluster results. My wife, my most honest critic, absolutely loved them and asked that i make them again!
We’re so glad they turned out well for you, Dennis! Thank you for trying them out.
I am so going to try this. Unfortunately we do not get buttermilk in stores here so will make my own using your tip in the blog post. Pinned this right away and definitely trying this over weekend! Thanks for sharing such an amazing recipe.
Awesome! Enjoy the biscuits! 🙂
I always use salted, but either will work — so go with your preference! 🙂
It’s funny, I remember my mom melting the Crisco in a saucepan, adding the milk, then the flour and pinching dough, rolling it into a ball and flattening them on the baking sheet. They were delicious and we kept a plate of them on the stove and just grabbed one whenever we wanted! Mmmmmmmmmmmmm.
Sounds delicious!!!!
Why are my biscuits not rising?
Hi, SAJ! Since I wasn’t in your kitchen, it’s hard to know for sure. My two first guesses would be: (1) that you were using regular all-purpose flour rather than self-rising flour; OR (2) the self-rising flour that you used was old and therefore the leavener in the flour mix was no longer working. Hope that helps!
When you say white vinegar is distilled white vinegar?
Yes. 🙂
Tank you!
Thank you!
I made these biscuits once before and they are best I ever made or tasted and I come from a longline of biscuit makers. Just take the time to read the instructions and ingredients before proceeding and make sure any missteps are yours and not the author of the recipe.
Thank you so much, Mae!❤️
These biscuits look absolutely WONDERFUL!
But they look a LOT BIGGER than 1 1/2″!
Might the biscuit cutter be 2 1/2″?
I’ve never used anything smaller than 2″, and wonder how they would work with biscuits and gravy.
Thank You for your wonderful website!
Hi! These are truly the smaller size, but I think the close-up photos make them look larger. That said, I’ve made them with the 2 and 2.5-inch biscuit cutters as well, and they work beautifully no matter which size you choose. I would stick with the larger size that you prefer!
Hey there, I literally never comment on recipes but I just really wanted to let you know that these biscuits were phenomenal! There are thousands of buttermilk biscuit recipes on the internet and I feel like I’ve probably tried at least half of them but this recipe stands out. It was so easy and the directions were so clear and simple that my 3-year-old and I were able to get these prepared in less than half an hour. Thank you so much for sharing!
That’s amazing, Courtney! I’m so happy to know that your family is enjoying these biscuits as much as we do. 🙂 I really appreciate your kind words and the fact that you took the time to come back here and leave a note. 🙂
I am having trouble getting my biscuits done with the temp and baking time suggested. Maybe my oven runs a little cooler than yours. Other than that, this recipe is easy to follow and the finished product is oh so amazing and delicious!!! ????
Thanks, Tasia! 🙂
Dear Blair,
Thank you so much for sharing this wonderful recipe. The biscuits came out good but I think I have done some mistake. So it was not as fluffy and flaky as yours. And just one query. When you say 1 cup it means 150gms or 235gms and 1/4 is equal to 60gms or more. Please reply. It will be good help for me…
Regards
Hi, Mamata! In general, 1 cup of self-rising flour is 4 ounces or 113.398 grams. So for this recipe you would need 226.796 grams. That said, I don’t ever weigh my flour for this particular recipe. Instead, I just adjust the amount of buttermilk that I use until the biscuits reach the right consistency — not too wet, but holding together and not too dry. Hope that helps!
This was my first time using this recipe. It was super quick and easy (I used the grated frozen butter method), and my daughter, who is not a biscuit person, ate two and told me that she liked them. This is a keeper.
Thank you, Alice! We’re so glad it was a hit.
The amount of fat needed is the same regardless of the type of fat being used. Melted or not; butter, lard or Crisco, 1/4 cup is how much to use!
Made these using the smaller biscuit cutter and then deep fried! Talk about a wonderful creation. You have to try them fried with sausage gravy.
OH MY GOSH — deep fried! That’s genius! I bet they were amazing! 🙂
will this recipe work if I drop into simmering chicken stock to make dumplings?
Hi, Jackie! I’m honestly not sure — I’ve never tried it that way, but I think it would probably work. I always use these Bisquick dumplings, though: https://www.theseasonedmom.com/bisquick-dumplings/
🙂
I just made chicken and dumplings using your biscuit recipe! They were the best dumplings I ever made!
Awesome! I’m so happy to hear that, Sharon. Thank you for letting me know!
Could you add grated cheese to this recipe?
Absolutely! Cheese is a delicious addition. I often add about 1/2 cup of grated cheddar to my biscuits. I prefer grating the cheddar by hand from a block, since it tends to melt and incorporate into the biscuits better than the pre-shredded packaged cheese. Enjoy!
My biscuits never have a smooth top: look like mountain peaks: even if I roll: taste good though!
Hi! There’s a recipe card at the bottom of the post that lists the exact measurements for each ingredient. I’ll copy and paste them here, too:
2 cups self-rising flour
¼ cup very cold butter, cut into pats, plus additional for brushing
2/3 – 3/4 cup buttermilk
I jused this recipe to make buttermilk biscuits tonight. I’ve tried several times to make them, but something is usually lacking. These were perfect and my husband was so impressed!
Yay! So glad that they were a hit, Christa! They’re my go-to recipe as well. 🙂
Hi, Sara! You can do it a couple of different ways. If you’re just defrosting one or two biscuits at a time, you can pop a frozen biscuit in the microwave for about 20 seconds to thaw, and then put it in the oven (or toaster oven) at 350 degrees to continue warming through and to get crisp on the outside again (about 5 minutes or so). If you have time to thaw the frozen biscuits on the countertop first, then just reheat with the same instructions that you would use for room temp biscuits (as described in the recipe card). Finally, if you want to reheat a whole batch of biscuits straight from the freezer, you can use the same reheating instructions in the 350 degree F oven, tenting loosely with foil, but you’ll just need to keep them in the oven much longer — probably closer to 20-30 minutes. Hope that helps!
Hi, CIndy! I’ve never actually tried that (I always freeze after baking), but I imagine it would work fine. You’ll just need to increase the baking time when cooking directly from the freezer. Enjoy!
Hi, Connie! Step 1 in the recipe box says to preheat the oven to 425 degrees F. You’ll bake the biscuits at 425 for about 12-15 minutes. Enjoy!