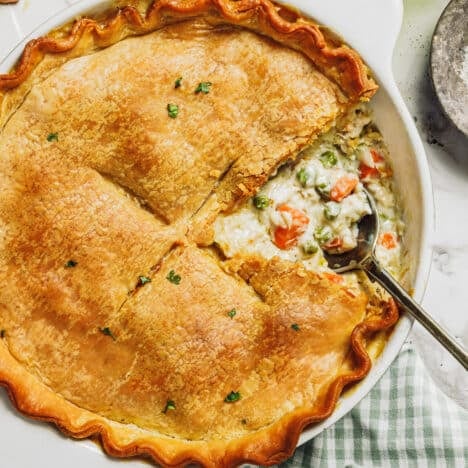
A farmhouse favorite! This old fashioned chicken pot pie recipe has a flaky butter crust and creamy filling that’s hearty, cozy, and perfect for family dinners.
You just can’t beat the made-from-scratch double crust, which gets perfectly crisp in a cast iron skillet. Add a flavorful chicken and veggie filling and you’ve got classic comfort food. It is hearty enough to feed hungry kids after sports practice and special enough to serve when company comes around!

Photos by BEA MORENO.
Table of Contents
Before You Get Started
Before we dive into rolling dough and stirring gravy, here are a few key tips:
- This all-butter crust is a total game-changer! From pastry chef Erin Jeanne McDowell’s book, The Book on Pie. it proves that a homemade pie crust doesn’t need shortening. It’s incredibly flavorful, and it bakes up golden brown, flaky, and crisp in a cast iron skillet (not a soggy crust in sight)!
- Keep your butter and water very cold for the flakiest crust.
- Use cooked chicken that’s cooled to room temperature so it stays tender in the oven. Shredded rotisserie chicken or slow cooker shredded chicken is a time-saver, but any cooked chicken works. Turkey is a great substitute after the holidays. Shred the meat with two forks or chop it into bite-sized pieces.
- Thaw and drain frozen veggies to keep extra liquid out of the filling.
- Cast iron skillets give the best golden, crisp crust, but a deep pie dish or a 2-quart baking dish will also work.
** Tip: If you’re short on time, you can use refrigerated pie crusts. The homemade version is worth it when you can swing it, but no judgment if you grab the shortcut!

Step-by-Step: How to Make Chicken Pot Pie
Making pot pie is a lot like cooking alongside your grandmother. It’s not just about following directions, but noticing little details that make the finished dish even better. Here’s how to do it, including some extra tips along the way:
Step 1: Prepare the Dough
Start by whisking together flour and salt, then cut in cold butter. You want those butter pieces about the size of walnut halves, which helps create those flaky layers. Add just enough ice water so the dough holds together. Divide, wrap, and chill.
** Tip: If the dough feels rock hard after chilling, let it sit out for 10 to 15 minutes so it rolls more easily.
Step 2: Roll Out the Bottom Crust
On a lightly floured surface, roll the first disc into a circle. Carefully fit it into your skillet or pie dish. Pop it in the fridge while you roll out the second disc.
** Tip: Chill the bottom crust in the fridge again while you roll out the top crust. The colder the pastry, the flakier the crust!
Step 3: Make the Filling
Melt butter in a skillet, then sauté onion and celery until soft. Add garlic, whisk in flour, and cook for a minute to cook off the raw flour taste. Slowly whisk in chicken broth and milk, then season with salt, pepper, and thyme. Cook until the mixture thickens into a creamy sauce. Stir in the chicken and vegetables.
** Tip: If the filling seems too runny, let it simmer for a few extra minutes. It should be thick enough to coat the back of a spoon.

Step 4: Assemble the Pie
Spoon the warm filling into the crust. Place the second crust on top, either as a lattice or full cover. Trim and crimp the edges to seal. Cut small slits in the top if you’re not using a lattice.
** Tip: Brushing the top crust with an egg wash (just a beaten egg with a splash of water) makes it golden and shiny.

Step 5: Bake and Rest
Bake the pie until the crust is golden and the filling bubbles, about 35 minutes. Let the pie rest for 20 to 30 minutes before slicing.
** Tip: A hot oven ensures a crisp crust, while the resting time lets the filling set.

Preparation and Storage Tips
- Make Ahead: Prepare the crust and filling a day in advance, then assemble and bake when ready.
- Freeze: Wrap the unbaked pie tightly and freeze for up to 3 months. Cover with foil and bake straight from frozen for 30 minutes. Remove the cover and continue baking for 35-40 minutes, or until the top is golden brown and the inside is bubbly. If you’re freezing for later, make sure that you use a freezer-to-oven safe dish (not a cast iron skillet).
- Storage: Refrigerate leftovers in an airtight container for up to 3 days. Reheat in a 350°F oven until warmed through. If the crust starts to get too brown, you can cover the edges with foil while the rest of the dish warms.
Serving Suggestions
This pie is delicious on its own, but I like serving it with Southern collard greens, fried cabbage, fried apples, or a simple green salad. Skillet cornbread, flaky biscuits, or this 3 ingredient biscuit recipe on the side makes the meal even more comforting. Then, add a cream cheese pound cake for dessert!
Variations and Customizations
- Different Vegetables: Add mushrooms, potatoes, or green beans to the filling.
- No Skillet: If you don’t have a 9-inch or 10-inch cast iron skillet, use a deep-dish pie plate or a 2-quart casserole dish. The cast iron skillet yields the best results, though, since it conducts heat better than a casserole dish or pie plate (yielding a crisp and flaky crust).
- Different Protein: Use leftover turkey instead of chicken.
- Different Crust: Swap the lattice crust for a single solid top crust (just cut a few slits in the crust to vent). Alternatively, you can top the pot pie with biscuits or puff pastry.
- Egg Wash: Brush the top of the crust with an egg wash (1 beaten egg and 1 tablespoon water) for an even deeper brown color and a bit of shine.
Frequently Asked Questions
- Can I make chicken pot pie gluten free or dairy free? Yes. Use a gluten free flour blend for the crust and roux, and swap dairy with almond milk or oat milk plus dairy-free butter.
- Why is my filling runny? The sauce needs enough flour and simmering to thicken. If it’s loose, cook a little longer before assembling.
- How do I avoid a soggy bottom crust? Keep the crust cold before baking and use a hot oven. Baking in cast iron helps too since it heats evenly, and placing the pot pie on the middle or bottom rack of the oven gets the bottom of the pie closer to the heating element.
- Can I make chicken pot pie without a bottom crust? You can skip the bottom crust and just add a top crust or even a biscuit topping.
- How do I stop the crust from over-browning? Check halfway through and cover the edges with foil or a pie shield if they’re getting too dark.

Amazing recipe!! My first try at a chicken pot pie and it was absolute perfection. Best pie crust recipe I’ve ever used, it literally looked like a magazine photo.
– Ali

Did you make this recipe?
If you enjoyed this recipe, please leave a comment with a 5-star review at the bottom of the post. Thank you!
Watch How to Make It

Homemade Chicken Pot Pie
Equipment
Ingredients
For the Crust (Yields a Double Crust):*
- 2 ½ cups (300 grams) all-purpose flour
- ¼ teaspoon salt
- 16 tablespoons (2 sticks) (8 ounces) cold salted butter, cut into ½ -inch cubes
- ½ cup ice water, plus more as needed
For the Filling:
- ⅓ cup salted butter
- ⅓ cup finely-diced onion
- ⅓ cup finely-diced celery
- ½ teaspoon minced fresh garlic (about 1 small clove)
- ⅓ cup all-purpose flour
- 1 ½ cups chicken broth
- ⅔ cup whole milk, at room temperature
- ½ teaspoon kosher salt
- ¼ teaspoon ground black pepper
- ¼ teaspoon dried thyme (or about 1 teaspoon fresh thyme leaves)
- 3 cups shredded cooked chicken
- 1 ½ cups frozen peas and carrots, thawed
- 1 cup frozen corn kernels, thawed
Instructions
MAKE THE PIE CRUST:
- In a large bowl, whisk together the flour and salt. Add the cold, cubed butter, tossing them through the flour until each piece is well coated. Using your fingers or a pastry cutter, cut the butter into the flour just until the pieces of butter are about the size of walnut halves.
- Make a well in the center of the flour mixture. Add the ice water, use your hands or a fork to toss the flour mixture with the water until the dough comes together. Do not knead. Add more water, 1 tablespoon at a time, until the dough is properly hydrated (it shouldn’t be sticky, but it should hold together and you shouldn’t see any dry pockets of flour).
- Divide the dough into two equal portions. Press each portion into a 1-inch thick disc. Wrap tightly in plastic wrap and refrigerate for about 1 hour, or up to 2 days. You can also freeze the discs of pie dough for up to 3 months.
ROLL OUT THE PIE CRUST:
- If the dough is very cold and hard, let the discs rest for 10-15 minutes at room temperature before rolling out. On a floured surface, roll out the first disc of dough to a large circle, about ⅛ – ¼ -inch thick. Make sure to roll and turn the dough so it doesn’t stick to the surface.
- Grease a 9-inch or 10-inch cast iron skillet with cooking spray. Using the rolling pin, transfer the rolled out dough to the skillet. Cover with plastic wrap and place the skillet in the refrigerator while you roll out the second disc.
- Roll out the second disc of dough to a large circle, using the same method as described above. Using a rolling pin, transfer the rolled out dough to a large platter or baking sheet. Cut the dough into 1-inch wide strips. Cover with plastic wrap and place it in the refrigerator while you make the filling.
MAKE THE FILLING:
- Preheat the oven to 425°F.
- In a large skillet or Dutch oven, melt the butter over medium heat. Add the onion and celery; cook until soft, about 5 minutes. Add the garlic and cook for 1 more minute, stirring constantly. Whisk in the flour; cook, whisking constantly, for 1 minute. Gradually whisk in the chicken broth and milk until smooth. Add the salt, pepper, and thyme. Cook, whisking frequently, until thickened, about 4-5 minutes.
- Remove from the heat. Stir in the chicken, peas and carrots, and corn.
ASSEMBLE THE PIE:
- Pull the cast iron skillet with the bottom crust out of the refrigerator. Pour the chicken mixture into the crust. Weave the strips of pie crust in a lattice pattern on top of the chicken mixture. Trim the ends of the lattice strips to be even with the edges of the bottom crust. Press the ends of the top strips and the edges of the bottom crust together, and crimp.
- Bake on the middle rack in the 425°F oven until the crust is golden brown and the filling is bubbly, about 35 minutes. Let stand for 20-30 minutes before slicing and serving.
Notes
Nutrition
More Chicken Pot Pie Recipes

Crockpot Chicken Pot Pie with Biscuits
4 hours hrs 15 minutes mins

Chicken Pot Pie with Biscuits
30 minutes mins
Chicken Pot Pie with Pie Crust
1 hour hr 15 minutes mins
Originally published in December, 2020, this post was updated in October, 2025.


I don’t have much luck with cast iron can I make this in a deep dish pie pan.
Yes, that should work! 🙂
Will the crust not be soggy on the bottom?
Hi, Jennifer! No, the crust doesn’t get soggy at all — especially if you use a cast iron skillet. A cast iron skillet conducts heat far better than a casserole dish or pie plate, so the crust on your pot pie becomes very crisp and flaky. You can substitute with a deep-dish pie plate or a 2-quart casserole dish, but the cast iron skillet yields the best results. Also, place the skillet on the middle or bottom rack in your oven. This helps the bottom crust become nice and crisp, since it’s closer to the heating element.
Of course, if you don’t want to use the bottom crust, you can make the pot pie with only a top crust. Totally up to you!
I have made this recipe a couple times now and it’s always so delicious! I do add a little white pepper with my spices, but other than that the recipe to a T. Always turns out great. It’s actually in my oven now. 😉
I love your recipes and old style of cooking. Thank you. Hope you keep them coming.
Thank you so much for saying that, Lindsay! I’m so glad that you enjoy the recipes. 🙂
Amazing recipe!! My first try at a chicken pot pie and it was absolute perfection. Best pie crust recipe I’ve ever used , it literally looked like a magazine photo.
Yay, yay, yay! Thank you, Ali! I’m so happy to hear that you loved it as much as we do. Thanks for taking the time to come back here and leave a note. 🙂
This was delicious! Thank you so much. We had very happy tummies.
Thank you, Gretchen!
Made this tonight for the first time and it turned out amazing, it really did look like it came out of a magazine phone! And the flavor was all there, delicious! I also made the suggested collard greens with it, also amazing easy to follow directions!
Sounds like the perfect meal, Kathryn! 🙂 Thank you for your note!
the flavor was all there, delicious! I also made the suggested collard greens with it, also amazing easy to follow directions!
The crust was . I have said I don’t like pie…but now I know I just don’t like dry. This was amazing and a wonderful introduction to making chicken pot pie. Thanks for the recipe. My only adjustment I may make in the future is to add more broth. I wished it had more juice after baking. Regardless it was good!
Apparently I can’t leave emojies in comments. But the crust was *fire*
Yay! Thank you!
Thanks so much, Brittany!
I was looking for a recipe with crust made from scratch. This recipe is golden. I used to make crust which is either tooo hard or too little and can hardly cover the skillet or pie pan. This one was just so smooth. I love the filling too. Easy to make and tasted delicious too. Now it;s in the oven and my mohter and i are waiting anxiously for the outcome
Thank you for sharing. 🙂
We hope you enjoy it, Sara! Thank you for trying it out.
I have a 12in cast iron skillet, how do I adjust the recipe?
Hi Ally! We haven’t tested this recipe with a 12-inch pan and can’t say for sure. You could try stretching the dough a bit further, but it’s likely to make the pot pie too thin. We would recommend making just a little extra dough and filling and adjusting the baking time as needed.
December 28 2025 made this as a turkey pot pie to use up the Christmas leftovers and used a 50% each mix of whole wheat and AP white flour butter crust for it. Important to keep the pastry cool while making it up (12 TBSPs of butter – which you work loosely and by hand so that some of the butter stays in tact about the size of walnuts and you don’t want that melting if your room is too warm). Used a 10” lodge cast iron skillet and even managed the lattice top thing. It turned out really well and cut in 6 it was dinner with just a side mandarin salad for 4 with two pieces of pie left over. Sister and brother-in-law loved it! Big hit and will do again!
Thanks, Joanne. I appreciate you taking the time to leave me a note. So glad that it was well received! 🙂