With just 3 ingredients and a microwave, you can whip up this easy, indulgent 5-Minute DIY Lip Balm recipe. It’s an affordable, all-natural, homemade gift for you or your loved ones!

Table of Contents
Whether you’re looking for a special Mother’s Day gift for that lady in your life, an end-of-school teacher’s treat, or a fun stocking stuffer for the Christmas holiday, this easy homemade lip balm recipe is the perfect solution!
Since it’s made with just 3 all-natural ingredients, it’s also safe for kids!
Ingredients for Homemade Lip Balm
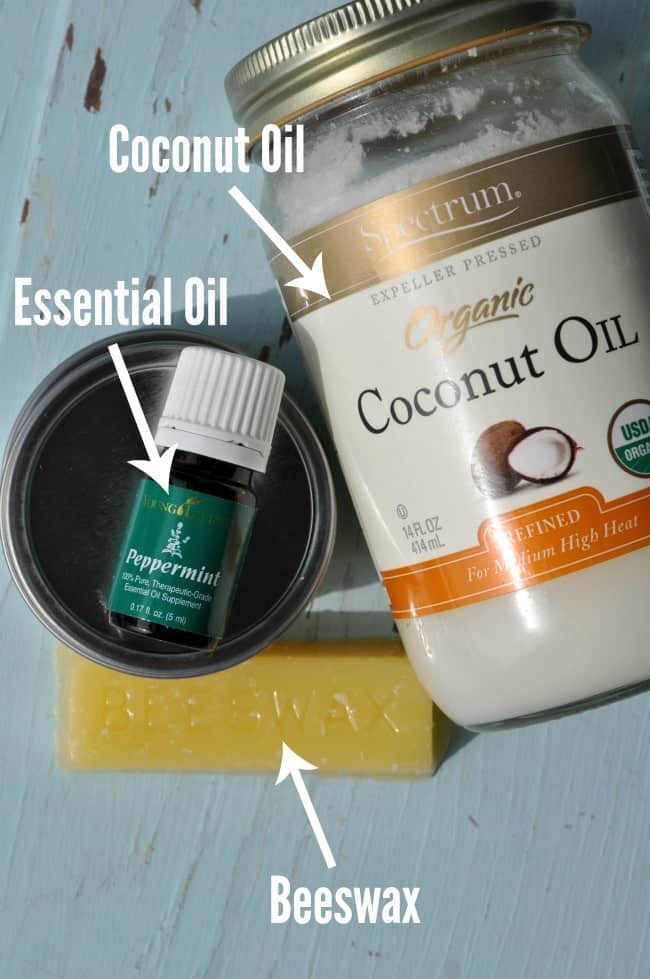
I kid you not — this homemade DIY lip balm only requires 3 ingredients and about 5 minutes of hands-on time.
You just need:
Best Containers for Homemade Lip Balm
You can store your DIY lip balm in any type of container that you prefer. You might like:
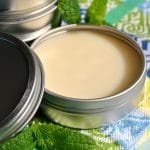
I like to make my lip balm in 2-ounce round metal tins since the shallow, wide tins allow me to use the balm as cuticle oil, too.


Tips for Homemade Lip Balm
- I love the refreshing scent of mint-flavored lip balms, so I opted to use peppermint essential oil. If you want a bright flavor to perk you up, a citrus flavor (like lemon) would be perfect. Want a nighttime, soothing balm? Lavender essential oil is your best bet!
- Have all of your supplies set up and ready to go before you start working. You don’t want to be messing around looking for anything once you start melting the wax.
- Work over a towel, paper towels, or old rags. You don’t want wax to drip on your nice countertops!
These lip balms would be the perfect addition to a Mother’s Day care package, or a great way to show your girlfriends that you’re thinking of them. During the winter holidays, they make a great stocking stuffer, hostess gift, or teacher appreciation treat.
Homemade lip balm is practical, indulgent, easy, and affordable. The perfect gift!
5-Minute Homemade Lip Balm
Equipment
Ingredients
- 5 tablespoons coconut oil
- 3 tablespoons beeswax
- 12 drops Young Living peppermint essential oil
Instructions
- Melt coconut oil and beeswax in a pourable glass measuring cup in the microwave, stirring every 30 seconds.
- Add approximately 12 drops of your favorite essential oil.
- Pour the liquid lip balm into your container of choice and let cool until hardened, at least 3 hours.
Notes
- I love the refreshing scent of mint-flavored lip balms, so I opted to use peppermint essential oil. If you want a bright flavor to perk you up, a citrus flavor (like lemon) would be perfect. Want a nighttime, soothing balm? Lavender essential oil is your best bet!
- Have all of your supplies set up and ready to go before you start working. You don’t want to be messing around looking for anything once you start melting the wax.
- Work over a towel, paper towels, or old rags. You don’t want wax to drip on your nice countertops!
More Gift Ideas You’ll Love


Disclosure: This post may contain affiliate links. I may earn a small commission for my endorsement, recommendation, testimonial, and/or link to any products or services from this website.

I could use some of this right now! I bet it smells amazing too!
It definitely does, Jenny! Thanks! 🙂
How long does it last? Will it go bad?
Hi, Ally! I honestly don’t know! It lasts quite a long time — many months — but I’ve never kept it around long enough to watch it go bad. 🙂
Also, I prefer to work over a cookie sheet so I can scrape up what I spill & reuse the spillages. ????
It keeps for Over a year. You can seal oil you have left and just take out cupboard (dark) and use to make more as in when. Merry Christmas x
I’m addicted to lip balms, I have like hundreds! Thank you for sharing 🙂
Me too, Lily! Love ’em! 🙂
Appeiciate it dear
Looks amazing! Thanks for linking up at Best of the Weekend!
I am so doing this!! Essential Oil chapstick is my favorite, but it can be expensive, and this looks so easy to make! 🙂 Love it!
Do it, Anna! You’ll love it! 🙂
So the photo shows refined coconut oil, but the Amazon link is for virgin. Does it matter?
Hi, Josh! I don’t think that it matters. 🙂
Hi there- can I use unrefined coconut oil?
Hi, Melissa! Yes, that should be fine!
Refined coconut oil will not smell like coconuts and virgin will. It’s your personal preference as to which you choose, either will work. If you accidentally use fractionated coconut oil, you’ll need to experiment by adding a bit more beeswax until you get the right consistency. Fractionated coconut oil is processed so that it stays liquid at room temp, whereas normal coconut oil is a soft solid at room temp.
Popping over from Merry Monday =) I love homemade gifts! This has been on my to do list for a bit now… just gotta go get the beeswax. Thanks for inspiring! Be sure to share your recipes, crafts, upcycles & DIYs at Two Uses Tuesday (Mon 8pm EST to Fri 11pm EST) over at Sarah Celebrates if you don’t already!
Thanks, Sarah! Definitely give it a try!!
How do you measure 3 tablespoons of beeswax if it comes in a bar? Do you melt it first? Can you reuse the wax you melted but didn’t use if you accidentally melt more than 3T? Just wondering how that works. Thanks!
Hi, M! I don’t know if there’s a “correct” way to do it, but I eyeballed 1 tablespoon (kind of like when I’m slicing off 1 tablespoon of butter from a stick). I then melted it, measured it, and discarded any extra. By eyeballing the measurement, I didn’t have too much leftover, so I didn’t try to save it. I honestly don’t know if you can reuse the wax once it cools and hardens again. I would think so (kind of like reusing coconut oil), but I’m no expert! 🙂
Yes you can save the extra melted wax. Just let it cool & harden then keep with the rest of your beeswax until ready to use.
You can buy beeswax pastilles Blair and I was wondering when done is it hard to the touch or soft applicable. Usually I add Shea butter.
Hi, Rita! It’s pretty hard — not soft like Vaseline. 🙂
Hi. You can shave it like cheese, or buy it already in small bead form. I used that because it’s so easy if it’s already shaven or shred. Hope this helps. By the way, the wax just seems to harden the same as it was in whatever shape your dish is.
Great tips! Thanks, Pam!
I have honey combs how do I get the wax out ?
Hi, Bobbie! I have no idea! 🙂 I’ve never worked with honey combs…I just buy the wax in blocks.
Once you have removed as much honey as you can from the honeycomb (beekeepers use a spinner to spin the honey out) melt the remaining honeycomb. I like to use a cast iron pan on low heat. As the wax melts, the impurities will settle to the bottom. You can the use the clean wax off the top or pour the clean wax into muffin tins for later use. Discard the “dirty” wax by pouring onto newspaper to let it harden then toss into the trash.
Once the wax is poured into muffin tins, you may need to heat the tin slightly to remove the wax muffins.
Can you tell me how long the balm will last?
At least a few months, but maybe even more Coda! 🙂
Approximately how much does it cost to get everything needed to make it?
Hey, Maddy! I’m not sure — if you just buy the bottle of peppermint oil it can cost anywhere from $10-30 but it lasts FOREVER and can be used for zillions of other things. The beeswax is about $6 (for a lot of it) and the coconut oil is about $10 for a lot of it. That gives you way more of those ingredients than you need for just the lip gloss, though. You can use a variety of different containers, but the version that I bought and linked to in the post is about $14 for 8 tins. Hope that helps!
Hi. I was just wondering if you could use an extract instead of an essential oil?
Hi, Jennifer! I’m honestly not sure how that would work since I have never tried it myself. It might be fine, since I know that extract is a fine replacement for the oil in some recipes. BUT, since the products are very different in composition (oil versus a liquid with alcohol), it might affect the consistency of the lip balm in this particular project. I’ve just never experimented. 🙂
I don’t have a microwave. Could I make this on the stove?
Definitely! You just need to melt the ingredients, so any heat source should work! 🙂
After making today, I would upt for a pourable container, such as a metal measuring cup? I opted for a 2:1 ratio and added some vitamin E. I think next time, I’ll try a 3:1 ratio or add more Vitamin E, but am in love with this recipe! It was super easy. Thanks!
Great suggestions, Jennifer! Thanks for letting me know! 🙂
Tis recipe is nice and solid. Thanks!
*This! And I also wanted to say, thanks for the links even if some are affiliate, they’re useful!
Thanks, Sharon!
How long does this take to set up or harden after it is poured?
Hey, Lori! Not too long. Maybe an hour or so?
I just have a stick of beeswax. How do I know how much 3 tablespoons is?
Hey, Renee! It will depend on how big your stick is. It’s kind of like butter — sometimes there are little markers on the solid stick (or wrapper) to tell you how much it is. If not, I would go ahead and melt the stick and then measure the melted wax with a tablespoon measure, just as if you were measuring melted butter or oil. 🙂
Hey Blair,
This is a Lovely idea.
I’ve been looking for something to do with the coconut oil I have. Thanks for the inspiration
Also i’m enjoying reading the content on your site, your recipes are amazing.
Thanks
Madi
Hey Blair,
This is a Lovely idea.
I’ve been looking for something to do with the coconut oil I have. Thanks for the inspiration
Also i’m enjoying reading the content on your site, your recipes are amazing.
Thanks
Madi
Hi Blair,
This is a wonderful idea.
I’ve been looking for something to do with my leftover coconut oil. Thanks for the inspiration
Also i’m enjoying reading the content on your site, your recipes are amazing.
Thanks
Madi
Hi, Madi! Thanks so much for stopping by! Enjoy that lip balm! 🙂
My friend an I just made this recipe almost exactly. We read the comments and answers prior… we seen a question asking about using vanilla extract instead instead of essential oils. Like I said we followed this exact recipe… we tried it with 100% pure vanilla extract and an essential oil. The results with both are the same.
This is an amazing recipe! My lips were chapped when we made the balms… as soon as I applied the balm to my lips I could feel the instant results. As well… it stays on after taking a drink too!
Thank you so much for sharing this recipe!
Sincerely,
Michelle and Cindy
Awesome! Such a great tip to use the vanilla extract, Michelle. Now I want to try it! 🙂
Blair,
If I wanted to make a Lavender Vanilla balm, would you recommend 6 drops of Lavender oil and 6 drops of vanilla extract?
I read a comment that vanilla extract worked. Was thinking of a vanilla lavender balm. Would you suggest 6 drops of each?
Hey, Teresa! I haven’t tried the vanilla extract myself, so I have no idea how much would work. I think that 6 drops is a safe bet, though. I also think that you can use anywhere from 6-12 drops of lavender, depending on how strong you want that flavor to be. If you just want a mild lavender, then I would go with 6. Increase from there, as you like! 🙂
Thanks Blair! And sorry! I scrolled through and couldn’t find my post so I asked again ????
No worries — I hope that it works well for you! 🙂
I have a question about the coconut in the lip balm. My niece is allergic to coconut can you use a different kind of oil in place of it?
Hi, Lillian! I wouldn’t know what to suggest instead of the coconut oil. The coconut oil is solid at room temp, which helps the lip balm solidify. I’m not sure what the texture would be like if you used a different oil.